QuickList | Ads Buy & Sell Classified Marketplace
QuickList is a full-featured online classifieds marketplace that lets users buy and sell almost anything — vehicles, electronics, property, jobs, services and more. This document covers the complete setup of the Admin Panel, the User Panel and the mobile application.
- Product: QuickList — Ads Buy & Sell Classified Marketplace
- Admin Panel: Laravel 12 / PHP 8.2 (Firebase Firestore backend)
- User Panel: Laravel 12 / PHP 8.2 + Bootstrap 5 (Firebase JS SDK)
- Mobile App: Flutter (Android & iOS)
- Backend: Google Firebase — Firestore, Storage, Authentication & Cloud Messaging
1. Introduction
QuickList is a modern, scalable "Ads Buy & Sell" classifieds marketplace. Sellers post advertisements for their products or services, buyers search and browse listings by category and location, and the two sides connect through built-in real-time chat. The platform is built on secure, modern technologies:
- Admin Panel — Laravel 12 / PHP 8.2 for full marketplace management.
- User Panel — Laravel 12 + Bootstrap 5 buyer/seller frontend.
- Mobile Application — Flutter for Android & iOS.
- Google Firebase — Firestore stores all marketplace data; Storage holds images and documents; Authentication handles sign-in; and Cloud Messaging (FCM) delivers push notifications.
All three clients (Admin, Web and Mobile) share a single Firebase project, so data stays consistent in real time across the whole platform.
Important — third-party services & costs: QuickList integrates several external services operated by third parties that may incur their own charges, separate from this product:
- Payment gateways (Stripe, PayPal, Razorpay and others) charge their own transaction/processing fees and may require account approval.
- Google Firebase (Firestore, Storage, Authentication, Cloud Messaging) is free up to Google's quotas; usage beyond the free tier is billed by Google.
- Google Maps Platform requires a billing-enabled Google Cloud account; map and places usage is billed by Google beyond the free monthly credit.
- SMS / phone OTP and other messaging providers may charge per message.
You are responsible for creating and funding these third-party accounts. Please review each provider's current pricing before going live.
Key Features
User Registration & Profiles
- Sign up / log in via email & password, phone number (OTP), or Google.
- Email verification and profile completion (name, gender, phone, avatar).
- Public seller profiles with ratings and reviews.
- Seller verification through document upload and admin approval (verification badge).
Advertisement Management
- Post ads through a guided multi-step wizard (category → details → specifications → photos → location).
- Unlimited nested categories with per-category dynamic custom fields.
- Up to 8 images per ad, stored in Firebase Storage, with a cover image.
- Multi-language title & description, price types (fixed, negotiable, price-on-call) and multiple currencies.
- Map-based location with Google Maps or OpenStreetMap.
- Manage your ads — edit, mark sold, renew, and track views/likes; ads auto-expire on a schedule.
- Admin moderation with auto-approve or manual review.
Discovery
- Home page with sliders and feature sections configured from the admin panel.
- Keyword search with live suggestions, category browsing and a location picker.
- Featured ads and "most popular" highlighting.
- Favorites / saved ads for logged-in users.
Communication
- Real-time buyer ↔ seller chat (Firestore) with unread indicators.
- Push notifications via Firebase Cloud Messaging.
- Admin broadcast notifications and email templates.
Monetization
- Subscription packages for Ad-Listing limits and Featured Ads.
- 17 integrated payment gateways (Stripe, Razorpay, PayPal, Paystack, Flutterwave, and more).
Trust & Safety
- User reports / complaints with configurable report reasons.
- Safety tips, seller reviews and profile verification.
Additional Features
- Multi-language Support — RTL-aware (e.g. English & Arabic) with admin-managed translations.
- Multi-Currency Support — configurable currencies for international markets.
- CMS & Content — blogs, FAQs and CMS pages (About, Contact, Privacy, Terms, Refund).
- SEO Settings — per-page SEO configuration.
- Ad Networks — AdMob and AdSense configuration.
- Maintenance Mode — toggle from the admin panel.
- And many more.
2. Basic Requirements
QuickList has three parts — a Flutter mobile app and two Laravel web panels (the Admin Panel and the User Panel) — all powered by Google Firebase. What you need depends on which part you are setting up.
For the Mobile App
- The Flutter SDK and an IDE (VS Code or Android Studio).
- Android Studio (Android SDK) to build for Android, and a Mac with Xcode to build for iOS.
- Basic knowledge of Flutter / Dart — only if you want to customise the app.
Full steps are in App Documentation → Setting up Flutter.
For the Web Panels (Admin & User)
- A server (a real server / cPanel recommended) running PHP 8.2+,
MySQL / MariaDB and Apache with
mod_rewrite. - Composer (PHP dependencies) and Node.js (Firebase CLI & utility scripts).
- Basic knowledge of PHP / Laravel — only if you want to customise the panels.
Full server details are in Web Documentation → Server Requirement.
Shared Services (used by all parts)
- A Firebase project — Firestore, Storage, Authentication and Cloud Messaging.
- A Google Maps API key.
- Basic familiarity with Google Cloud & Firebase.
3. Setting up Flutter
The QuickList mobile application is built with Flutter (Dart). The steps below are self-contained — follow them in order to install Flutter and run the app. The official reference is docs.flutter.dev, but you should not need it to complete this guide.
3.1. System Requirements
- OS: Windows 10/11 (64-bit), macOS, or Linux. iOS builds require macOS + Xcode.
- Disk space: ~2.8 GB for the Flutter SDK (plus your IDE / Android Studio).
- Tools: Git installed; PowerShell 5+ on Windows.
- Version: use the stable channel (Flutter 3.x / Dart 3.x).
3.2. Install the Flutter SDK
Download the stable SDK from the Flutter website and extract it, or clone it with Git:
# Windows (PowerShell) — install to C:\src\flutter
git clone https://github.com/flutter/flutter.git -b stable C:\src\flutter

# macOS / Linux — install to ~/development/flutter
git clone https://github.com/flutter/flutter.git -b stable ~/development/flutter
Add the Flutter bin folder to your PATH:
# Windows: add this line under Path in "Edit the system environment variables"
C:\src\flutter\bin

# macOS / Linux: add to ~/.zshrc or ~/.bashrc, then restart the terminal
export PATH="$PATH:$HOME/development/flutter/bin"
3.3. Install the Platform Toolchains
- Android: install Android Studio (it bundles the Android SDK, platform-tools and an emulator). Launch it once so it finishes downloading the SDK components.
- iOS (macOS only): install Xcode from the App Store, then run
sudo xcodebuild -license accept.
Accept the Android SDK licences from the terminal:
flutter doctor --android-licenses
3.4. Verify the Installation
Run Flutter's built-in diagnostic — each item you intend to use should show a green tick
([✓]):
flutter doctor -v
Fix anything marked [✗] or [!] before continuing (most often a missing
Android SDK component or an unaccepted licence).
3.5. Install the IDE Plugins
Use VS Code (install the Flutter and Dart extensions) or Android Studio (install the Flutter plugin from Settings → Plugins).
3.6. Open the QuickList Project
Extract the mobile app source, open the folder in your IDE, and fetch its dependencies:
cd quicklist_app
flutter pub get
3.7. Run the App
Start an emulator (or connect a physical device), confirm it is detected, then launch the app:
flutter devices     # confirm a device/emulator is listed
flutter run         # build and launch QuickList
4. Changing the Package Name
Changing the package name (also known as the bundle identifier or application ID) in a Flutter project involves a few steps:
4.1. Change the Android package name
- Navigate to the
androiddirectory within your Flutter project. - Open the
AndroidManifest.xmlfile located inapp/src/main. - Find the
packageattribute in the<manifest>tag and change its value to your desired package name.
4.2. Change the iOS bundle identifier
- Open
ios/Runner.xcodeprojusing Xcode. - Select the Runner project → Runner target → General tab.
- Change the Bundle Identifier field to your desired bundle identifier.
4.3. Update Flutter project configuration
- Open
pubspec.yamlin the project root and update thenamefield. - Update the
android: packagefield underflutter:with your new package name.
4.4. Update source code references
Update MainActivity.java/kt (Android) and AppDelegate.swift (iOS) references
to the old package name, then clean and rebuild the project.
5. Changing the Launcher Icon
To change the launcher icon (app icon) in a Flutter project:
5.1. Prepare Your New Icons
Android: Replace the existing ic_launcher.png files in the mipmap folders
inside android/app/src/main/res (mipmap-hdpi, mipmap-mdpi,
mipmap-xhdpi, mipmap-xxhdpi, mipmap-xxxhdpi).
iOS: Replace the AppIcon set in ios/Runner/Assets.xcassets via Xcode.
5.2. Flutter Launcher Icon Package (Optional)
Alternatively, use the flutter_launcher_icons package to generate icons from a single
source image:
dev_dependencies:
  flutter_launcher_icons: "^0.13.1"
flutter pub get
flutter pub run flutter_launcher_icons:main
6. Changing the App Name
6.1. For Android
Open android/app/src/main/AndroidManifest.xml, locate the
<application> tag, and change the android:label attribute.
6.2. For iOS
Open ios/Runner/Info.plist, locate <key>CFBundleDisplayName</key>
and change the associated <string> value.
<key>CFBundleDisplayName</key>
<string>QuickList</string>
7. Google Maps API Key (Flutter)
To set the Google Maps API key in the mobile app for both platforms:
7.1. For Android
In android/app/src/main/AndroidManifest.xml, inside the
<application> element, set the com.google.android.geo.API_KEY
meta-data value:
<meta-data
    android:name="com.google.android.geo.API_KEY"
    android:value="YOUR_API_KEY_HERE"/>
7.2. For iOS
In ios/Runner/AppDelegate.swift, provide the key inside
didFinishLaunchingWithOptions:
GMSServices.provideAPIKey("YOUR_API_KEY_HERE")
8. Firebase Authentication
QuickList supports Email/Password, Phone (OTP) and Google sign-in (Apple sign-in optional). Enable the providers you need in the Firebase Console:
- Go to the Firebase Console and select your project.
- Select Authentication from the left-hand menu.
- Under the Sign-in method tab, enable Email/Password, Phone, Google and (optionally) Apple.
9. Firebase Project Setup (Mobile)
Connect the mobile app to the same Firebase project used by the Admin Panel and User Panel.
9.1. Register the apps
- In the Firebase Console, add an Android app (enter your package name) and/or an iOS app (enter your bundle identifier).
- Download
google-services.json(Android) andGoogleService-Info.plist(iOS).
9.2. Place the config files
- Put
google-services.jsoninandroid/app/. - Put
GoogleService-Info.plistinios/Runner/(via Xcode).
9.3. Install & initialize
Run flutter pub get and make sure Firebase is initialized on startup:
import 'package:firebase_core/firebase_core.dart';

void main() async {
    WidgetsFlutterBinding.ensureInitialized();
    await Firebase.initializeApp();
    runApp(MyApp());
}
10. Generate SHA-1 & SHA-256 Keys
Google and Phone sign-in on Android require SHA-1 / SHA-256 fingerprints registered in Firebase.
10.1. Using Gradle (recommended)
./gradlew signingReport
10.2. Using Keytool
keytool -list -v -keystore path-to-your-keystore-file -alias your-alias-name
10.3. Add the keys to Firebase
In the Firebase Console → Project Settings → Your Android app → Add fingerprint, paste
the SHA-1 and SHA-256 values, then re-download google-services.json.
11. Building & Publishing the App
Once the mobile app is configured, build a signed release version and publish it to the app stores.
11.1. Build a Release Version
Android — from the app's root folder, build an app bundle (recommended for the Play Store) or an APK:
flutter build appbundle --release   # .aab for Google Play
flutter build apk --release         # .apk for direct install
iOS (macOS + Xcode required) — build the IPA:
flutter build ipa --release
The signed release build uses the keystore / signing configuration from Generate SHA-1 & SHA-256 Keys.
11.2. Publish to Google Play
- Create a Google Play Console developer account.
- Create a new app and upload the
.aabunder Production → Create new release. - Complete the store listing (title, description, screenshots, icon), content rating, the data-safety form and pricing.
- Submit for review and roll out once approved.
11.3. Publish to the Apple App Store
- Enroll in the Apple Developer Program and create the app in App Store Connect.
- Upload the build with Xcode (Product → Archive → Distribute App) or Transporter.
- Complete the app listing (screenshots, description, keywords), privacy details and pricing.
- Submit for review and release once approved.
12. FAQ
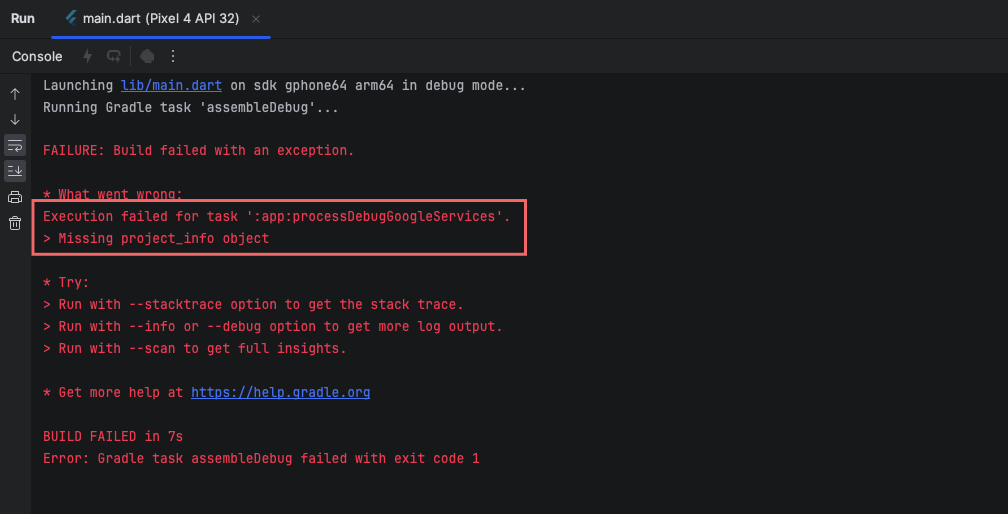
What should I do if I get the error "Missing project_info object"?
This error typically arises when the google-services.json file is missing or misplaced.
Solution
- Ensure
google-services.jsonis placed in theandroid/appdirectory. - Verify you completed all Firebase setup steps and downloaded the latest config file.
- Make sure the Google Services Gradle plugin version is up to date in
android/build.gradle. - Run
flutter clean, thenflutter pub get, and rebuild the project.
13. Server Requirement
- Laravel 12.x requires a minimum PHP version of 8.2.
- MySQL v5.7+ / MariaDB (for Laravel infrastructure — admin auth, sessions, cache, jobs).
- Apache Server (Recommended) with
mod_rewriteenabled. - PDO, cURL, OpenSSL, Mbstring, Fileinfo, Tokenizer and other standard Laravel PHP extensions.
- Node.js (for the admin panel's Firestore cron/utility scripts).
- Composer (PHP dependency manager).
- A Firebase project (Firestore, Storage, Authentication, Cloud Messaging).
- A Google Maps API key.
14. Installing Node.js & npm
Node.js (with npm) is required for the Firebase CLI, the Firestore import/export and indexing scripts, and the admin panel's cron/utility scripts. To install it:
- Download the LTS installer for your OS from nodejs.org/en/download.
- Run the installer and accept the defaults (this installs both
nodeandnpmand adds them to your system PATH). - Verify the installation in a terminal:
node -v
npm -v
Then install the Firebase CLI globally (used for Firestore indexing and deploys):
npm install -g firebase-tools
15. Create Firebase Project
Firebase is the primary backend for the Admin Panel, User Panel and Mobile App. Create one Firebase project and use its credentials across all clients.
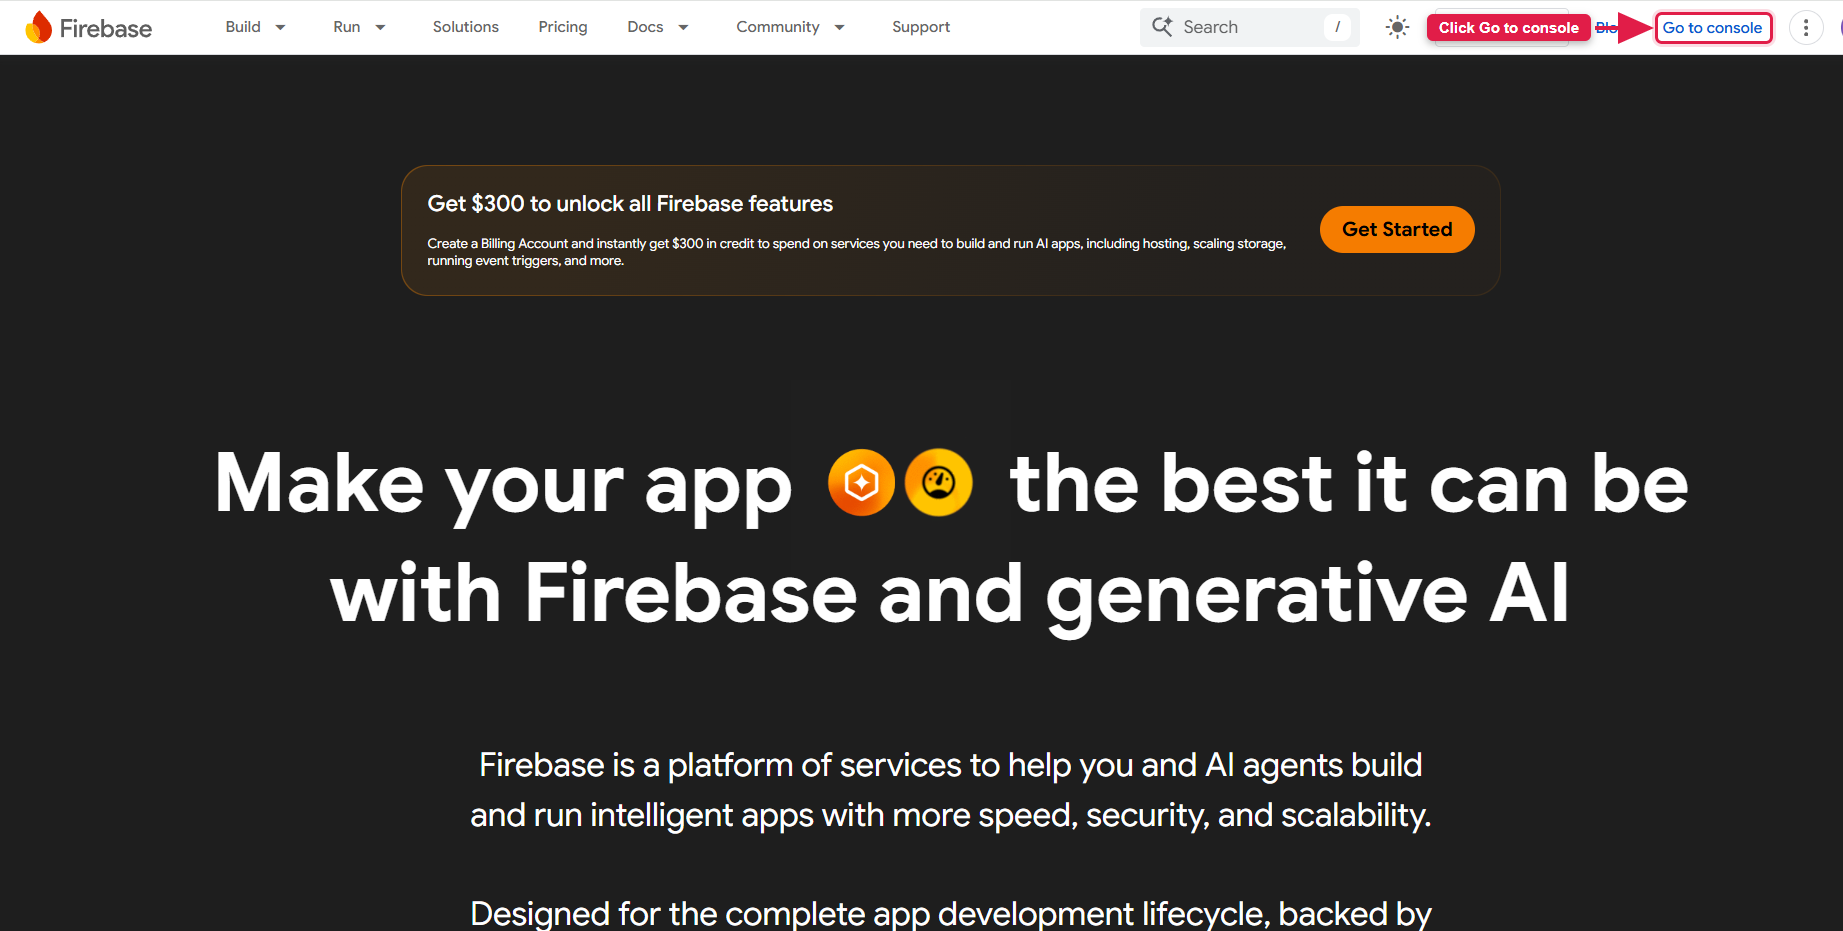
15.1. Go to the Firebase console: https://firebase.google.com/
15.2. Click "Go to console" in the top right corner.
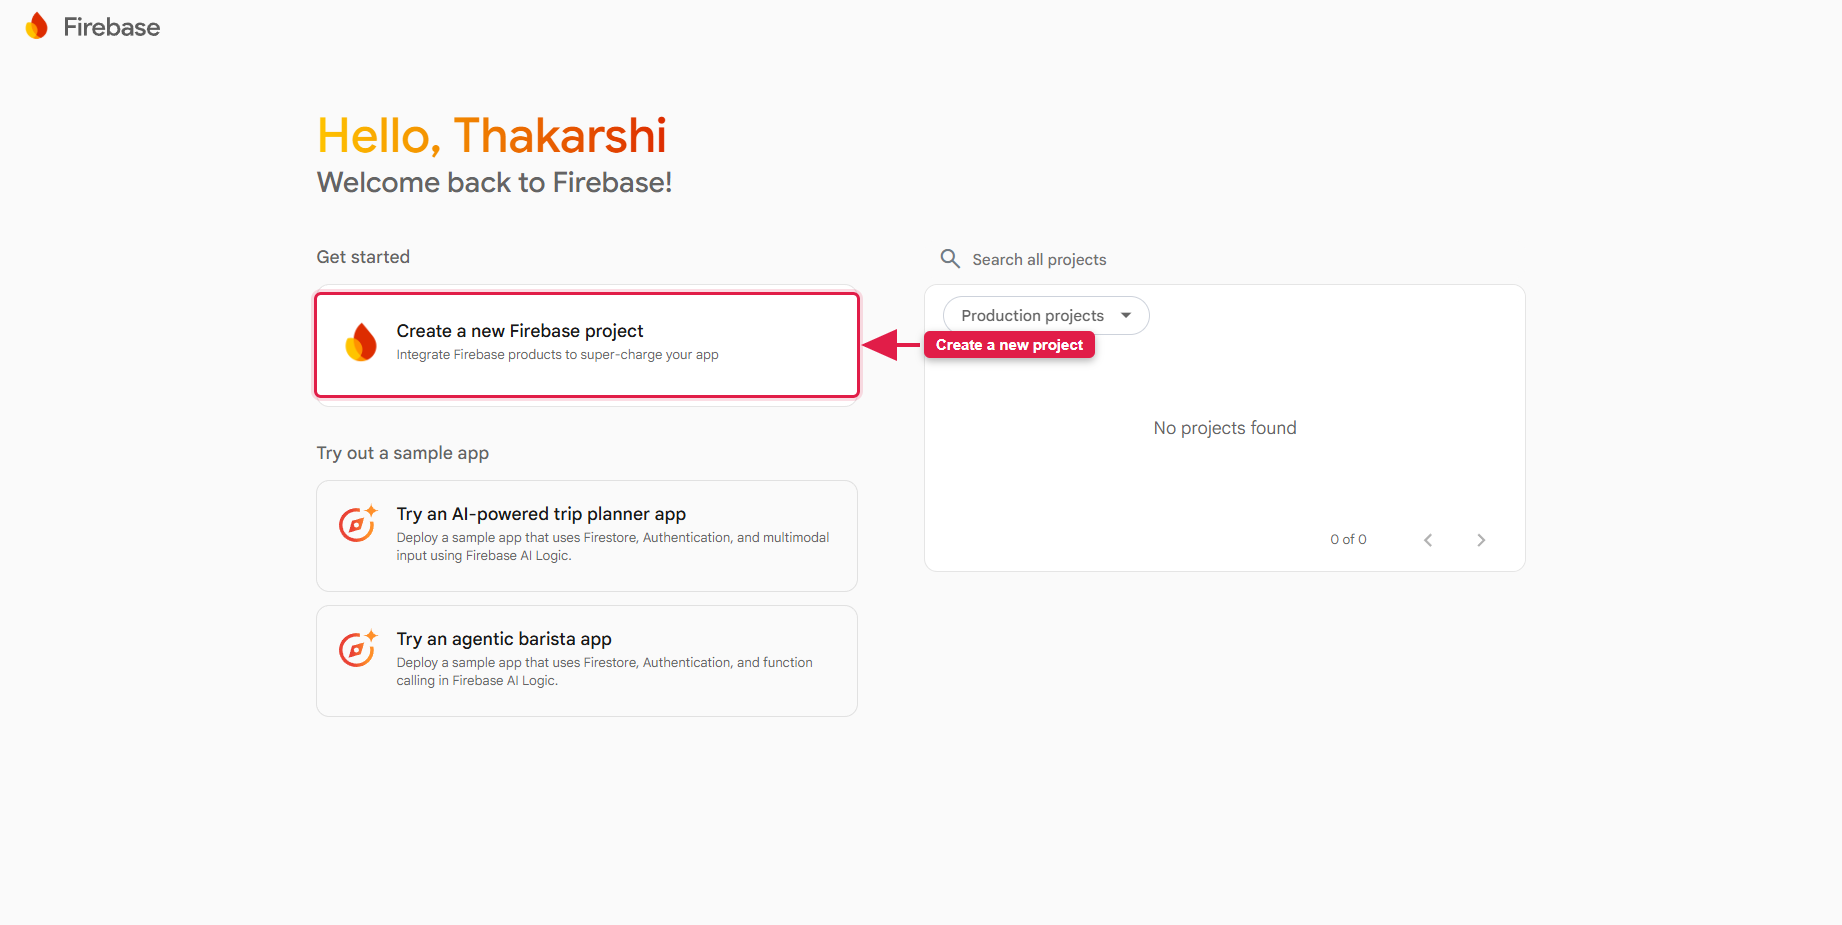
15.3. Click "Create a project" (or "Add project"), enter your project name and click "Continue".
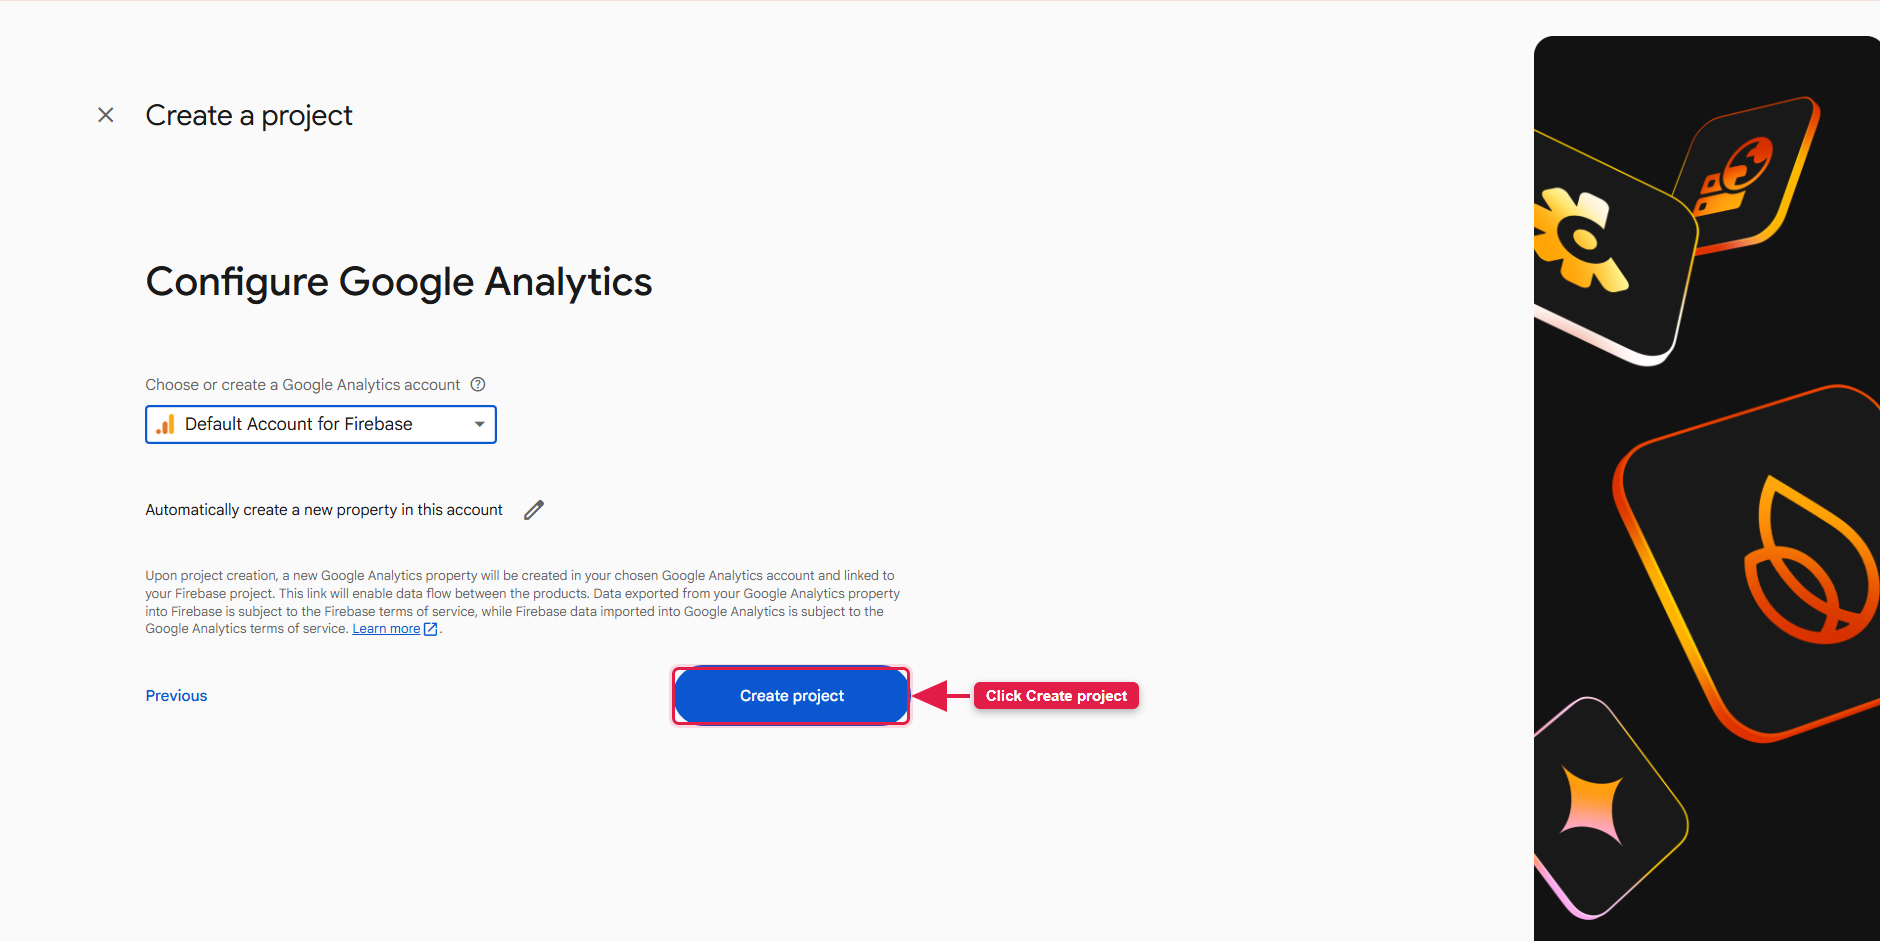
15.4. Configure Google Analytics as desired, then click "Create project" and wait for it to finish provisioning.
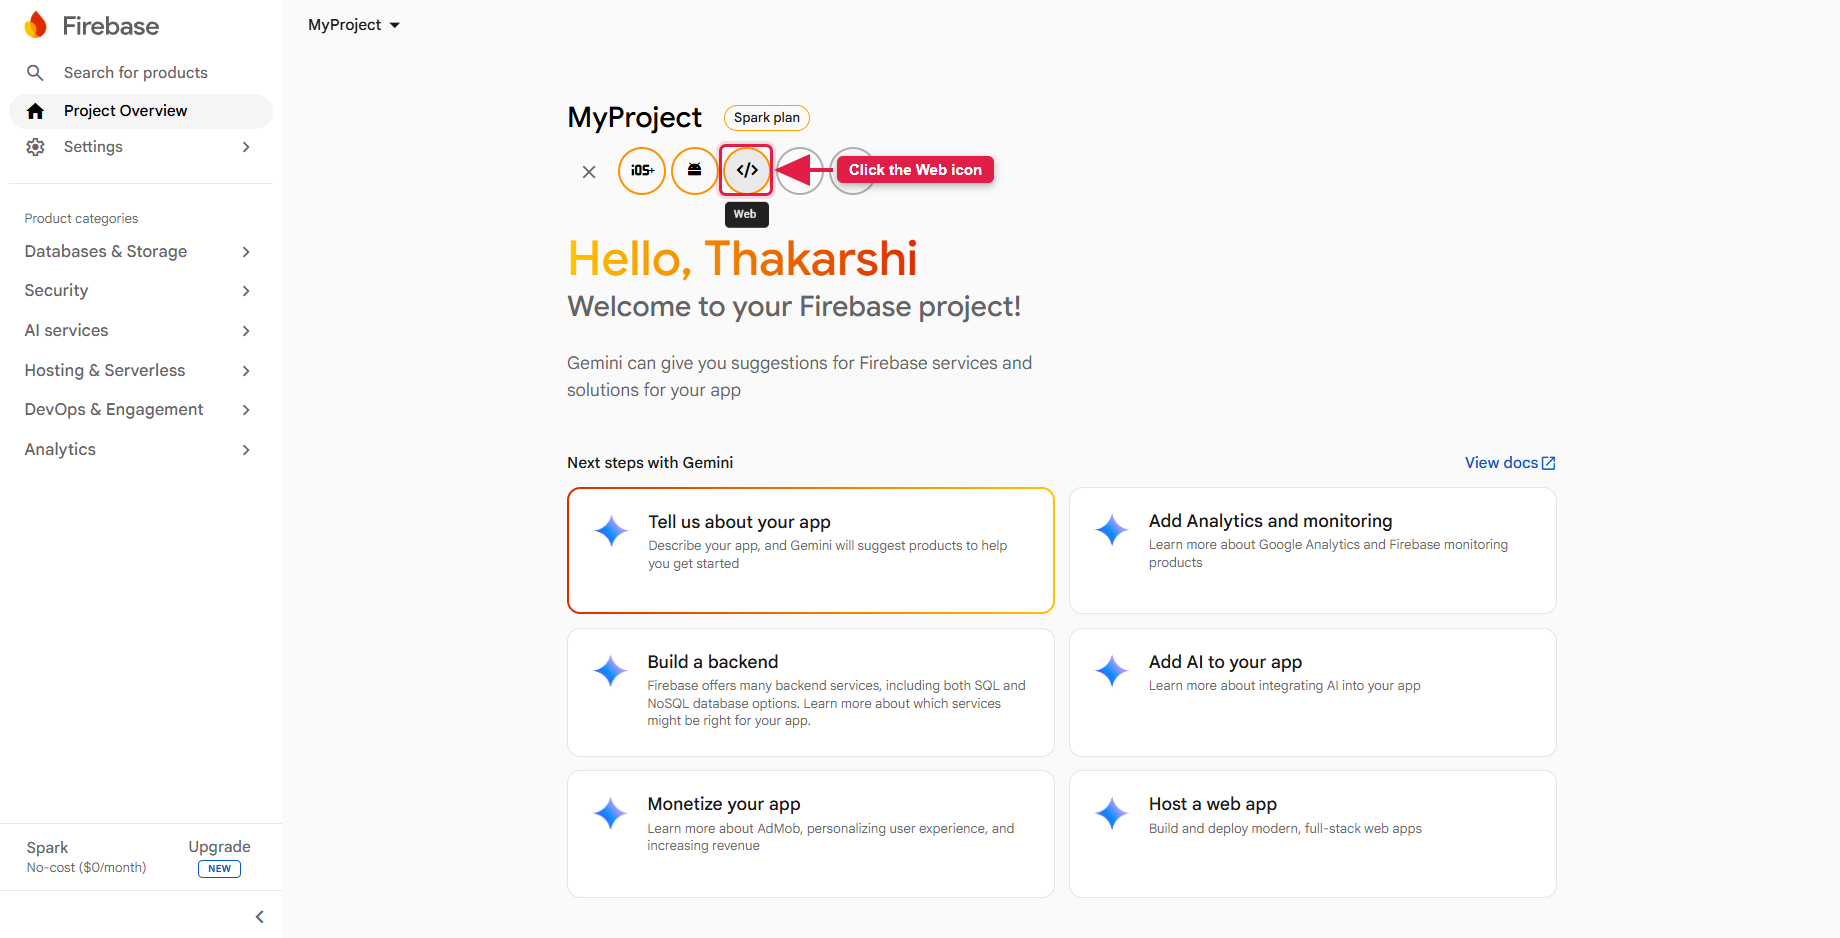
15.5. On the project overview page, click the Web icon
(</>) to add a web app.
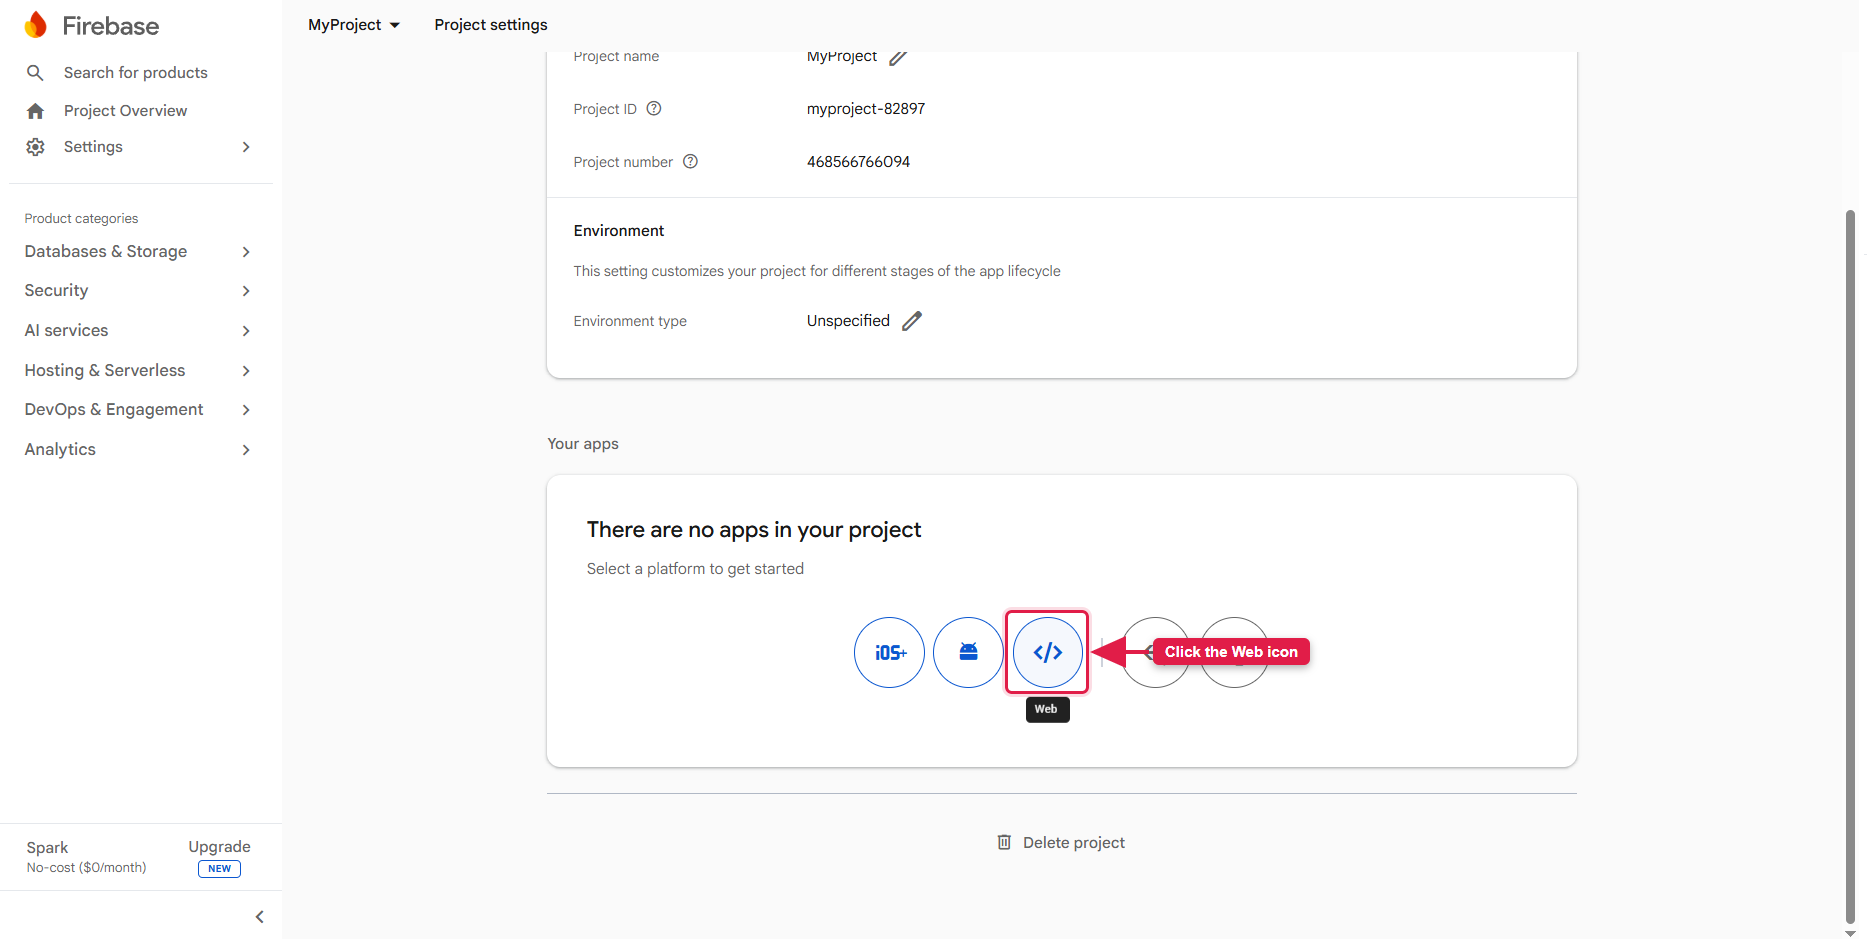
15.6. You can also add a web app from Settings → General → Your apps
— click the Web (</>) icon there.
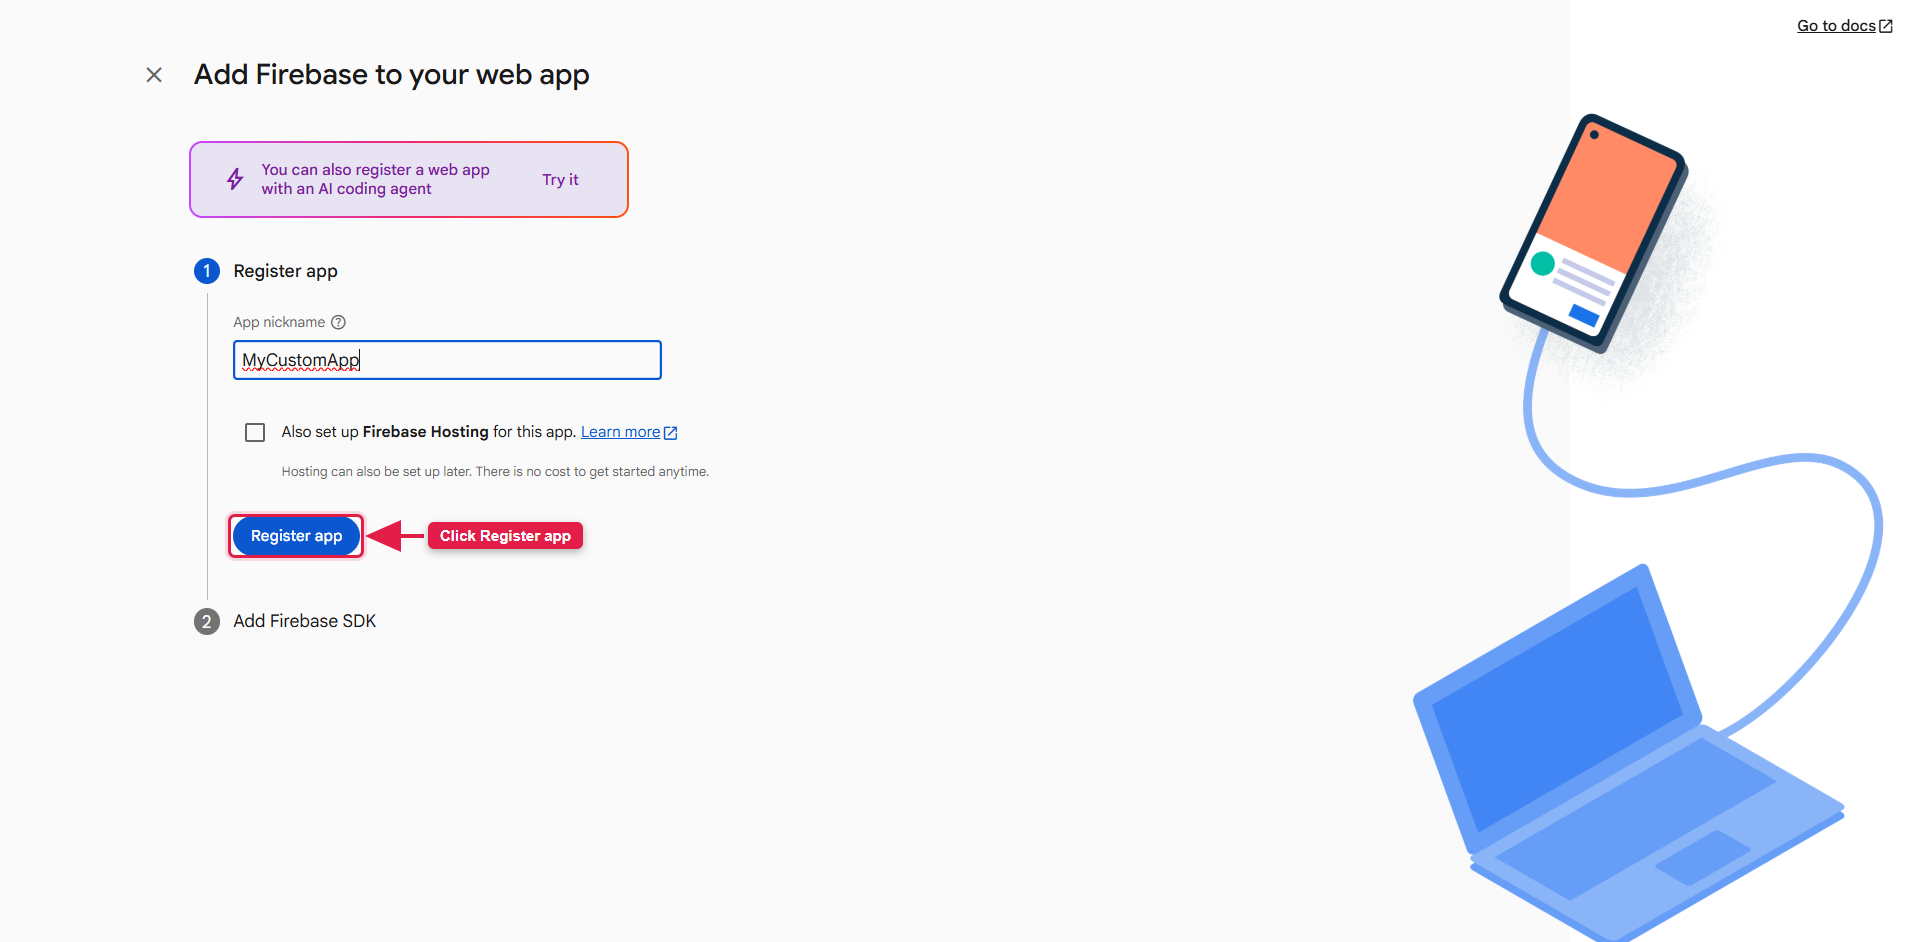
15.7. Give the app a nickname and click "Register app".
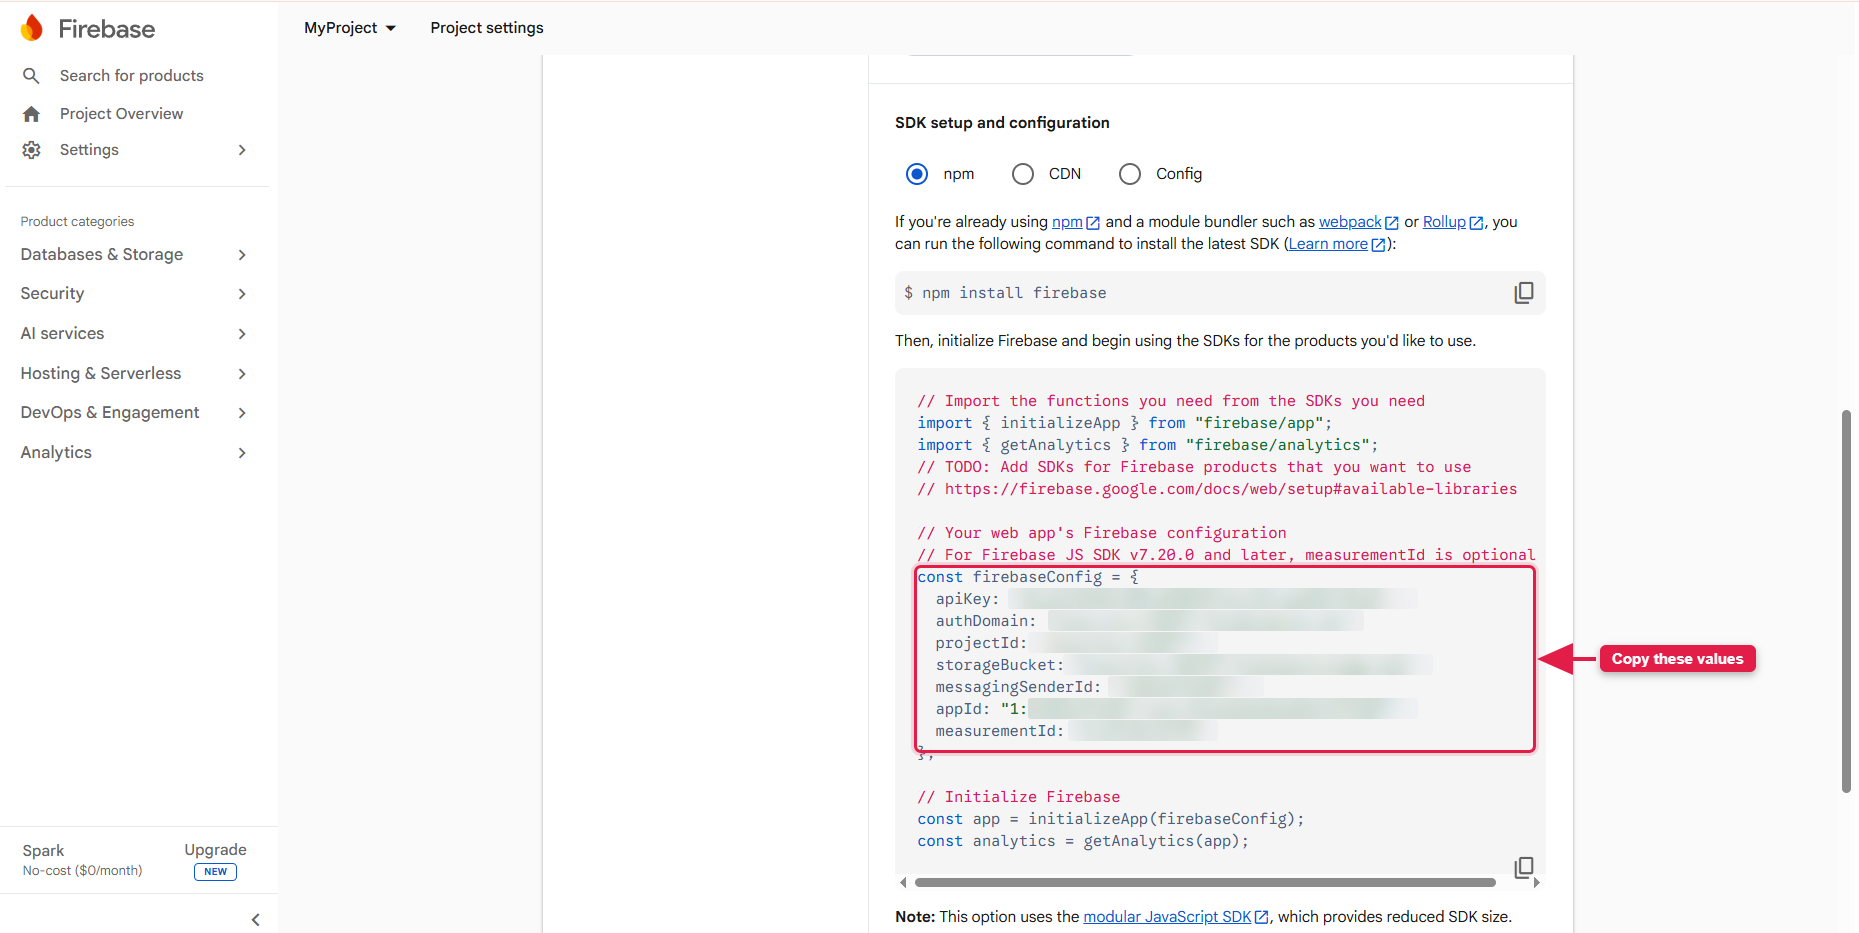
15.8. Firebase then shows your web app's firebaseConfig values (API key,
auth domain, project ID, storage bucket, messaging sender ID, app ID) on the Add Firebase
SDK screen. Copy these into the .env files of both the Admin and User panels.
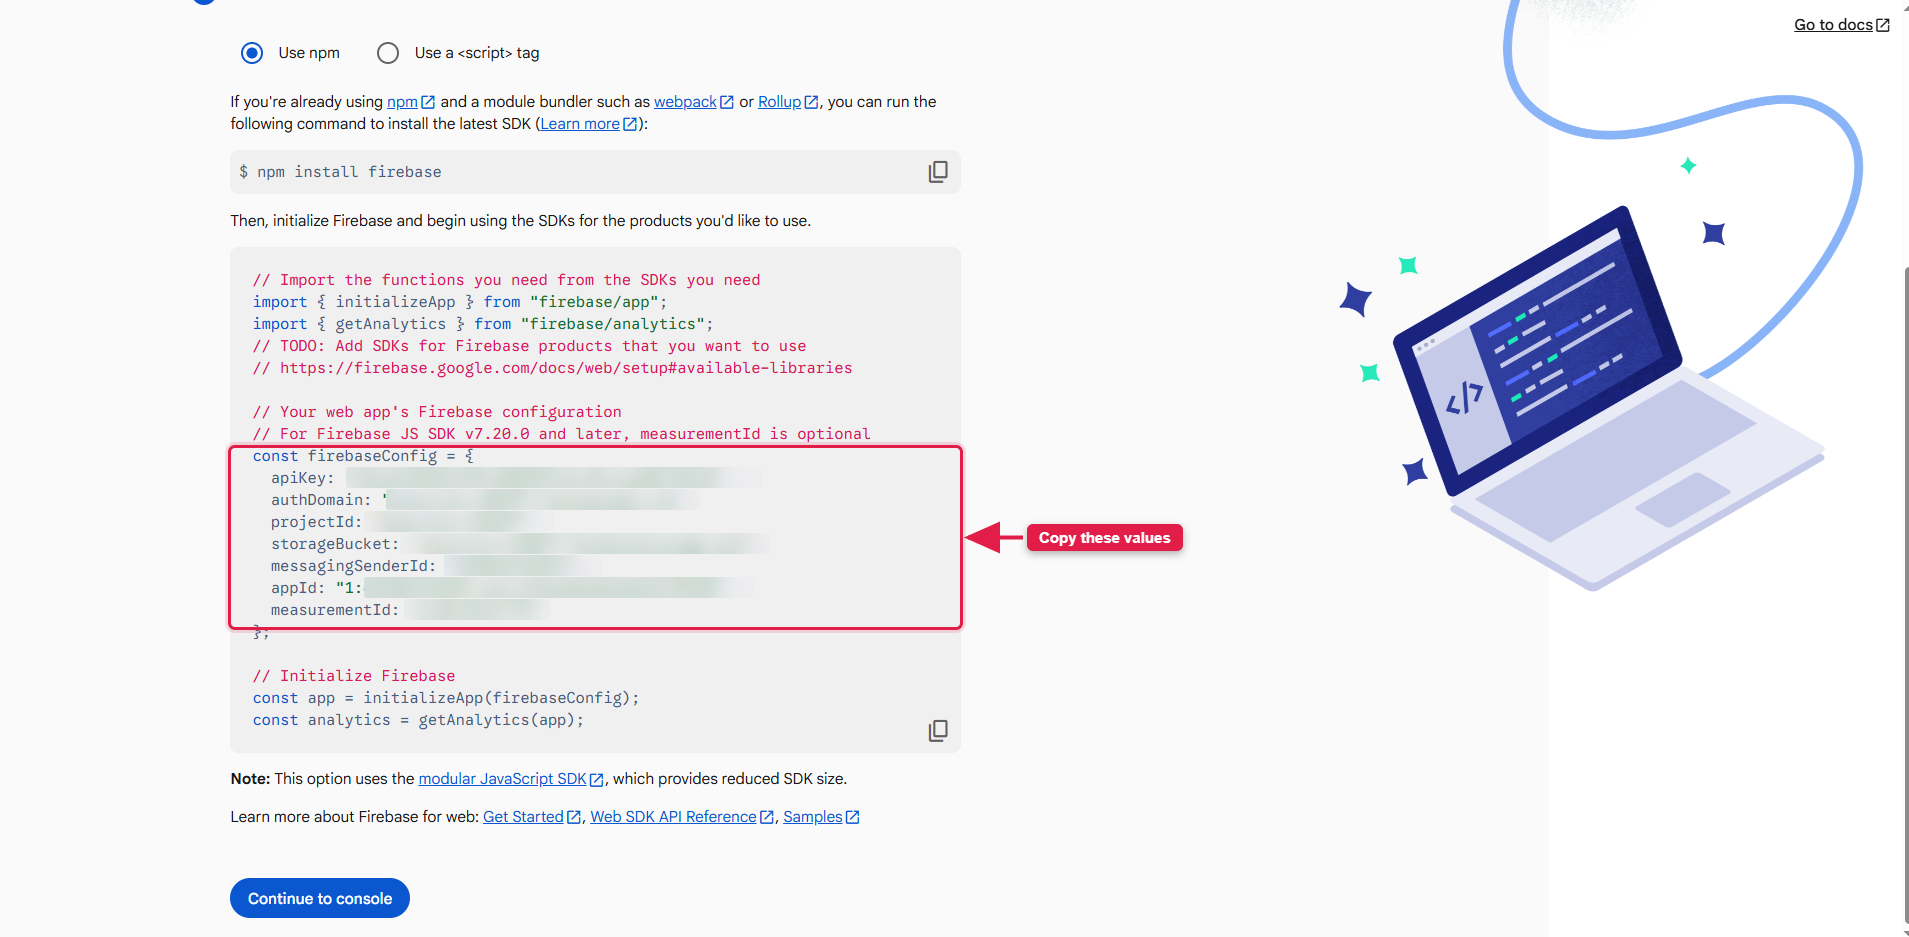
15.9. You can retrieve these config values again at any time from Settings → General → Your apps — select your web app and open SDK setup and configuration (the Config option).
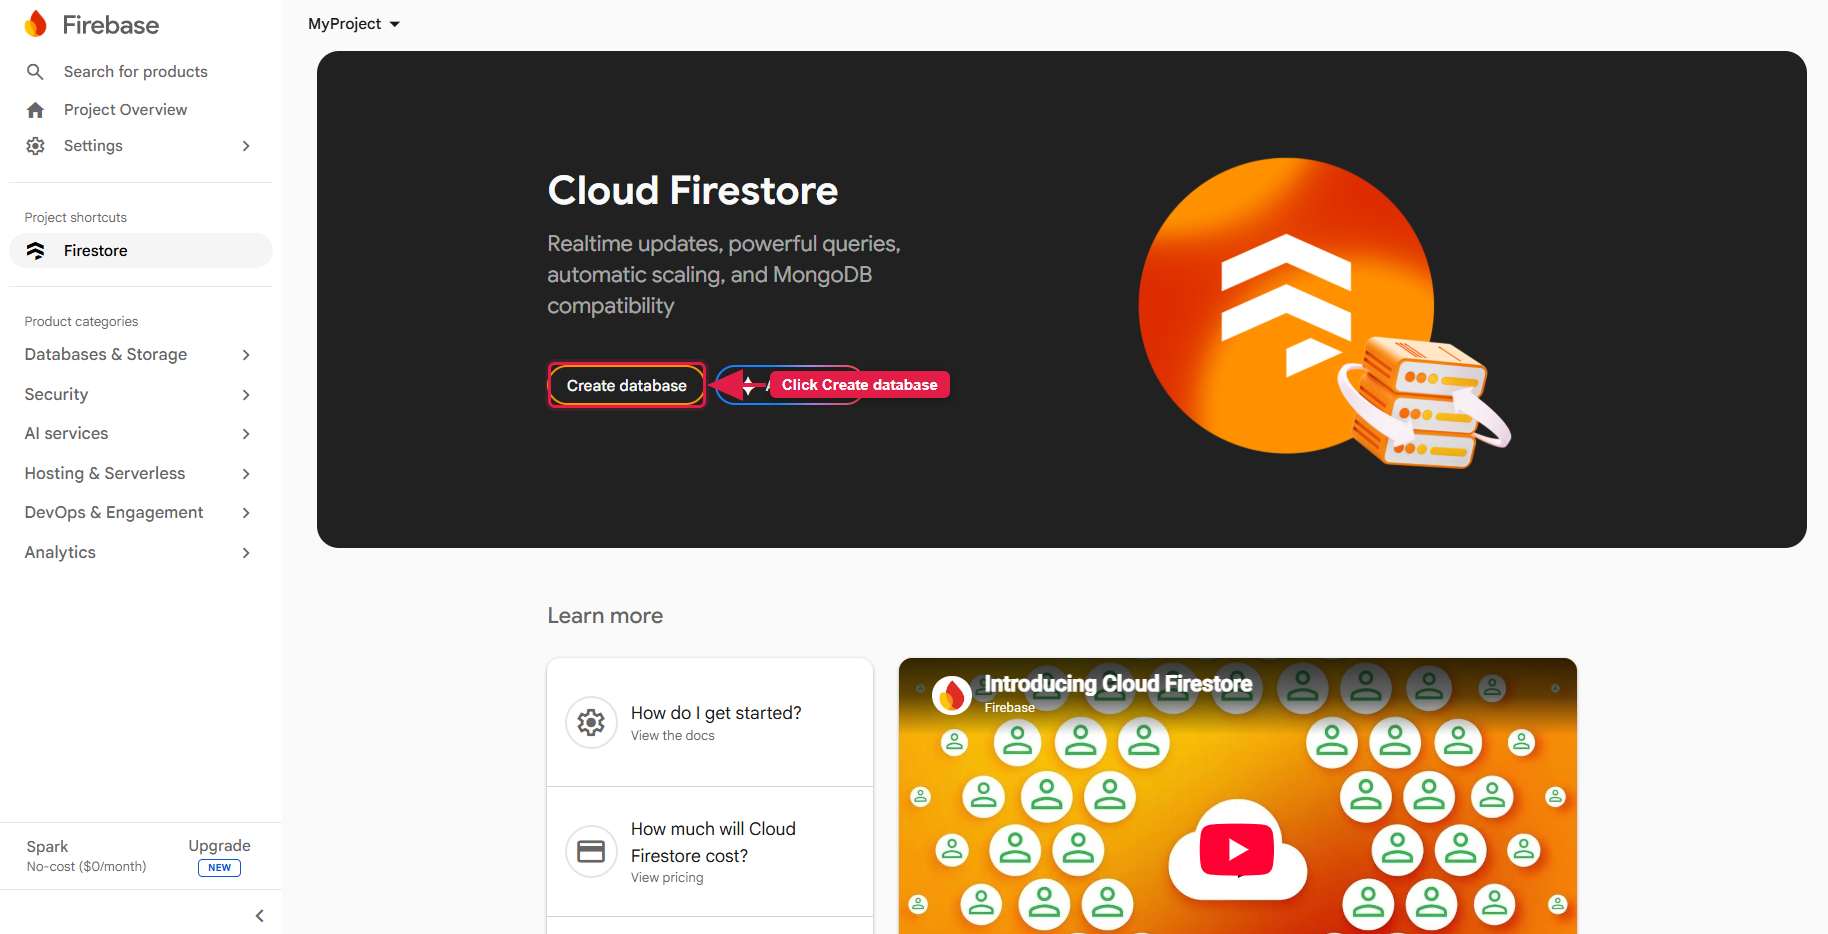
15.10. In the left sidebar, open Firestore Database and click "Create database".
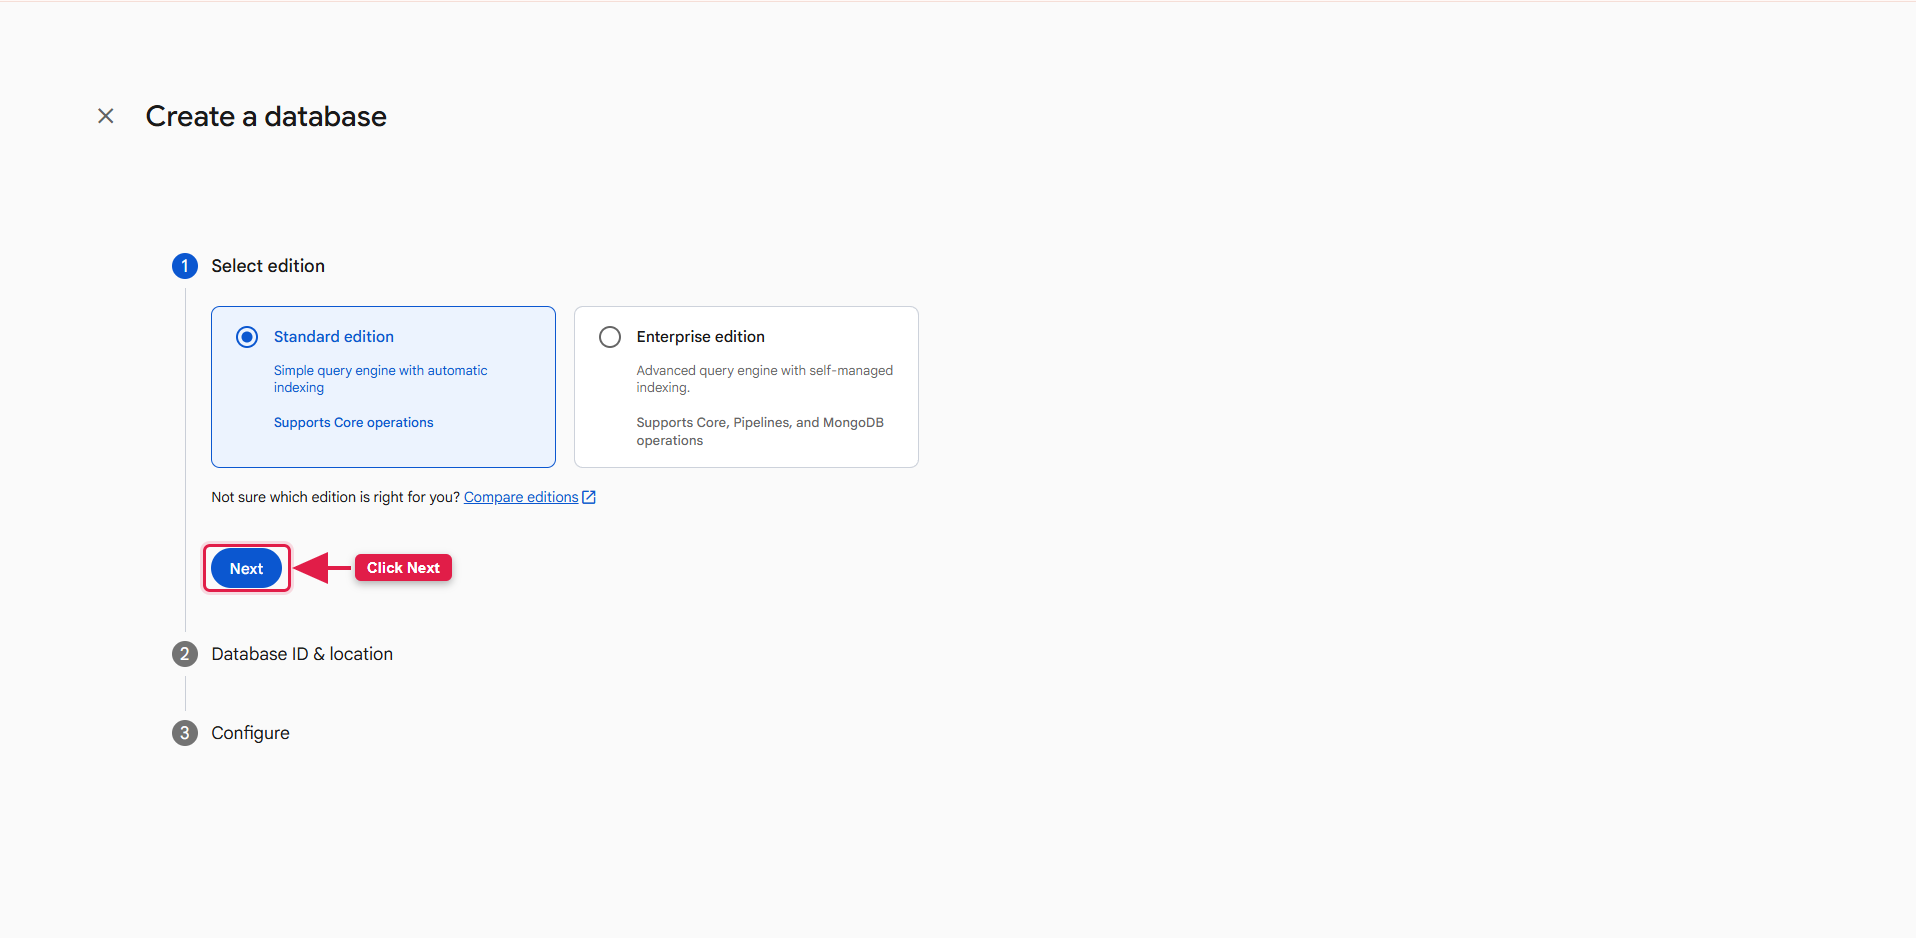
15.11. Select the edition and click "Next".
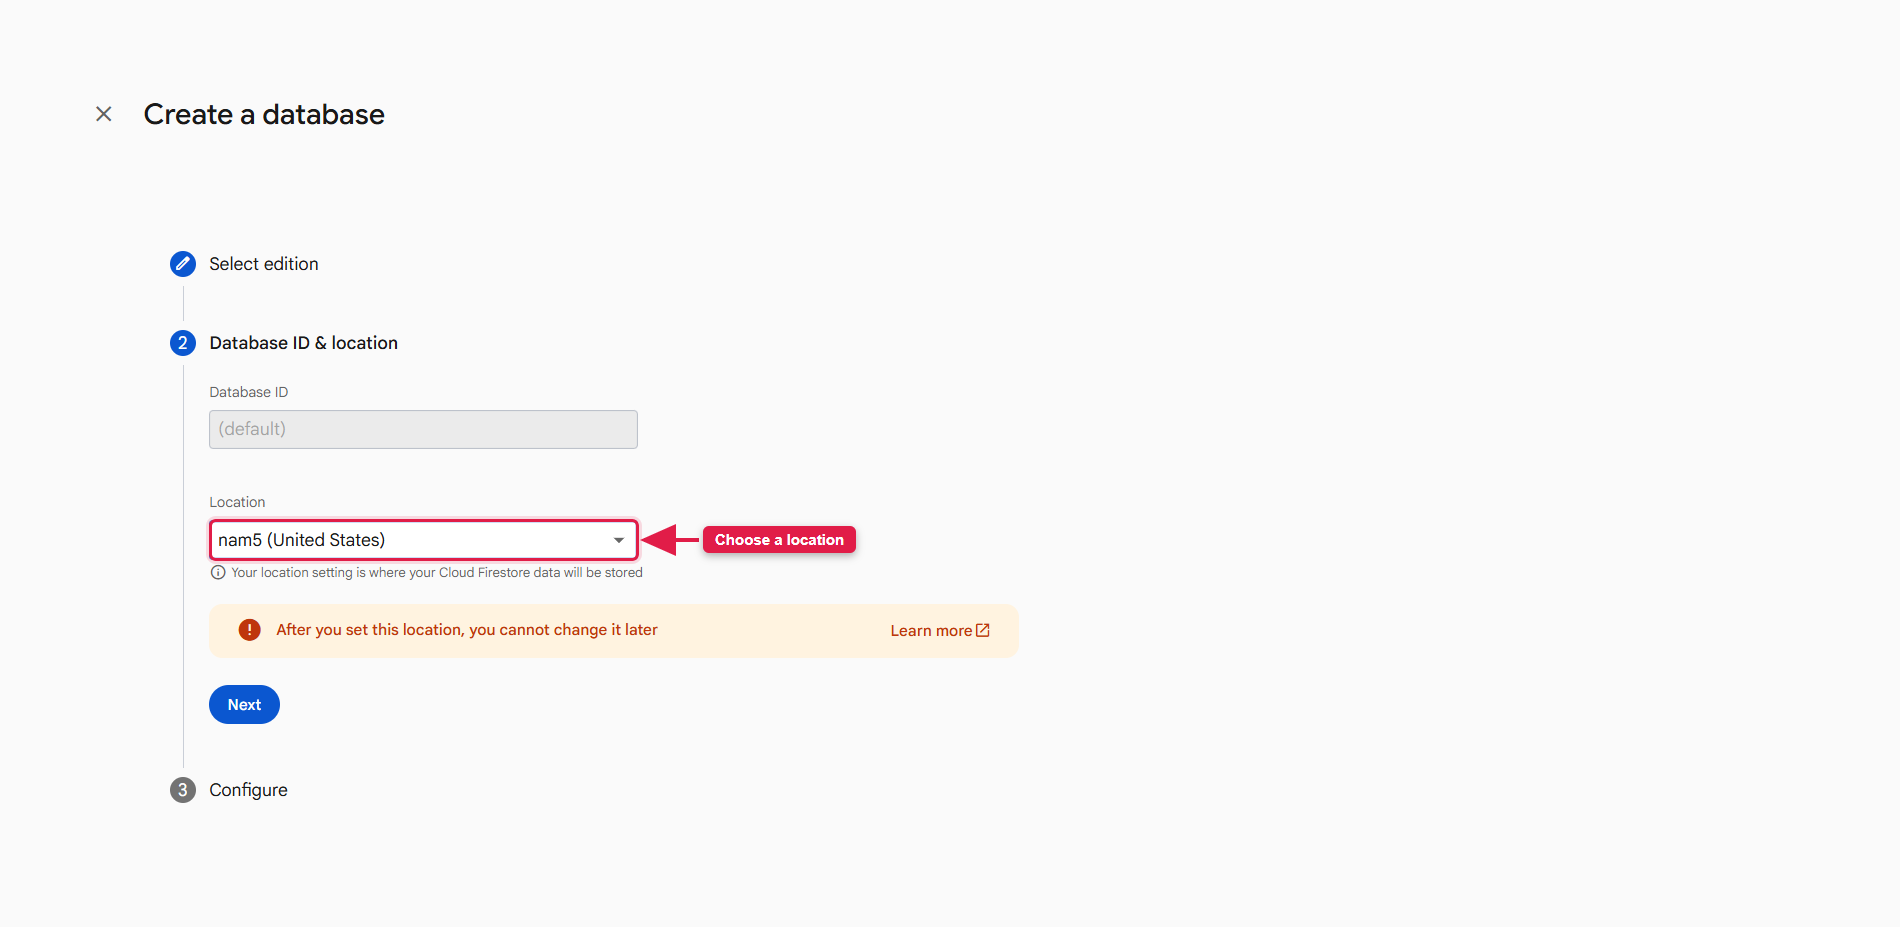
15.12. Choose the database ID and a location.
15.13. Choose the security mode and click "Create".
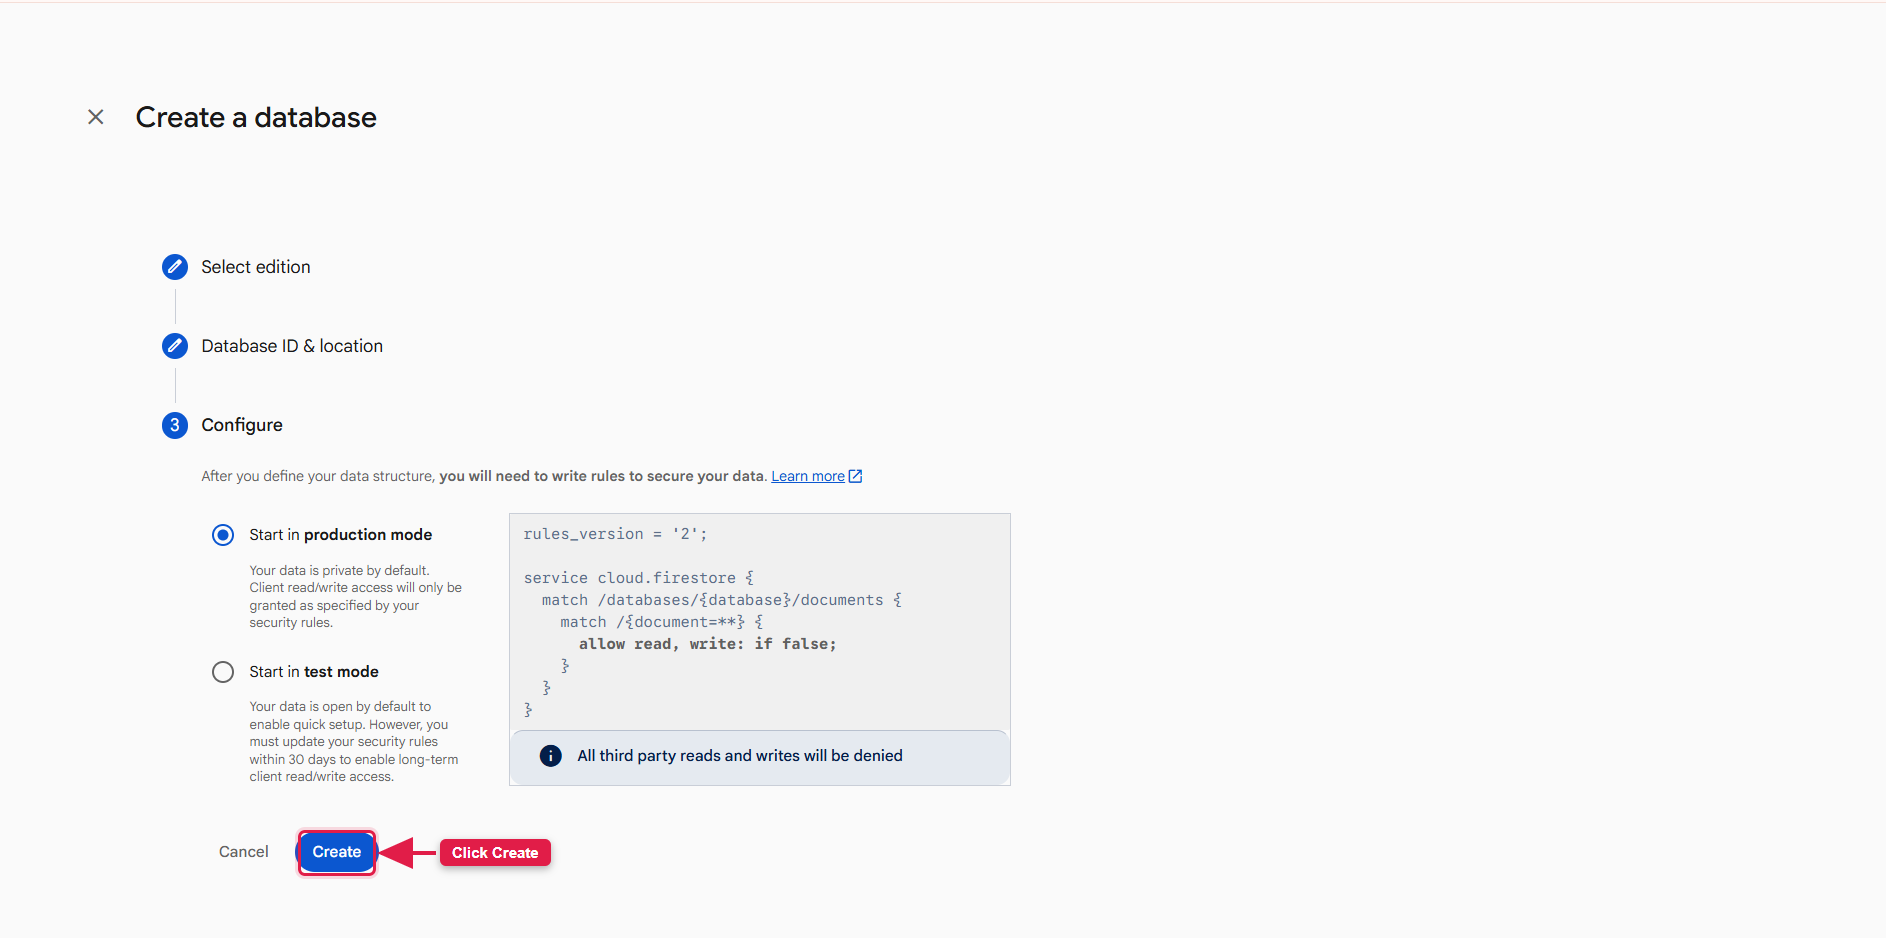
Named database (staging vs production): QuickList supports a named Firestore
database via the FIRESTORE_DATABASE_NAME env value. Leave it as (default)
for production. Internal/staging environments may use a separate named database (e.g.
staging). Keep the same value across the Admin and User panels.
15.14. Open Storage in the left sidebar and enable it — QuickList stores advertisement images, avatars and seller documents here.
15.15. Update your Firestore & Storage security rules so the panels can read public data and authenticated users can write their own documents. Open the Rules tab, paste the rules below, and click Publish.
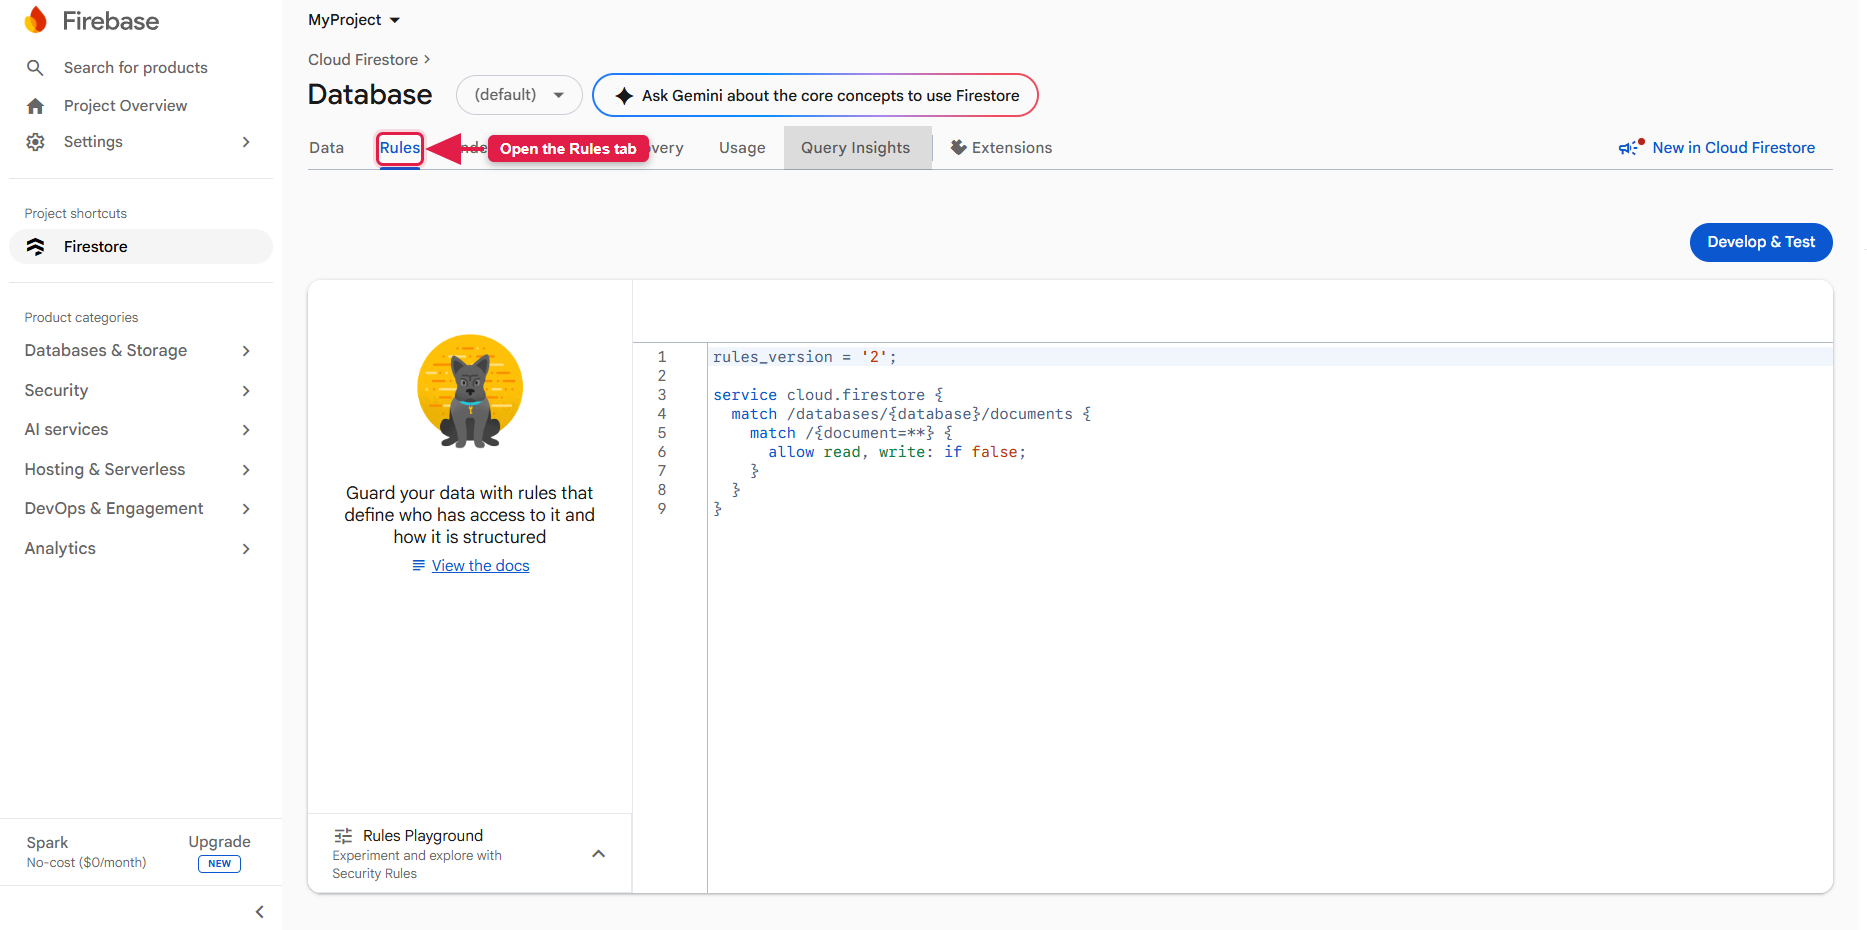
15.16. Firestore Security Rules
These are the Firestore security rules used by QuickList. They grant the admin full
access, allow public read of catalog collections (categories, settings, blogs, etc.), keep the
settings/payment document private (readable only by your Cloud Functions
via the Admin SDK), and restrict writes so users can only modify their own records.
A complete, ready-to-deploy firestore.rules file is included in the Firebase
Rules package. Deploy it either way:
- Deploy the file (recommended): open a terminal in the extracted Firebase
Rules folder and run
firebase deploy --only firestore:rules(see its README). - Or paste manually: open Firestore Database → Rules, replace the contents with the rules below, and click Publish.
rules_version = '2';
service cloud.firestore {
  match /databases/{database}/documents {

    function isAdmin() { return request.auth != null && request.auth.token.admin == true; }
    function isSelf(uid) { return request.auth != null && request.auth.uid == uid; }
    function ownsField(f) {
      return request.auth != null && (
        (resource != null && resource.data[f] == request.auth.uid) ||
        request.resource.data[f] == request.auth.uid
      );
    }

    match /{document=**} { allow read, write: if isAdmin(); }

    match /categories/{d}             { allow read: if true; }
    match /custom_fields/{d}          { allow read: if true; }
    match /languages/{d}              { allow read: if true; }
    match /currencies/{d}             { allow read: if true; }
    match /countries/{d}              { allow read: if true; }
    match /states/{d}                 { allow read: if true; }
    match /cities/{d}                 { allow read: if true; }
    match /areas/{d}                  { allow read: if true; }
    // Public app settings, EXCEPT the payment document (gateway configs) — the
    // payment doc is read only by Cloud Functions via the Admin SDK, never by clients.
    match /settings/{doc}             { allow read: if doc != 'payment'; }
    match /settings/payment           { allow read, write: if false; }
    match /feature_sections/{d}       { allow read: if true; }
    match /slider_sections/{d}        { allow read: if true; }
    match /safety_tips/{d}            { allow read: if true; }
    match /faqs/{d}                   { allow read: if true; }
    match /cms_pages/{d}              { allow read: if true; }
    match /blogs/{d}                  { allow read: if true; }
    match /on_boarding/{d}            { allow read: if true; }
    match /report_reasons/{d}         { allow read: if true; }
    match /subscription_packages/{d}  { allow read: if true; }
    match /notification_templates/{d} { allow read: if true; }

    match /users/{uid} {
      allow read: if true;            // public profile (name, photo, rating)

      // Owner can write anything; any signed-in user may update ONLY the
      // review aggregate fields (written when submitting a review).
      allow create, delete: if isSelf(uid);
      allow update: if isSelf(uid)
        || ( request.auth != null
             && request.resource.data.diff(resource.data).affectedKeys()
                  .hasOnly(['reviewCount', 'reviewSum']) );

      match /{sub=**} {
        allow read, write: if isSelf(uid);
      }
    }

    match /advertisements/{ad} {
      allow read   : if true;
      allow create : if ownsField('userId');
      allow delete : if ownsField('userId');
      // Owner can edit anything; any signed-in user may only bump the counters.
      allow update : if ownsField('userId')
        || ( request.auth != null
             && request.resource.data.diff(resource.data).affectedKeys()
                  .hasOnly(['viewCount', 'likeCount', 'updatedAt']) );

      // Per-user view records (advertisements/{ad}/views/{uid})
      match /views/{uid} {
        allow read, write: if request.auth != null;
      }
    }

    match /notifications/{n} {
      allow read:   if ownsField('userId');
      allow update: if ownsField('userId');
      allow create: if request.auth != null;
    }
    match /seller_verifications/{d}  { allow read, write: if ownsField('userId'); }
    match /seller_documents/{d}      { allow read, write: if ownsField('userId'); }
    match /user_subscriptions/{d}    { allow read, write: if ownsField('userId'); }
    match /user_reports/{d}          { allow read, write: if ownsField('userId'); }
    match /favorite_item/{d}         { allow read, write: if ownsField('userId'); }

    match /review/{d} {
      allow read: if true;
      allow create, update: if ownsField('reviewerId');
    }

    match /chat/{chatId} {
      // get/list: participants only; also allow the existence-check on a
      // not-yet-created conversation (resource == null).
      allow read: if request.auth != null &&
        ( resource == null
          || resource.data.buyerId == request.auth.uid
          || resource.data.sellerId == request.auth.uid );

      allow create: if request.auth != null &&
        ( request.resource.data.buyerId == request.auth.uid
          || request.resource.data.sellerId == request.auth.uid );

      allow update, delete: if request.auth != null &&
        ( resource.data.buyerId == request.auth.uid
          || resource.data.sellerId == request.auth.uid );

      match /messages/{m} {
        allow read, write: if request.auth != null;
      }
    }
  }
}
15.17. Storage Security Rules
These are the Firebase Storage security rules used by QuickList. They allow public reads of catalog images (sliders, categories, blogs, and more) and restrict uploads to the owning user with image type and size validation. Open Storage → Rules, replace the contents with the rules below, and click Publish:
rules_version = '2';
service firebase.storage {
  match /b/{bucket}/o {

    function isAdmin() { return request.auth != null && request.auth.token.admin == true; }
    function isOwner(uid)   { return request.auth != null && request.auth.uid == uid; }
    function validImage(mb) { return request.resource.size < mb * 1024 * 1024 && request.resource.contentType.matches('image/.*'); }

    // Admin has full access everywhere
    match /{allPaths=**} { allow read, write: if isAdmin(); }

    // Public reads
    match /sliders/{allPaths=**}       { allow read: if true; }
    match /custom_fields/{allPaths=**} { allow read: if true; }
    match /categories/{allPaths=**}    { allow read: if true; }
    match /subscription_packages/{allPaths=**} { allow read: if true; }
    match /blogs/{allPaths=**}         { allow read: if true; }
    match /cms_pages/{allPaths=**}     { allow read: if true; }
    match /faqs/{allPaths=**}          { allow read: if true; }

    // Flutter user uploads
    match /advertisements/{userId}/{allPaths=**} {
      allow read  : if request.auth != null;
      allow write : if isOwner(userId) && validImage(10);
    }
    match /profileImage/{userId}/{allPaths=**} {
      allow read  : if request.auth != null;
      allow write : if isOwner(userId) && validImage(5);
    }
    match /seller_verifications/{userId}/{allPaths=**} {
      allow read  : if isOwner(userId);
      allow write : if isOwner(userId) && validImage(5);
    }
    match /verification_documents/{userId}/{allPaths=**} {
      allow read, write: if isOwner(userId);
    }
  }
}
16. Firestore Database Collection Import / Export
QuickList ships with a set of seed collections (categories, currencies, countries, settings, etc.). Import them into your Firestore database using the provided Node.js utility. To perform a Firebase Collection Import/Export:
16.1. Install Node.js from https://nodejs.org/en/download/.
16.2. Unzip the provided "Firebase Import Export Collections" package.
16.3. Configure the credentials.json file (service account). In the
Firebase Console go to Project Settings → Service accounts → Node.js, click "Generate
new private key", and save the downloaded file as credentials.json.
16.4. Open a PowerShell/terminal window in the extracted folder (hold
Ctrl+Shift, right-click → "Open PowerShell window here").
16.5. Run the import / export commands:
To import all collections:
npx -p node-firestore-import-export firestore-import -a credentials.json -b collections.json
To export all collections:
npx -p node-firestore-import-export firestore-export -a credentials.json -b collections.json
Please Note: If you use a named database (e.g. staging), make sure the
import tool targets the correct database, and always verify that your Firebase credentials in
credentials.json are correct before running these commands.
17. Deploy Firestore Indexes
QuickList's queries (search, category filtering, sorting) require composite Firestore indexes. Deploy
them from the provided firestore.indexes.json:
17.1. Install Node.js (if not already installed) and the Firebase CLI:
npm install -g firebase-tools
17.2. Unzip the provided "Firebase Indexing" package and open a PowerShell/terminal in that folder.
17.3. Log in to Firebase:
firebase login
17.4. Initialize Firestore configuration:
firebase init
Choose Firestore: Configure security rules and index files, select Use an
existing project, and pick your QuickList project. Accept the default file names
(firestore.rules, firestore.indexes.json).
Please Note: Use the arrow keys to navigate and the space bar to select options in the CLI prompts.
17.5. Copy the provided index definitions into firestore.indexes.json,
then deploy:
firebase deploy --only firestore:indexes
18. Deploy Firestore Security Rules
QuickList ships a complete, ready-to-deploy firestore.rules file in the
Firebase Rules package. These rules grant the admin full access, allow public read of
catalog collections, keep the settings/payment document private (read
only by your Cloud Functions via the Admin SDK), and restrict each user's documents to their owner.
Deploy them:
18.1. Install Node.js (if not already) and the Firebase CLI:
npm install -g firebase-tools
18.2. Unzip the provided "Firebase Rules" package and open a PowerShell/terminal in
that folder (the one containing firebase.json).
18.3. Log in to Firebase:
firebase login
18.4. Select your QuickList project:
firebase use YOUR_PROJECT_ID
18.5. Deploy the security rules:
firebase deploy --only firestore:rules
Please Note: Keep payment secret keys only in the settings/payment
document (locked by these rules and read server-side by your Cloud Functions) or in Google Secret
Manager — never in a client-readable location. The full rules are also listed under
Create Firebase Project → Firestore Security Rules.
19. Admin Panel Setup
The Admin Panel is a Laravel 12 application. Ensure your server meets the requirements in the Server Requirement section. Upload the Admin Panel package to your server (domain or subdomain) and extract it.
19.1. Create Database
The admin panel uses MySQL only for admin authentication (users, roles, permissions), sessions and jobs. Create a database and user from your server's control panel.
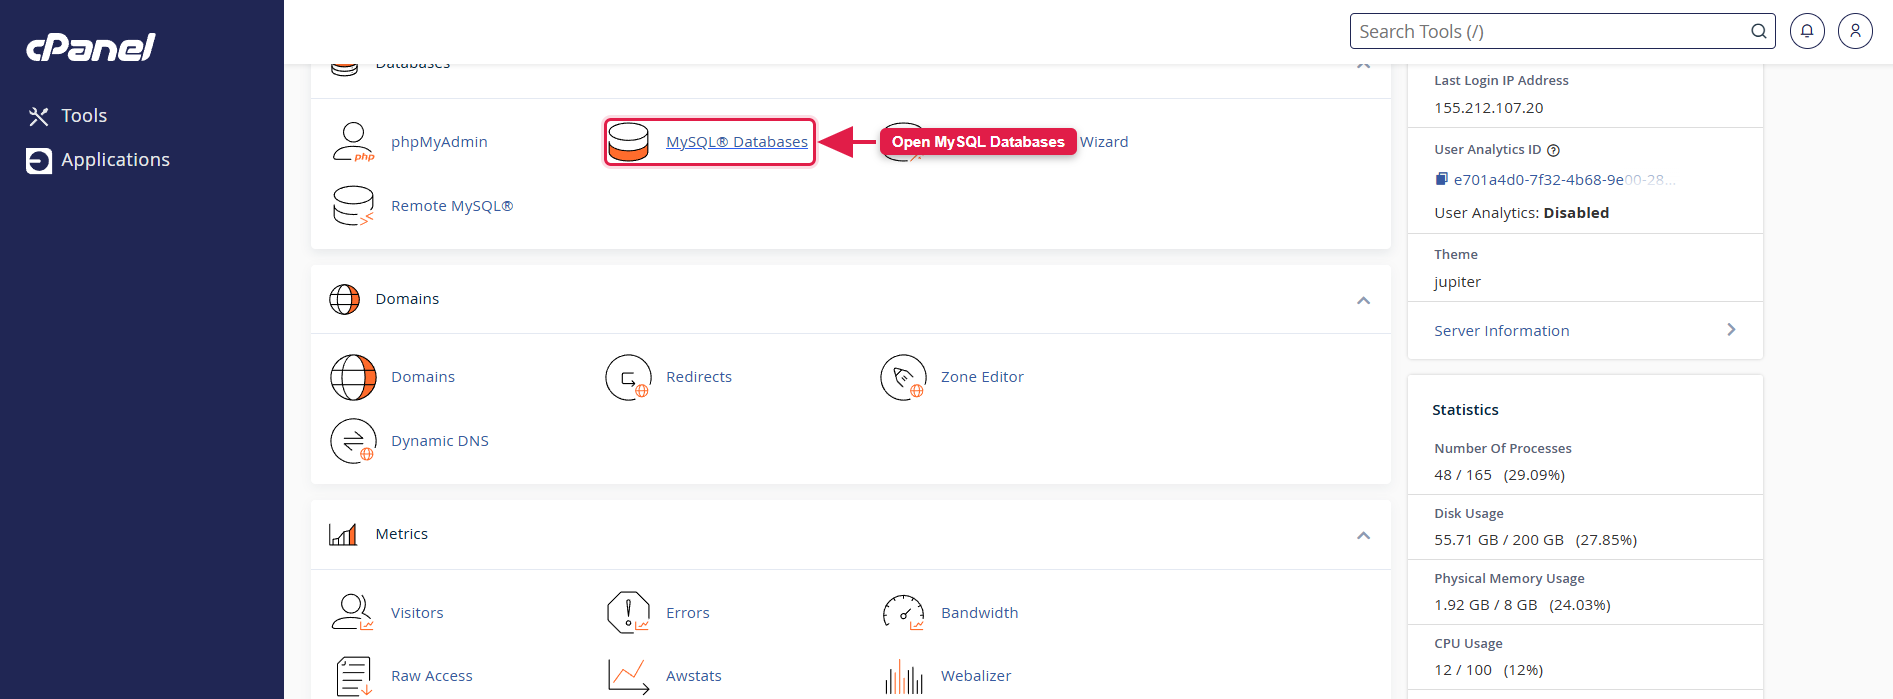
19.1.1. Open MySQL Databases in cPanel.
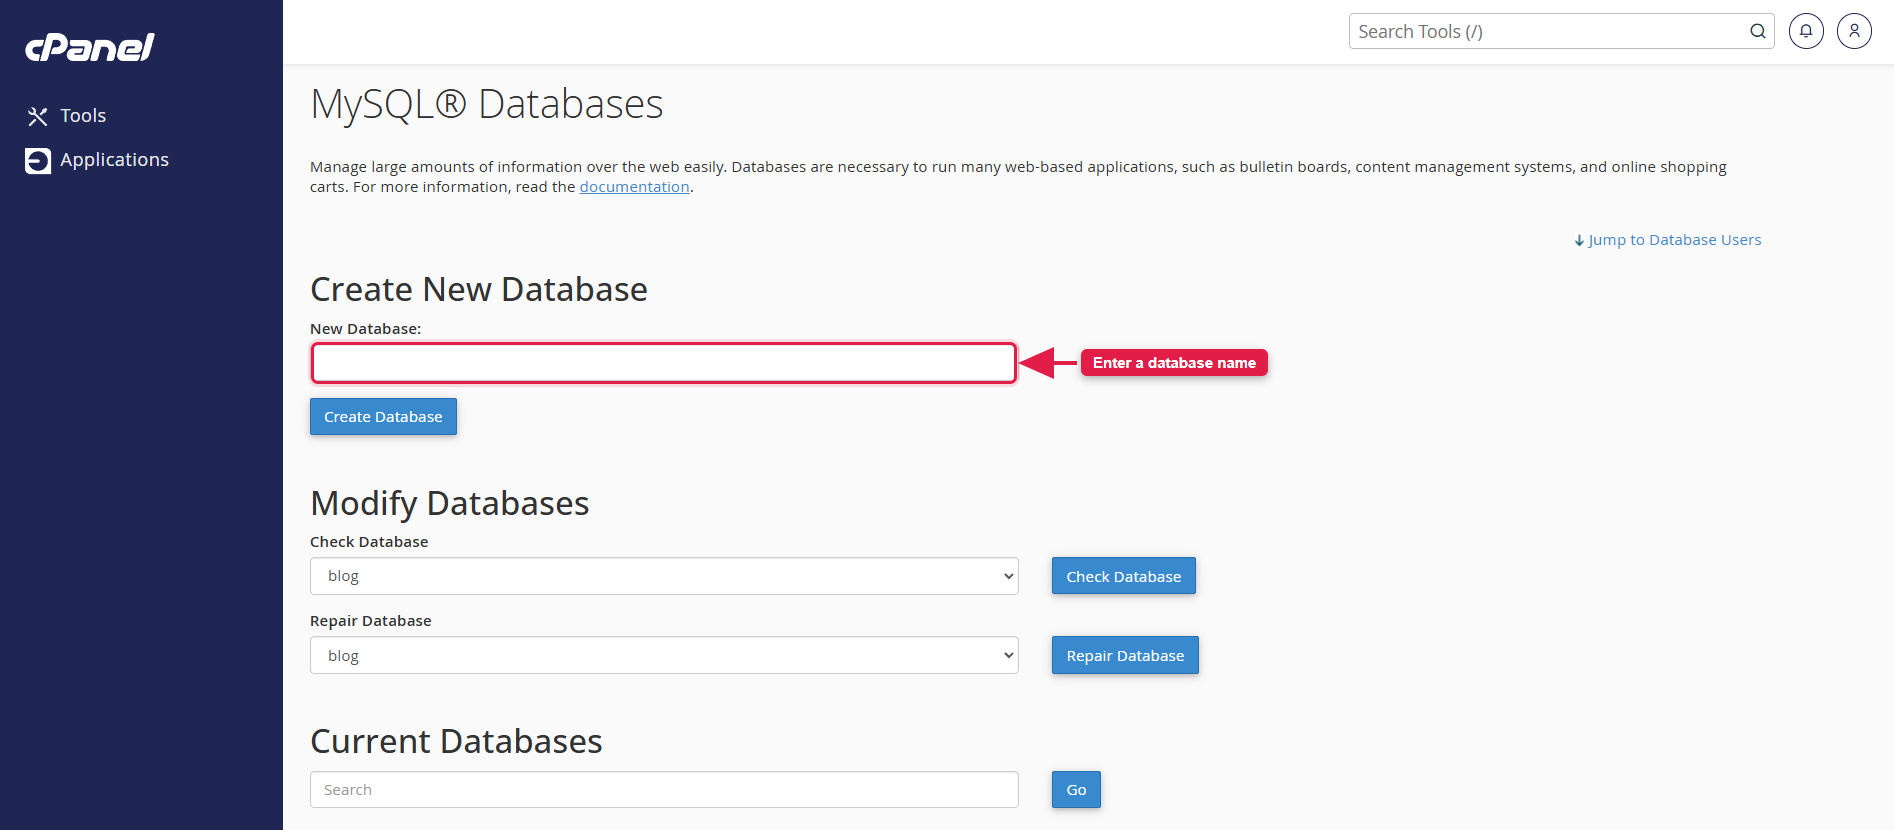
19.1.2. Enter a name and create a new database.
19.1.3. Create a new database user with a strong password.
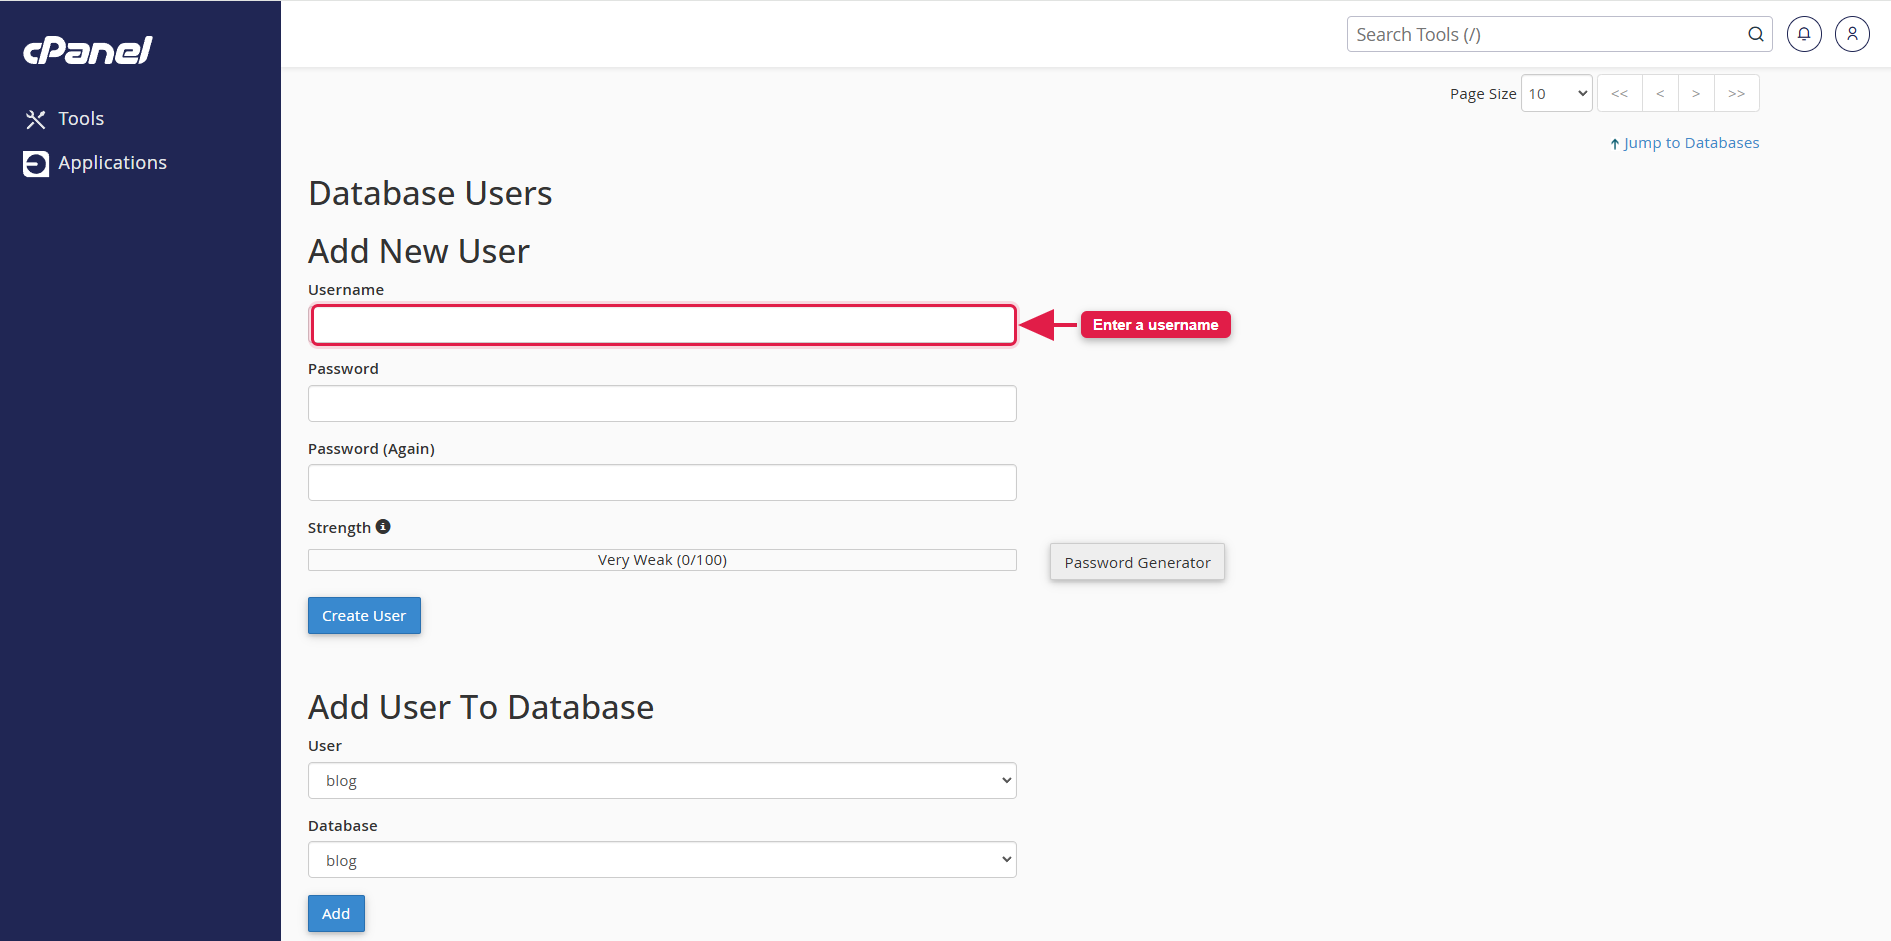
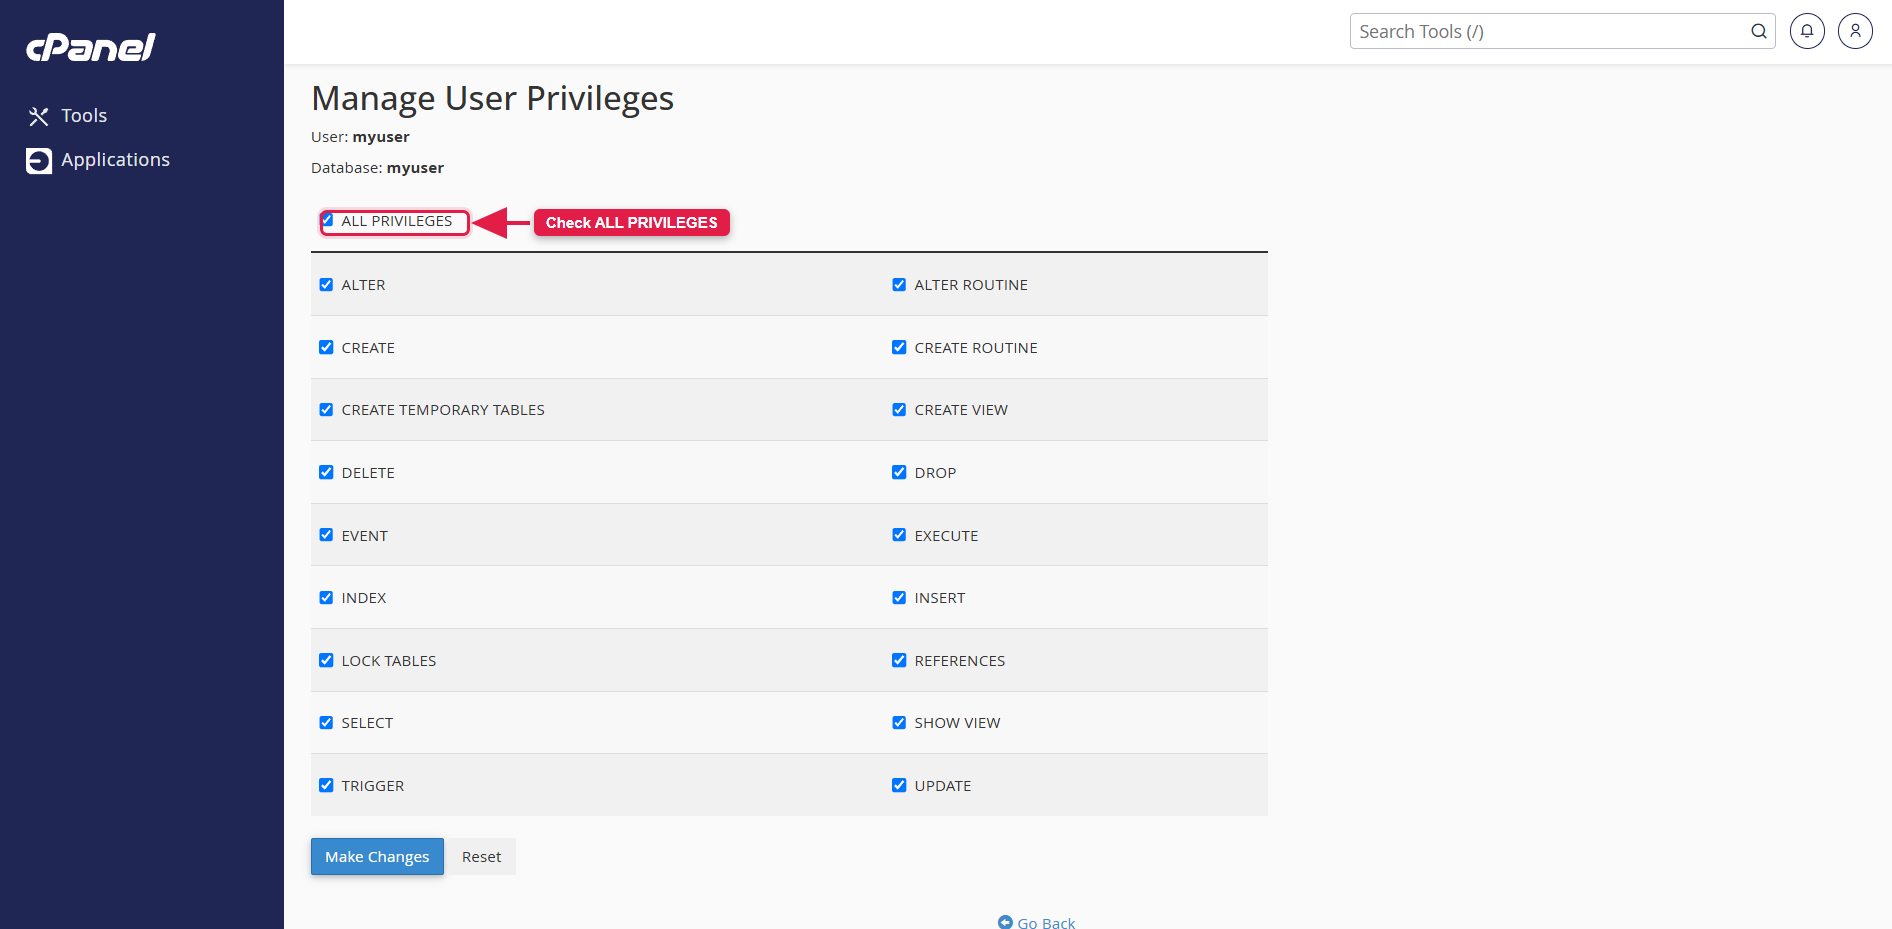
19.1.4. Add the user to the database, grant ALL PRIVILEGES, and click "Make Changes".
19.2. Configure the Admin Panel
19.2.1. Install dependencies and generate the application key:
composer install
cp .env.example .env
php artisan key:generate
npm install
19.2.2. Edit the .env file and configure the database connection and your
Firebase web app credentials:
DB_DATABASE=your_database
DB_USERNAME=your_db_user
DB_PASSWORD=your_db_password

FIREBASE_APIKEY=
FIREBASE_AUTH_DOMAIN=
FIREBASE_DATABASE_URL=
FIREBASE_PROJECT_ID=
FIREBASE_STORAGE_BUCKET=
FIREBASE_MESSAAGING_SENDER_ID=
FIREBASE_APP_ID=
FIREBASE_MEASUREMENT_ID=

# Firestore named database — '(default)'
FIRESTORE_DATABASE_NAME=(default)

# Node binary path used by the cron/utility scripts
NODE_PATH=
To obtain these Firebase credentials, open the Firebase Console → Project Settings → General → Your apps → Web app, and copy the config values.
19.2.3. Place your Firebase service account file at
storage/app/firebase/credentials.json (Project Settings → Service accounts → Generate new
private key). This is required for server-side ID-token verification and FCM.
19.2.4. Run the database migrations and seeders to create the admin tables and default admin user:
php artisan migrate --seed
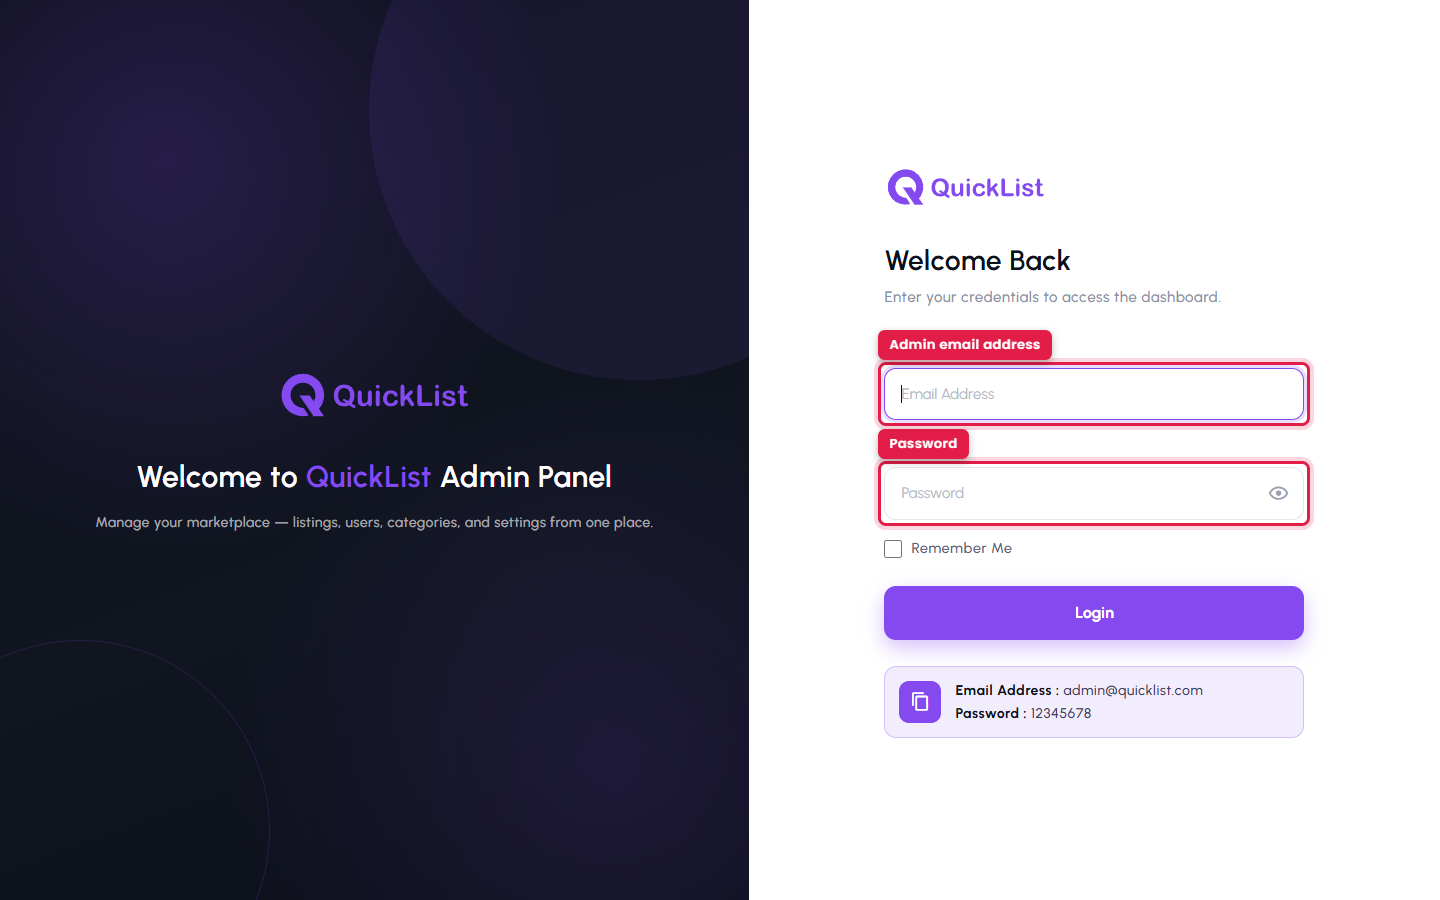
19.2.5. The admin panel is now ready. Log in with the default super-admin account and change the password immediately:
Email:    admin@quicklist.com
Password: 12345678
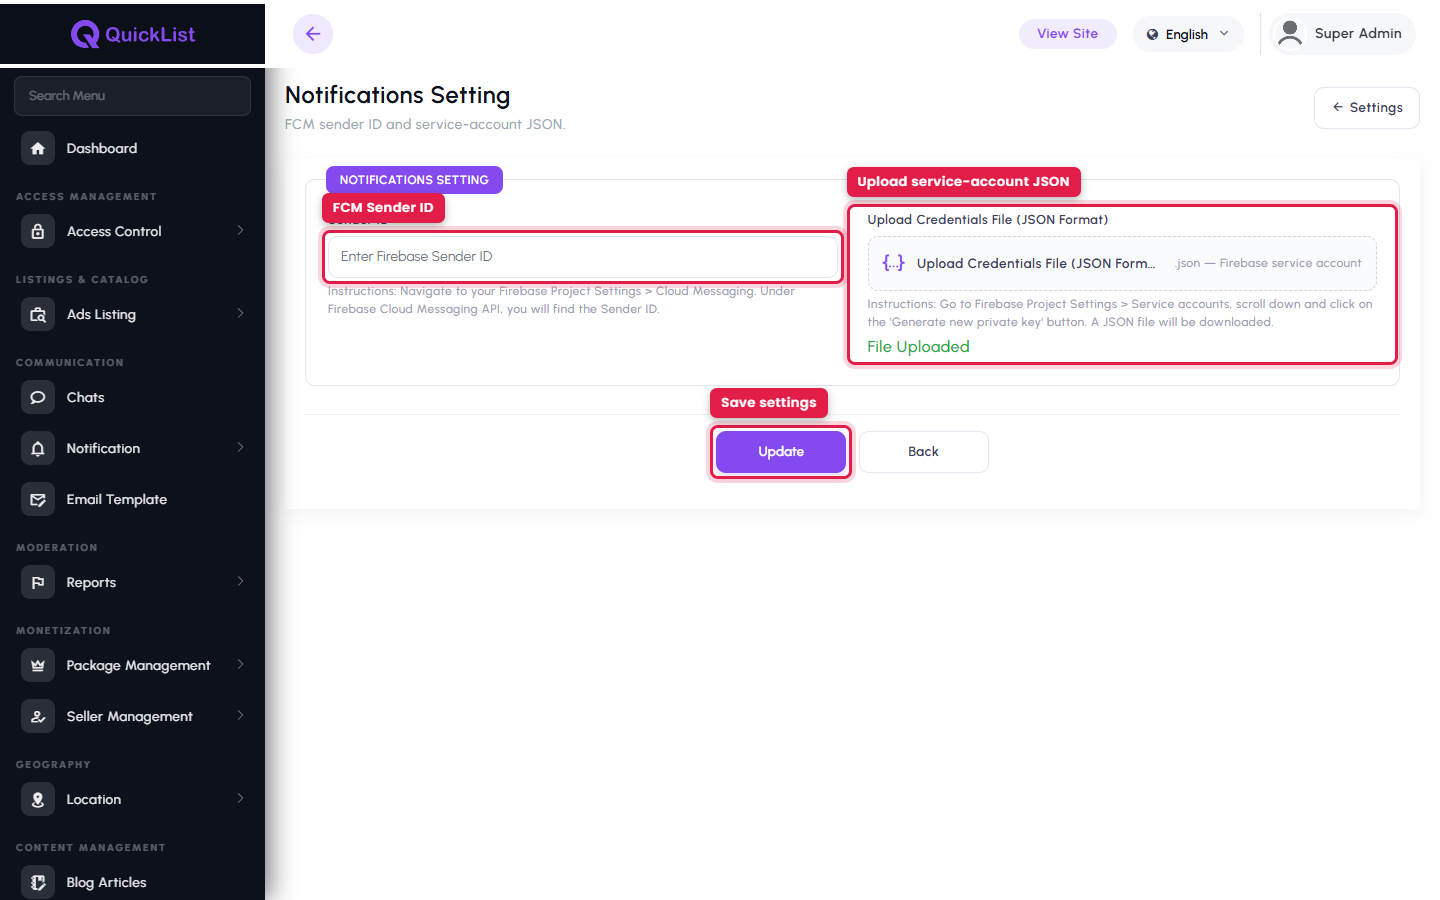
Important: For push notifications to work, upload your Firebase service-account (FCM) credentials file in the admin panel under Settings → Notification Settings, and set the Firebase Sender ID.
20. Admin Panel Menus Overview
After logging in, the admin panel sidebar is organized into the following groups. Menu items are shown based on the logged-in admin's role permissions.
20.1. Dashboard
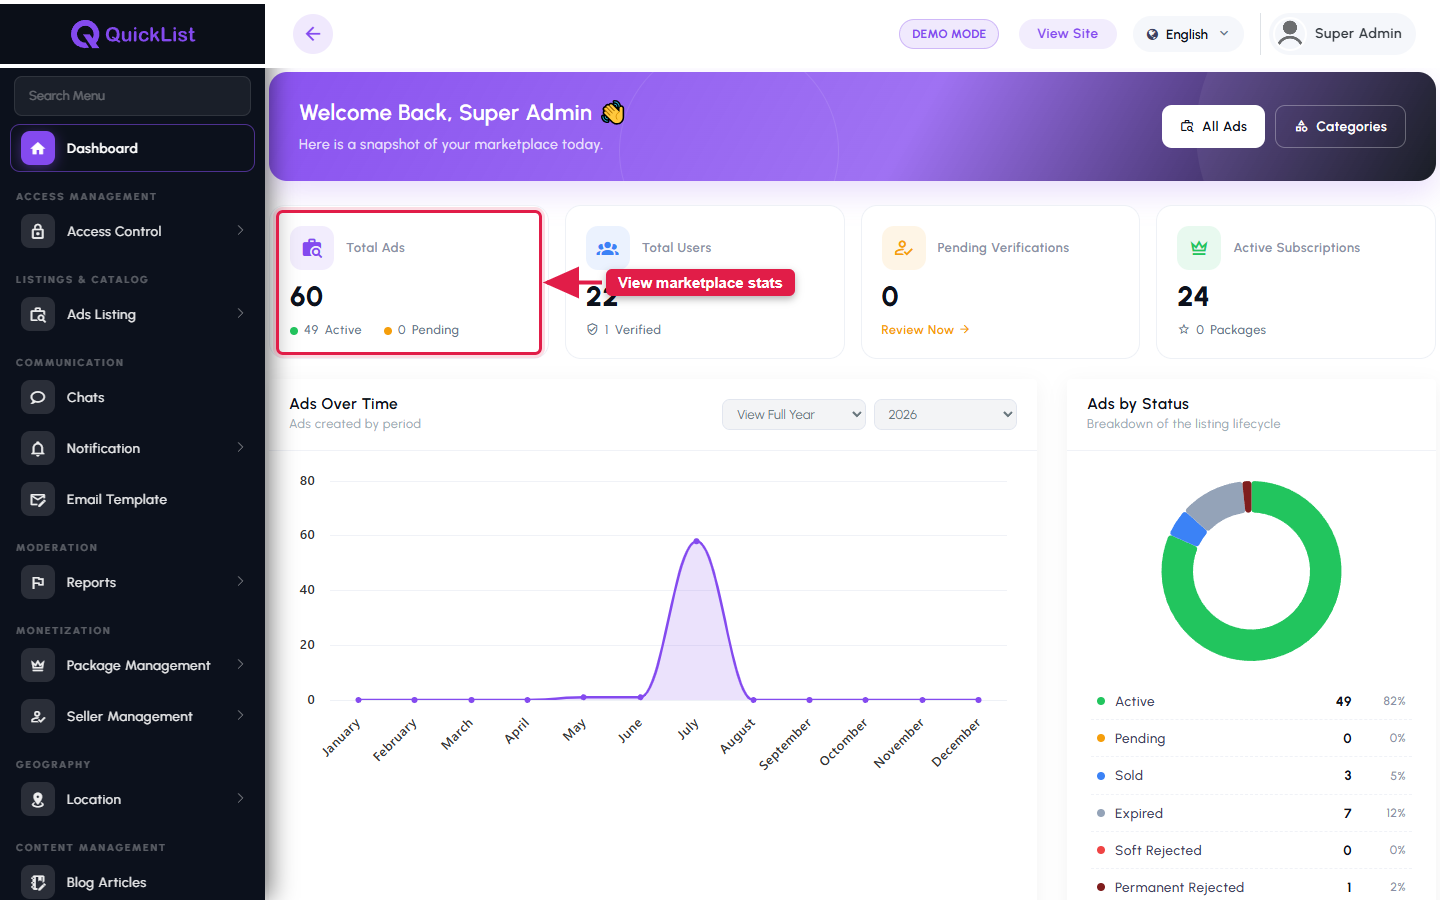
At-a-glance overview of the marketplace — key counts (total ads, users, pending verifications, active subscriptions), an "Ads Over Time" chart and an "Ads by Status" breakdown.
20.2. Access Management
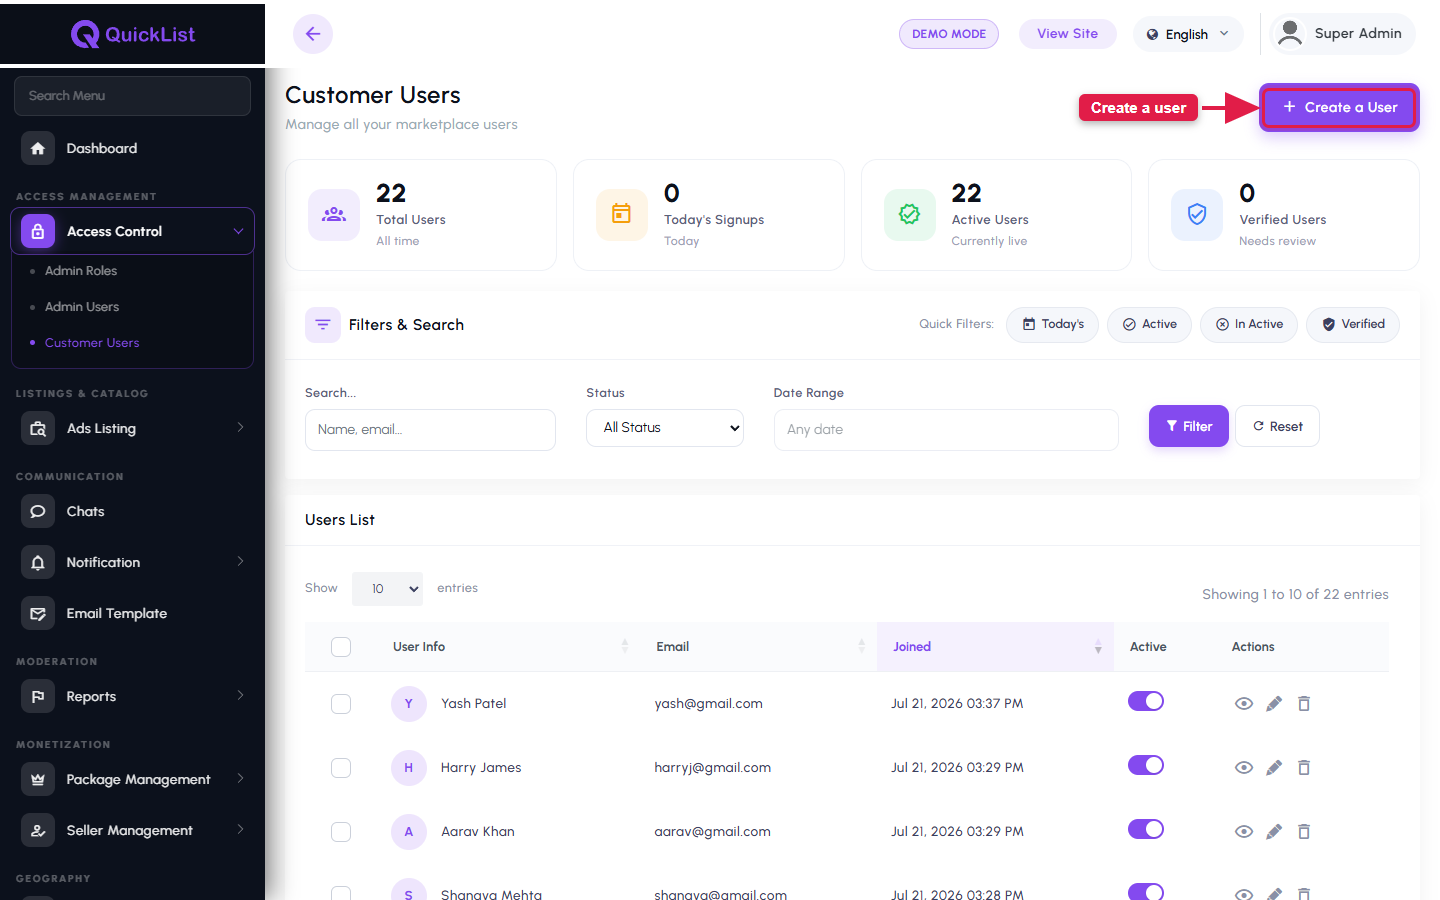
- Roles — define roles and their permissions (QuickList uses its own permission system).
- Admins — manage back-office admin accounts.
- Users (Customers) — manage marketplace buyers/sellers.
20.3. Listings & Catalog
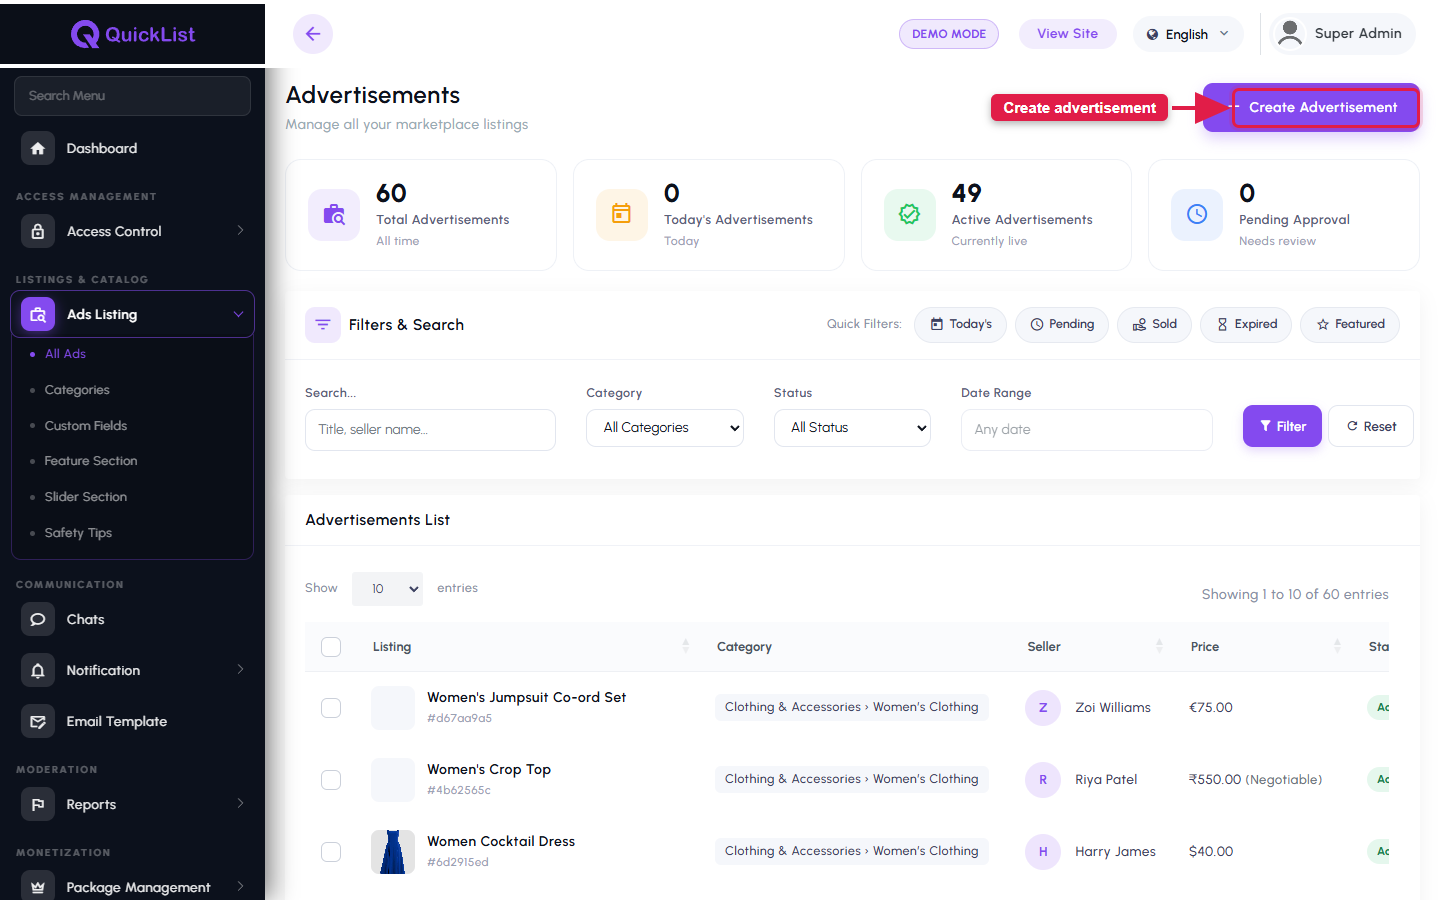
- All Ads — view, approve, edit and moderate every advertisement.
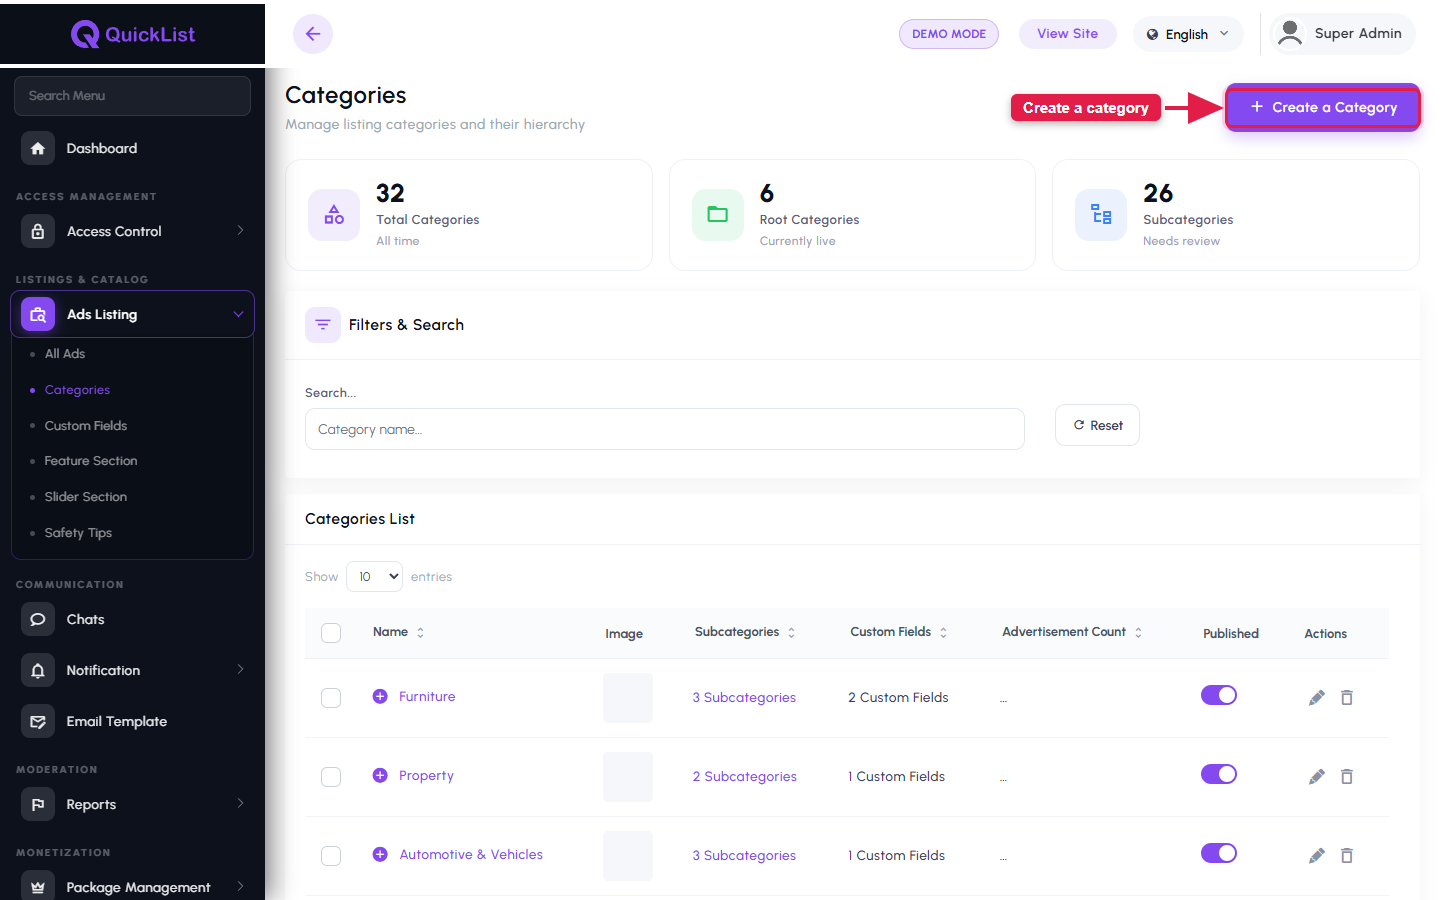
- Categories — manage unlimited nested categories.
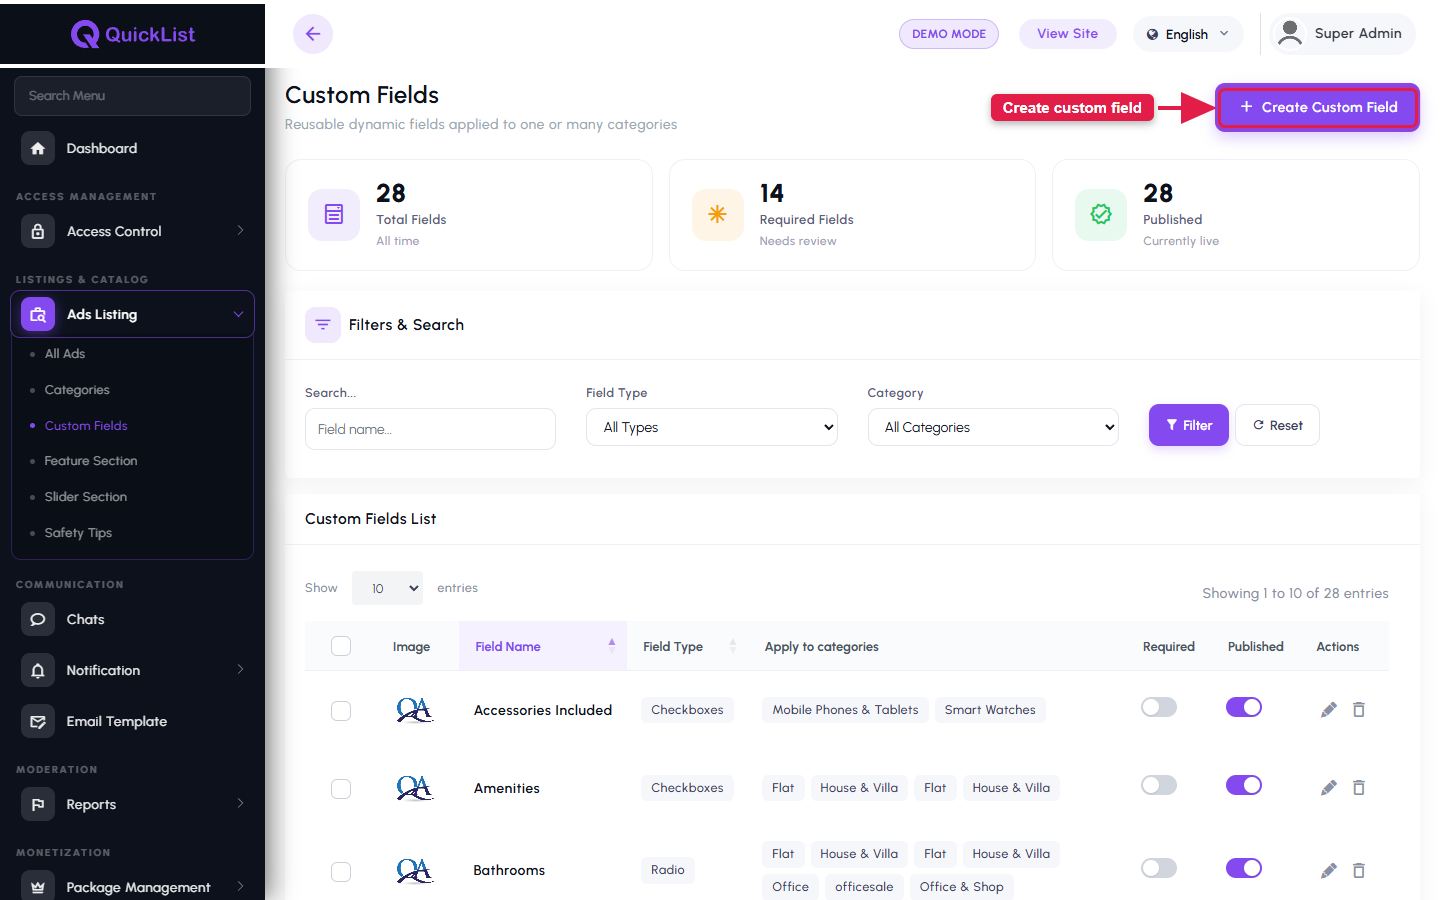
- Custom Fields — dynamic per-category fields (text, number, dropdown, radio, checkbox).
- Feature Section — curated home-page ad sections.
- Slider Section — home-page banner carousel.
- Safety Tips — buyer/seller safety guidance shown on the site.
20.4. Communication
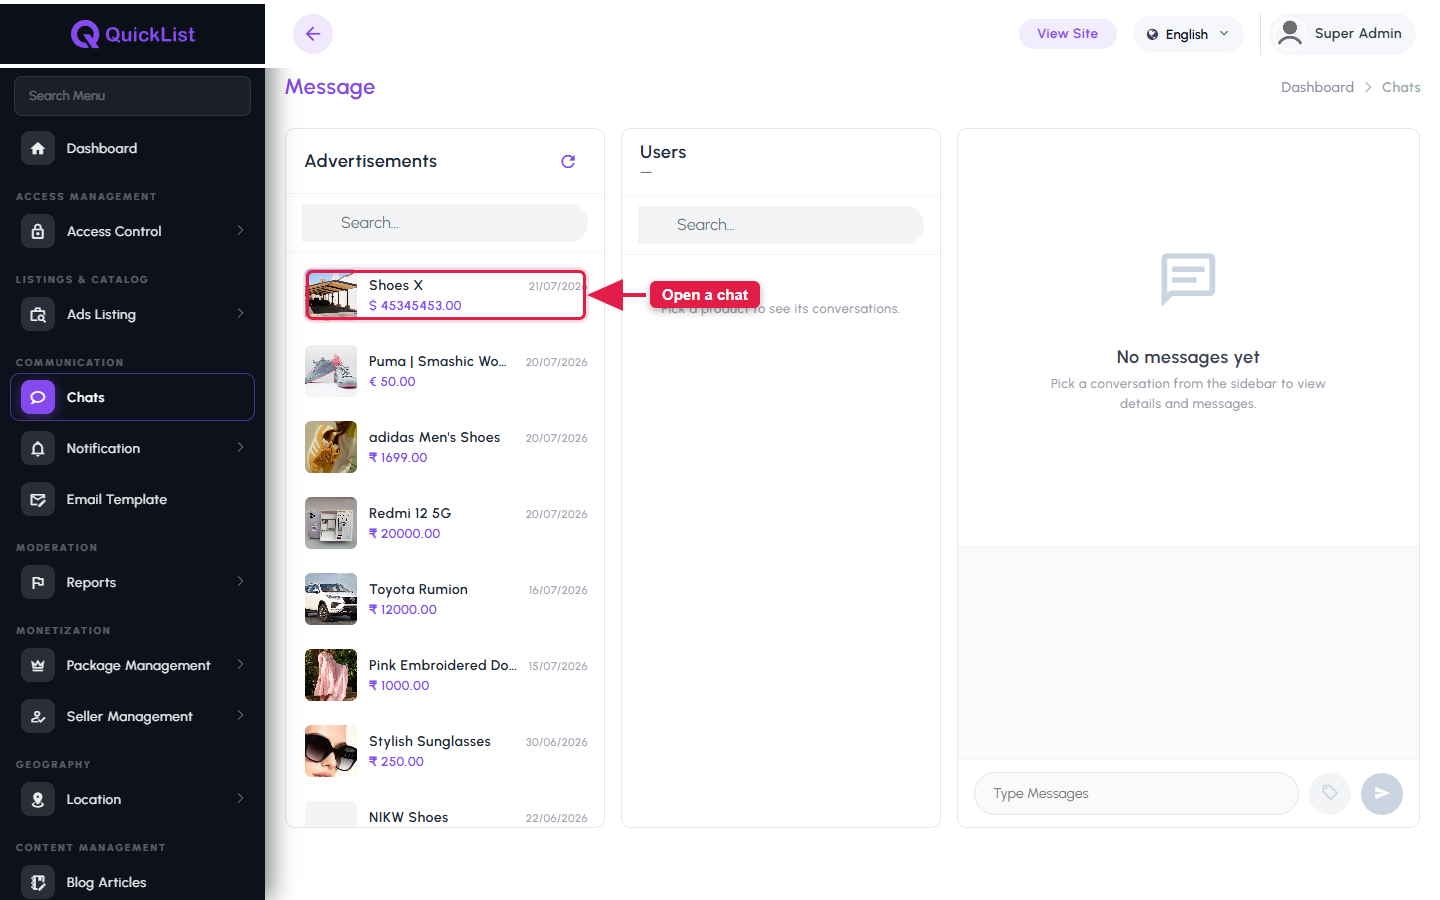
- Chats — monitor buyer ↔ seller conversations.
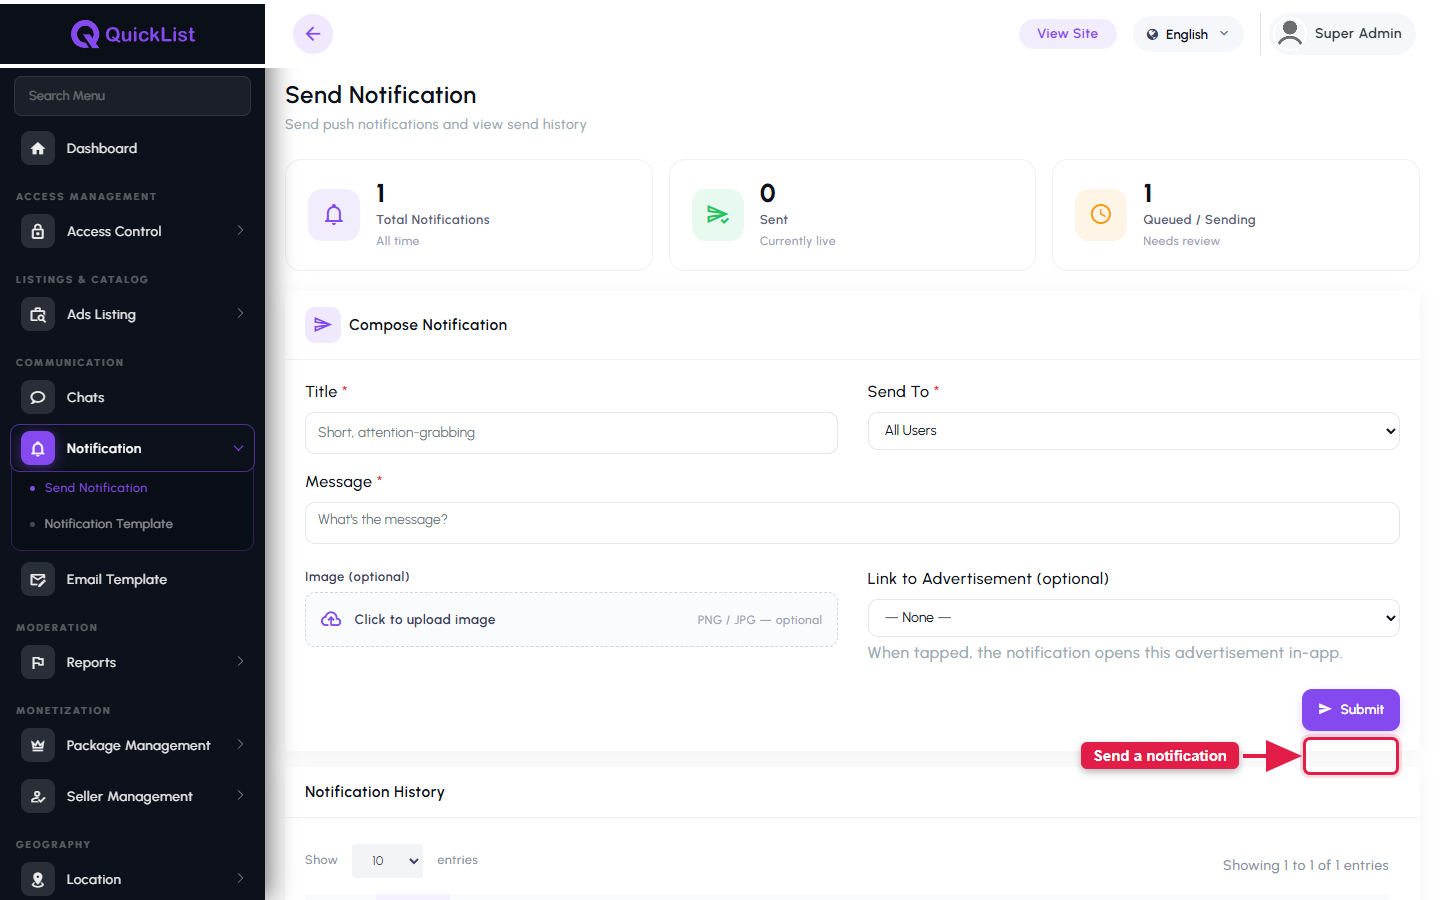
- Notification — send push notifications (FCM) and manage notification templates.
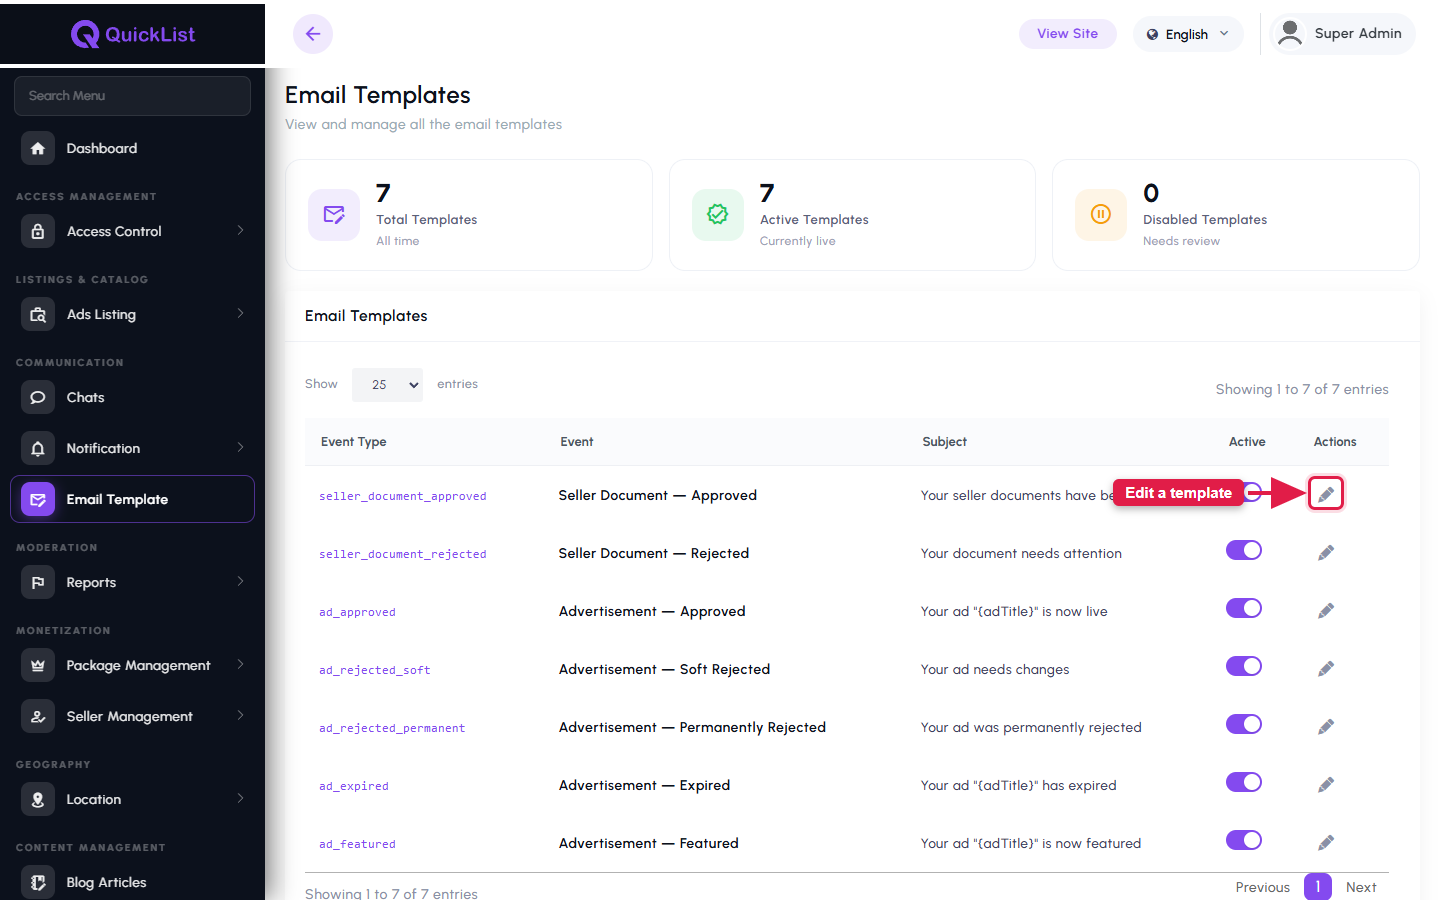
- Email Template — manage transactional email templates.
20.5. Moderation
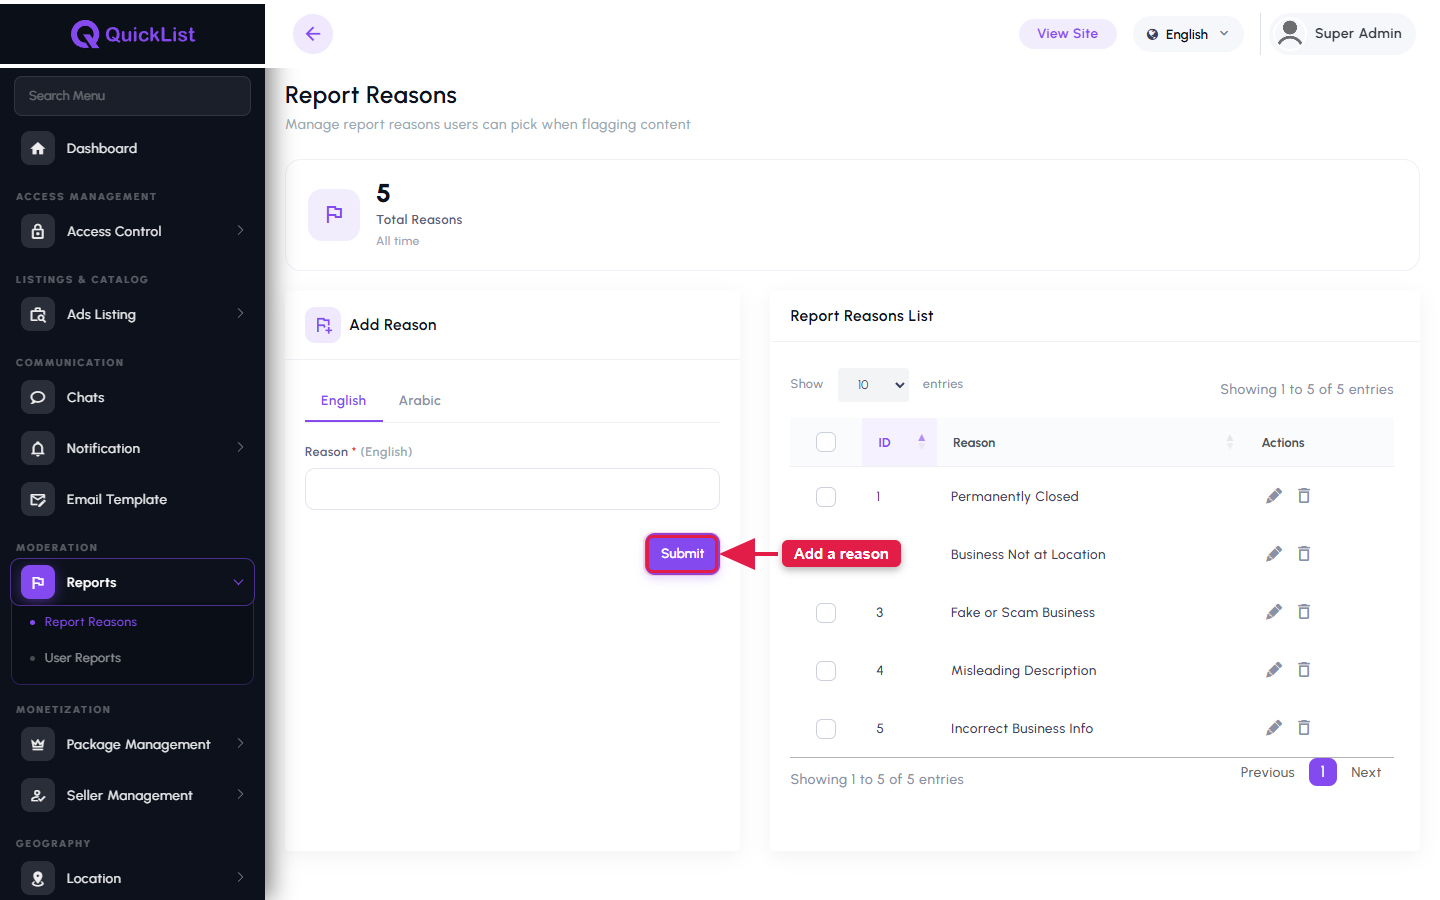
- Report Reasons — configurable reasons users can pick when reporting.
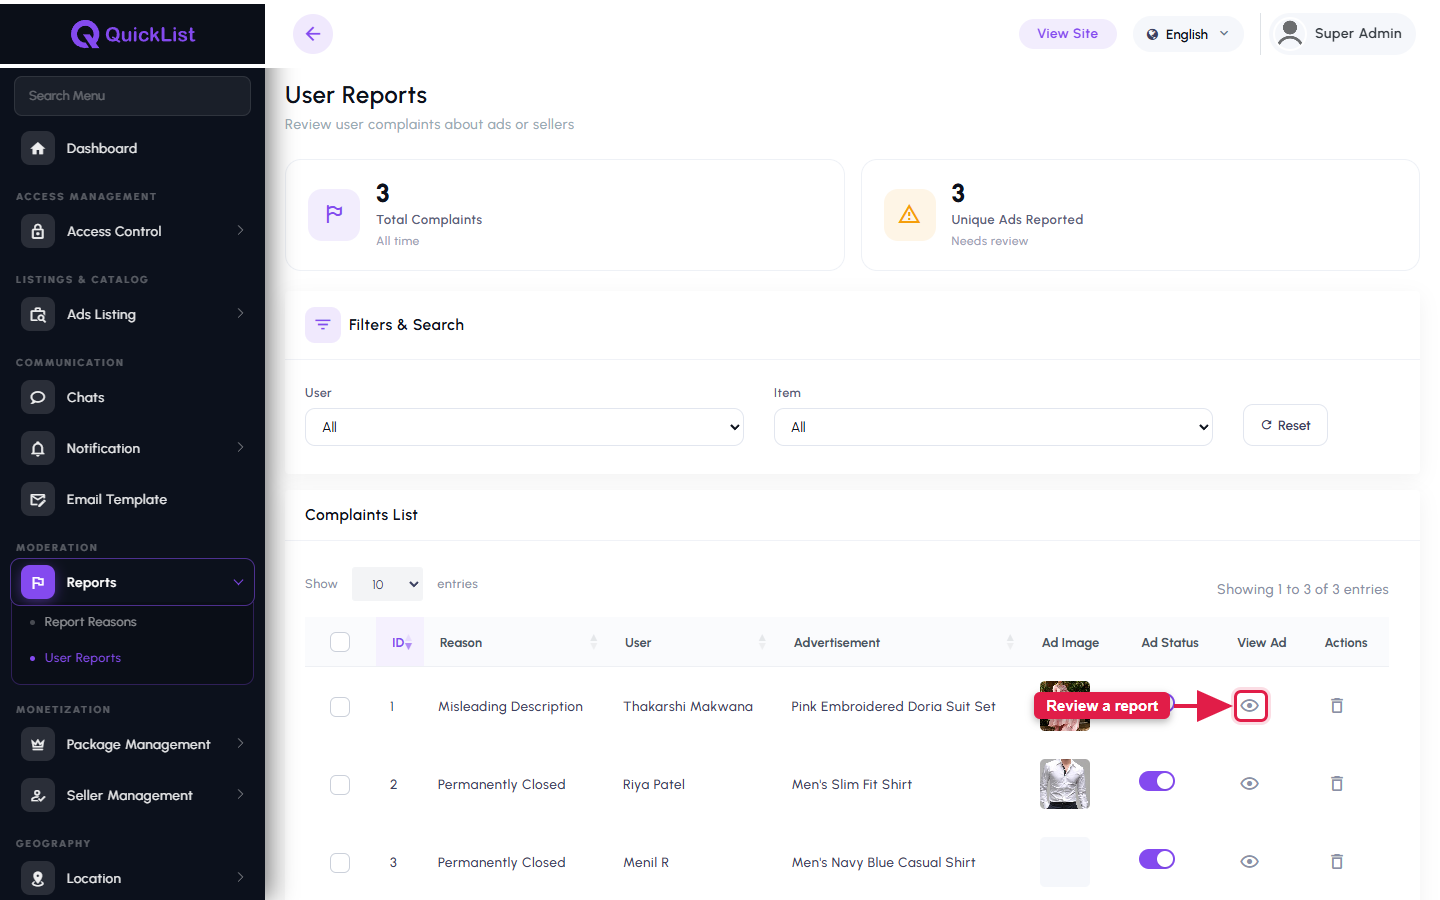
- User Reports (Complaints) — review and act on reported ads/users.
20.6. Monetization
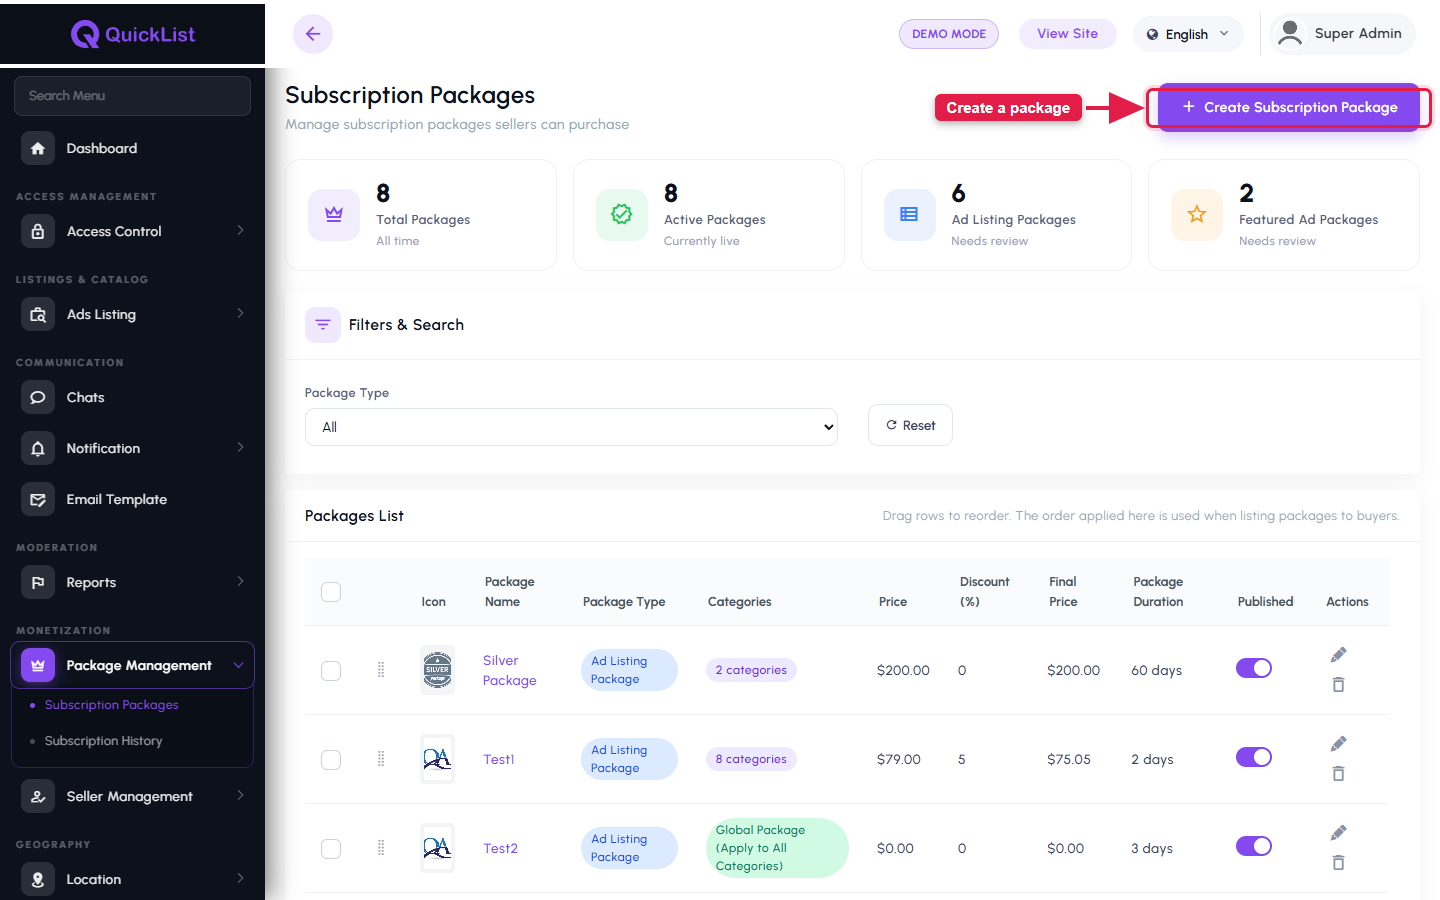
- Subscription Packages — create Ad-Listing and Featured-Ads plans.
- Subscription History — view users' purchased subscriptions.
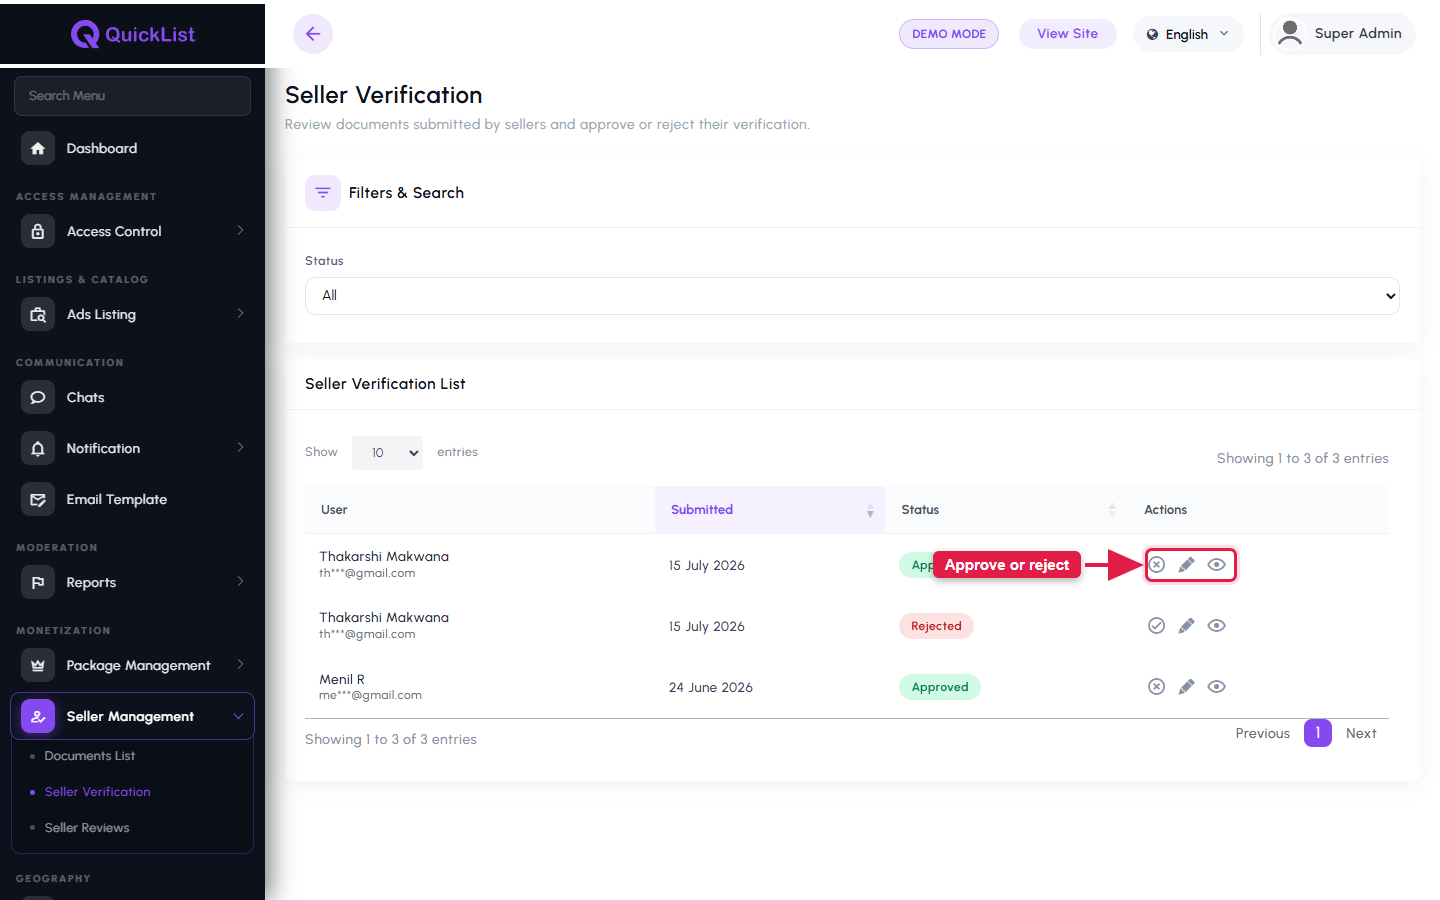
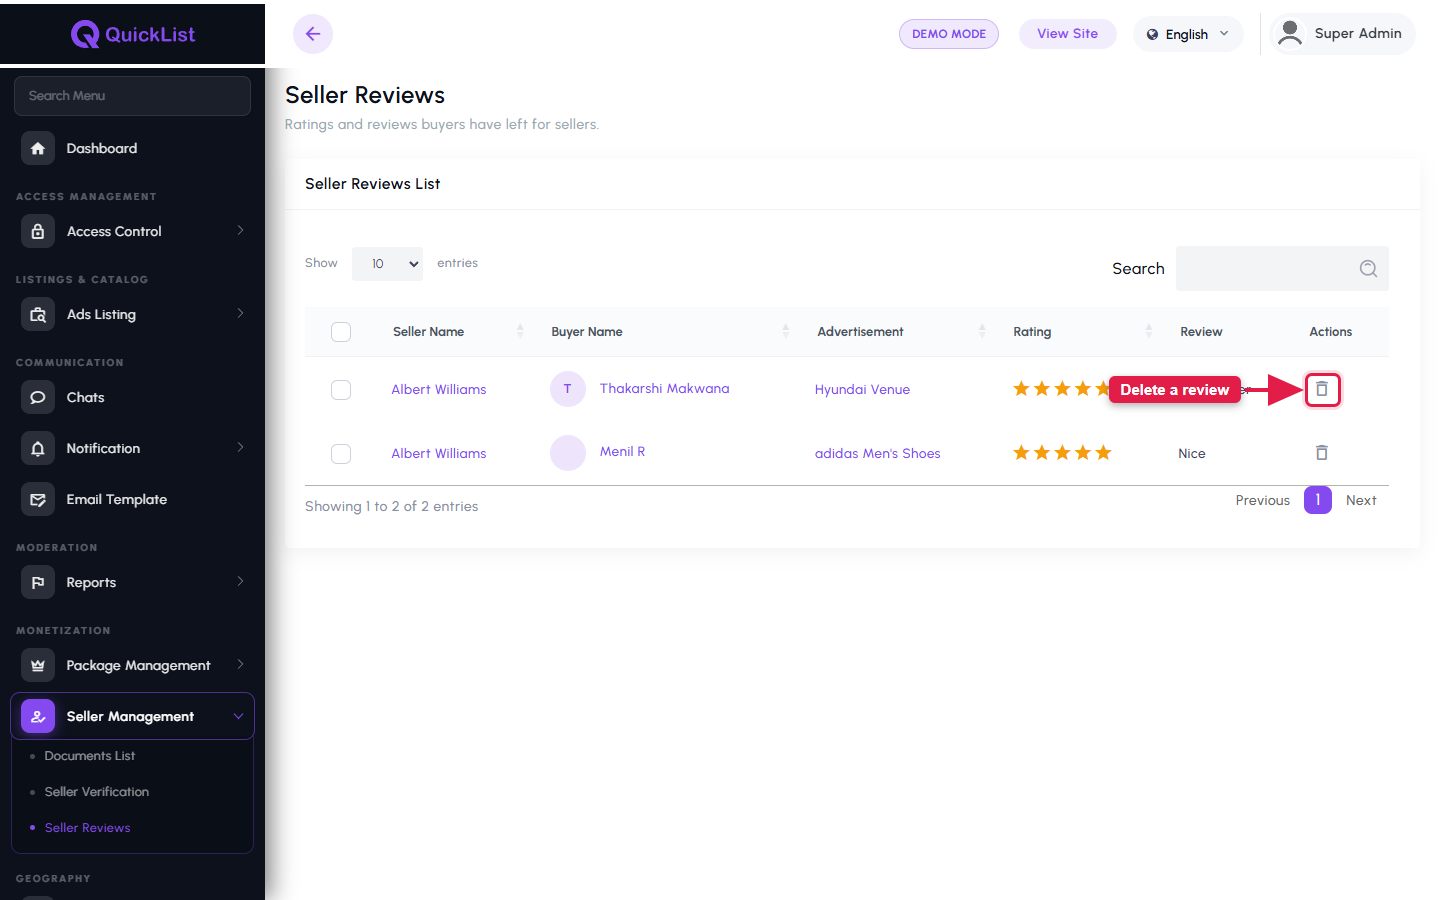
20.7. Seller Management
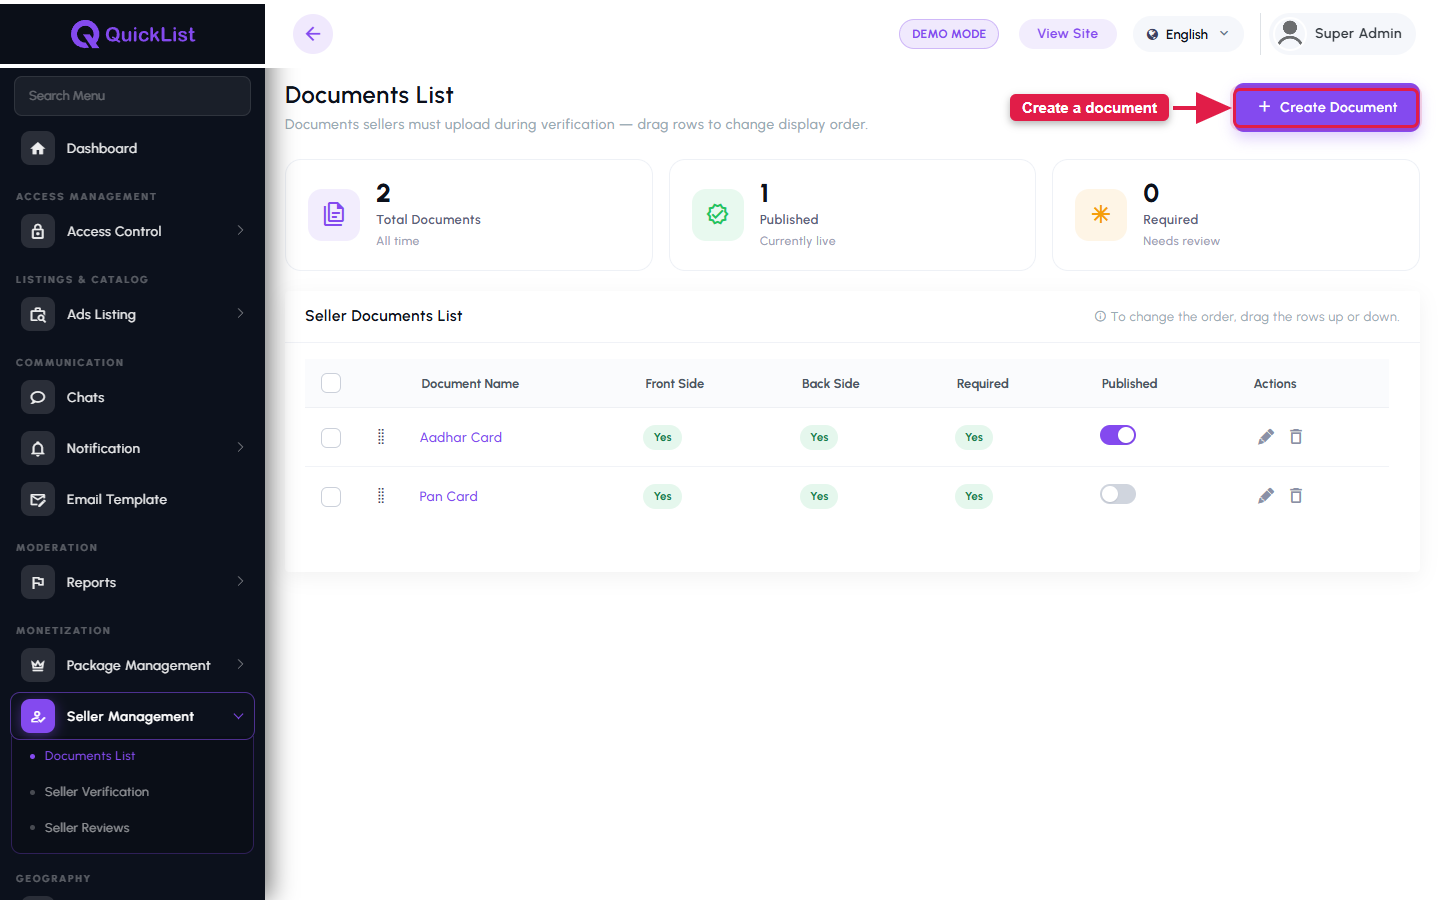
- Seller Documents — define the documents required for verification.
- Seller Verifications — approve/reject submitted verification requests.
- Seller Reviews — moderate ratings and reviews.
20.8. Geography (Location)
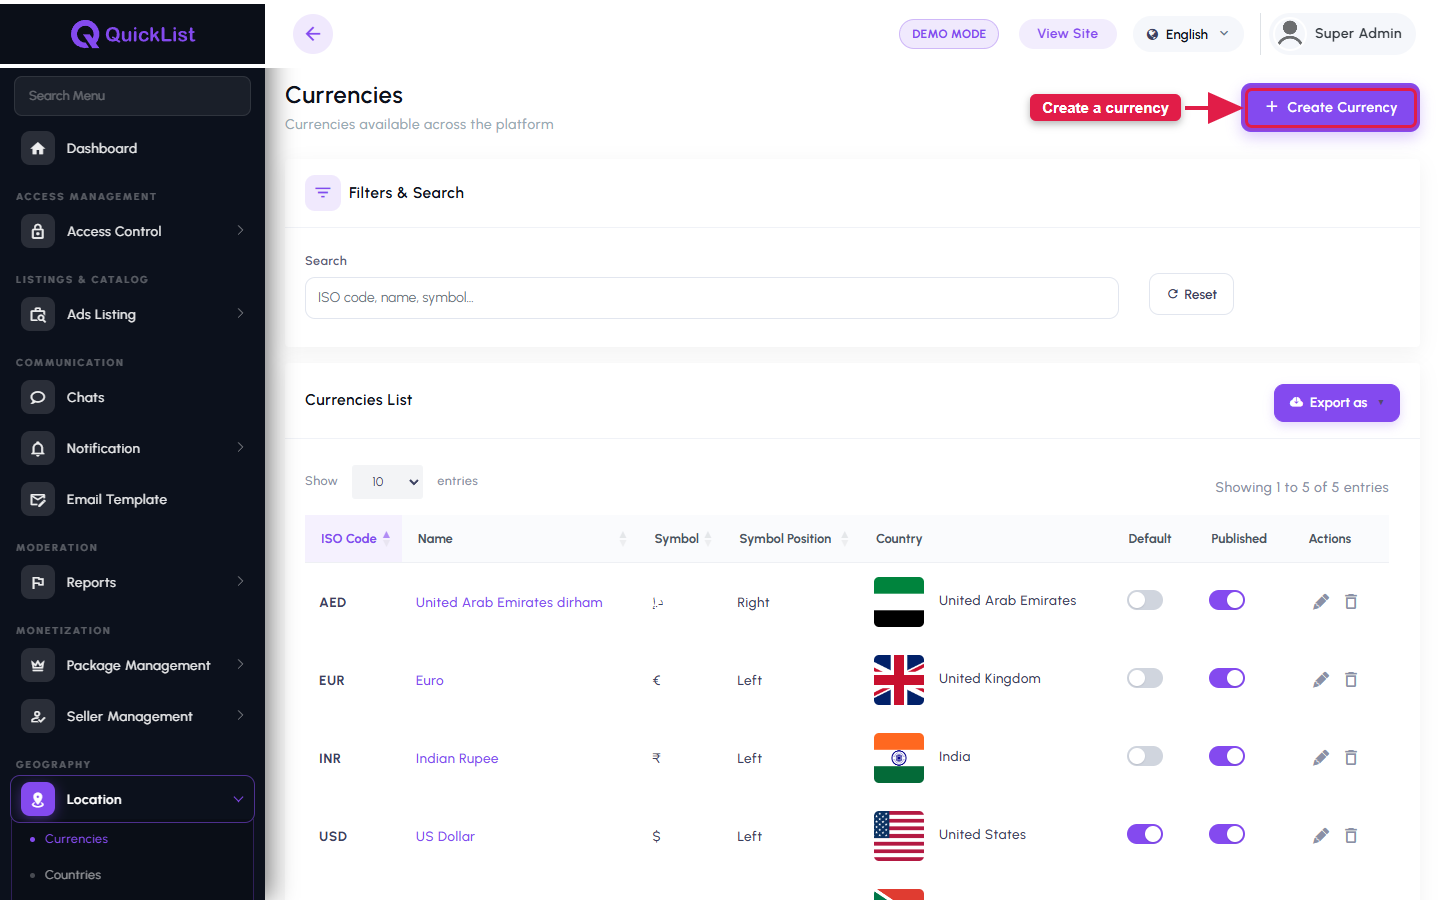
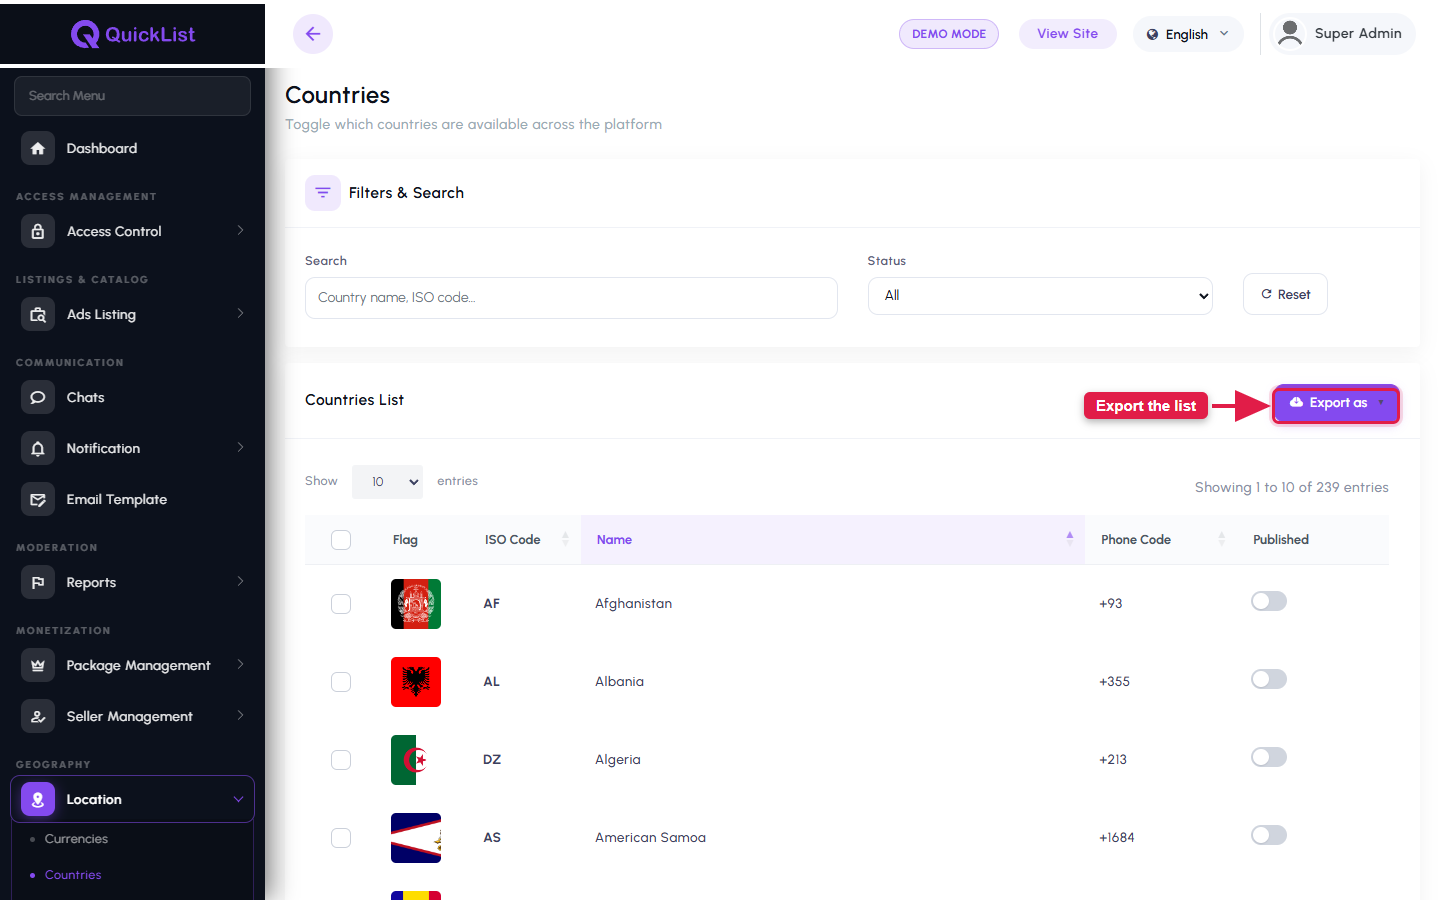
- Currencies, Countries, States, Cities, Areas — manage the location hierarchy and currencies used across the marketplace.
20.9. Content Management
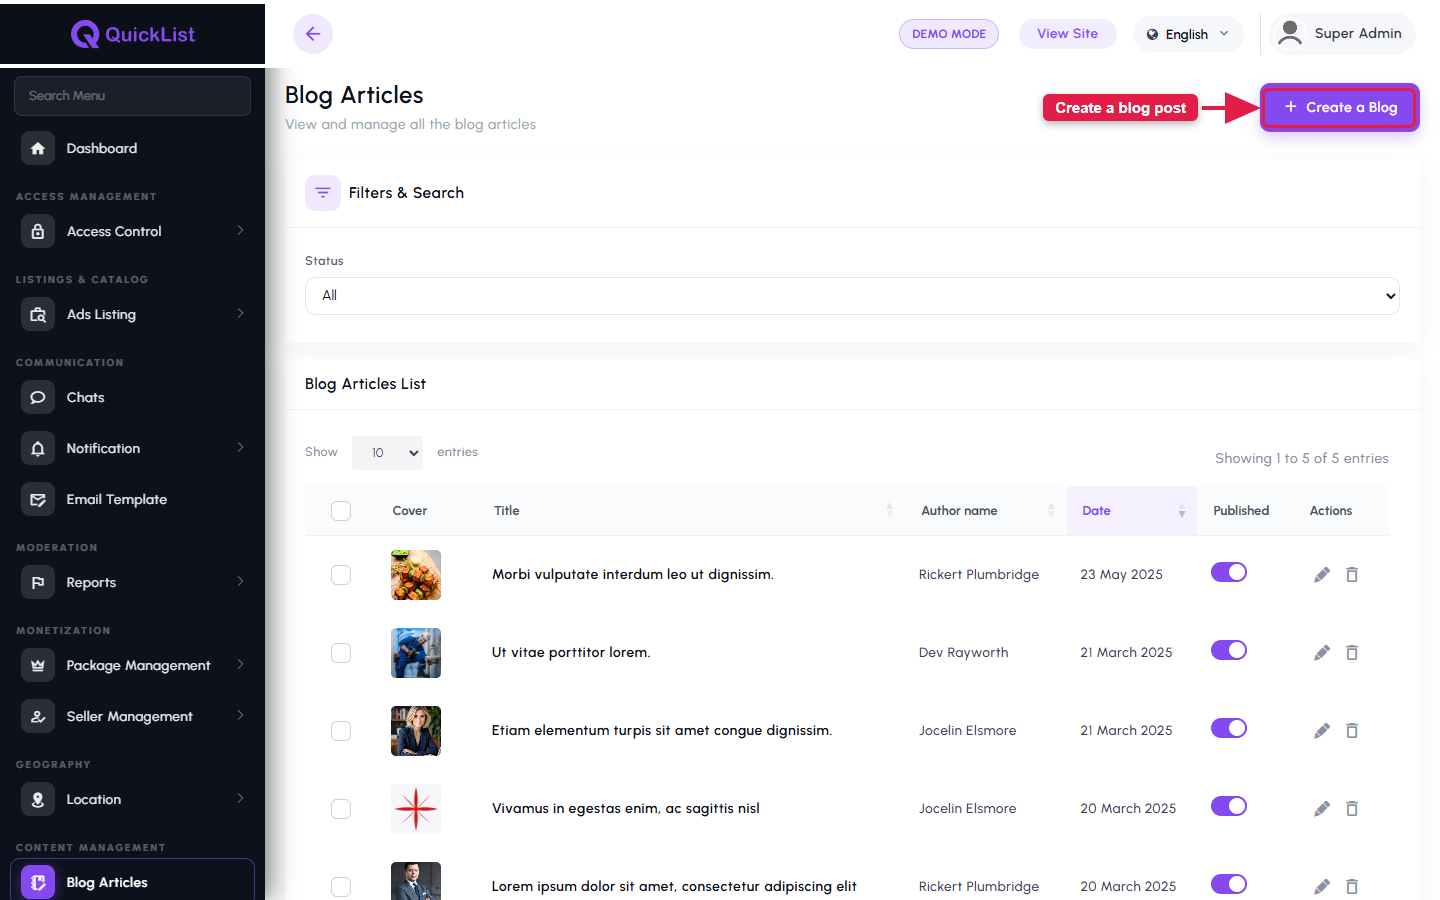
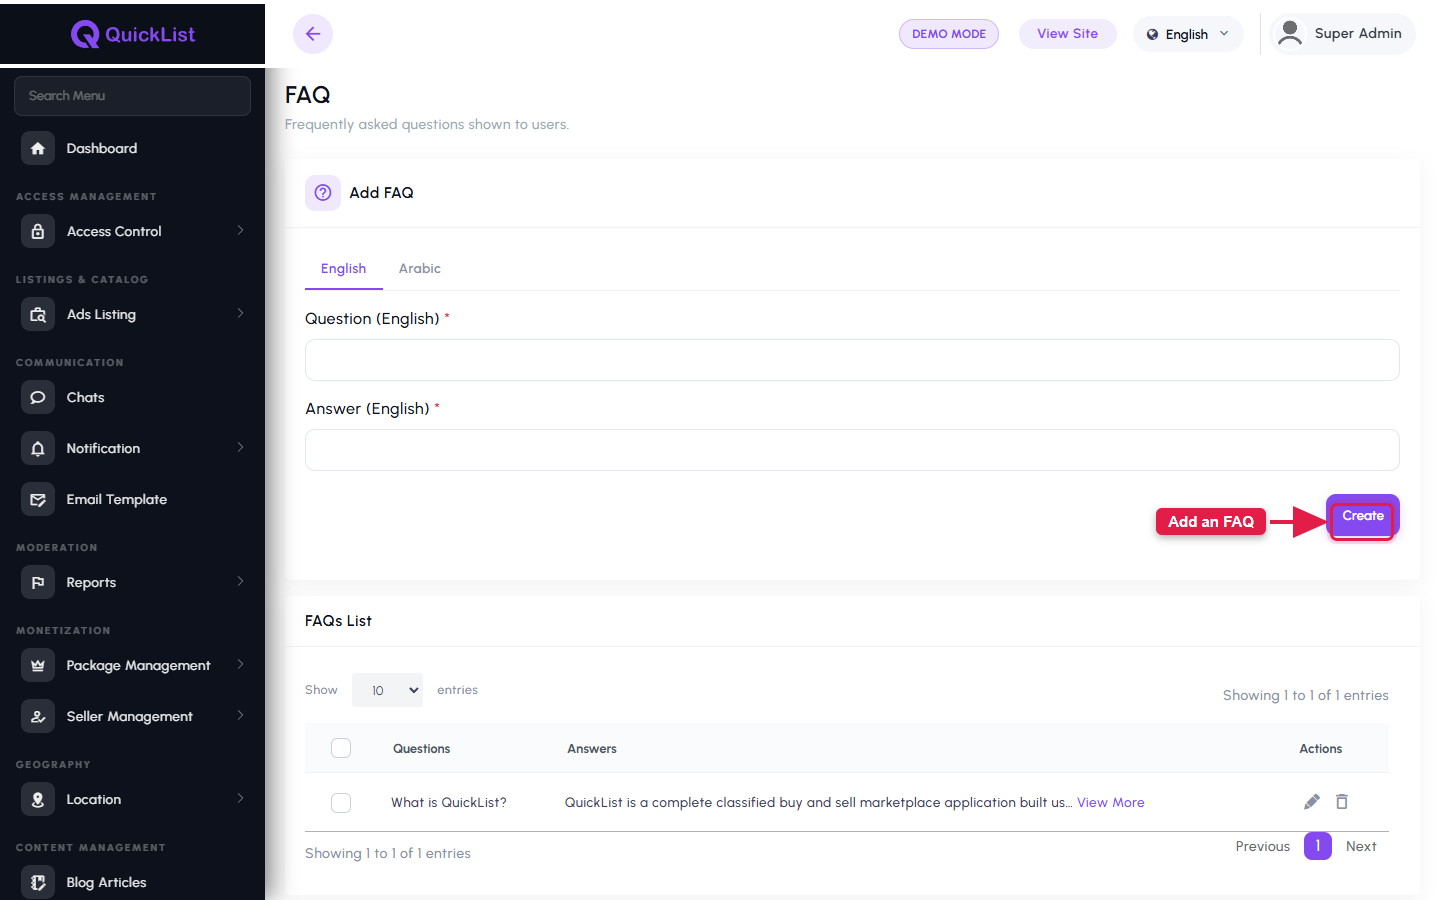
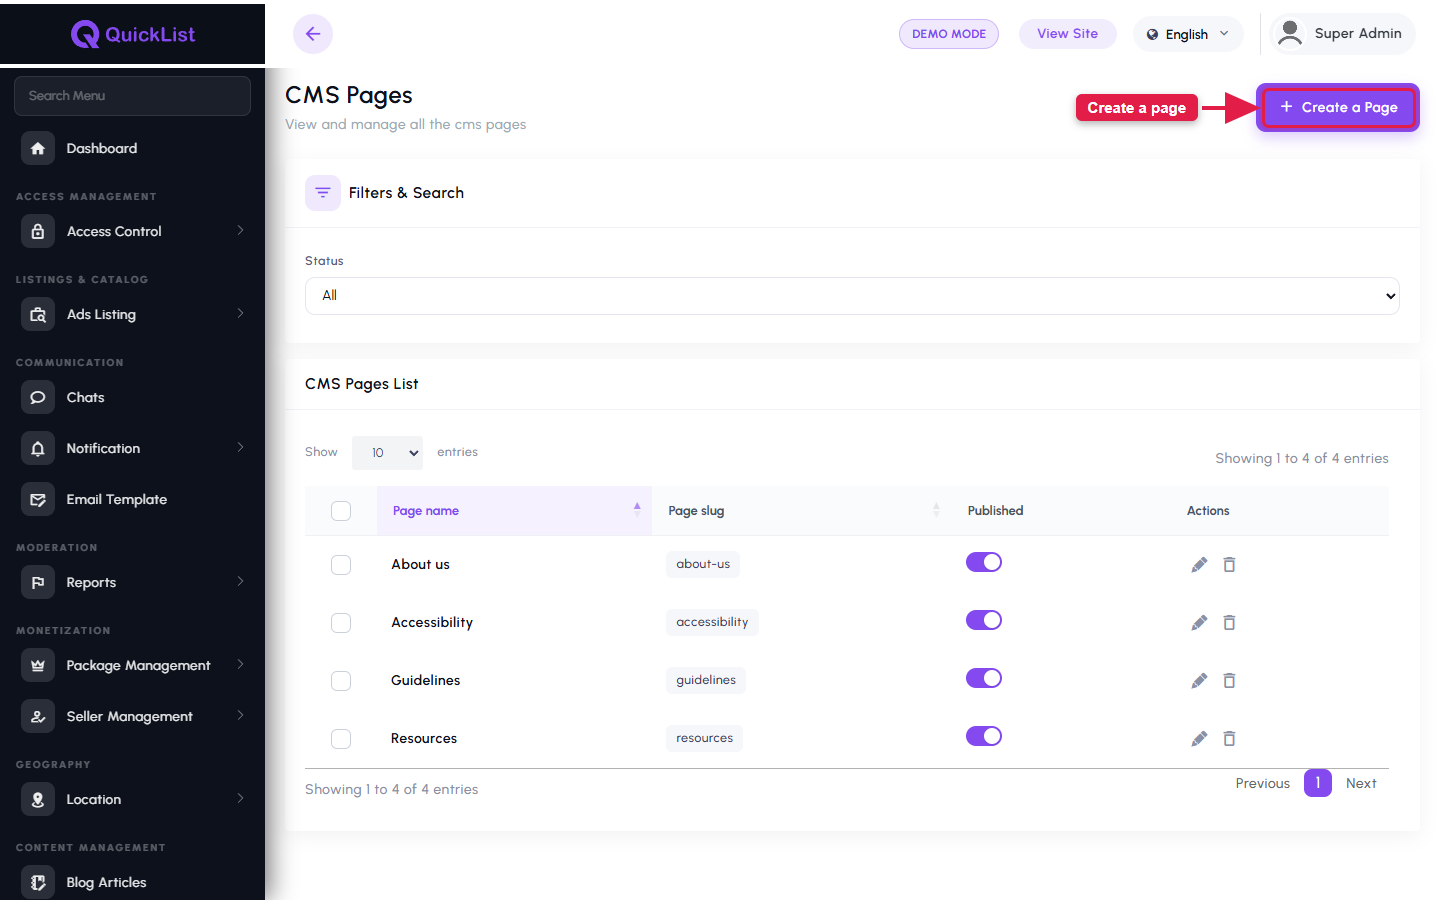
- Blogs, FAQs, CMS Pages (About, Contact, Privacy, Terms, Refund).
20.10. Settings & Configurations
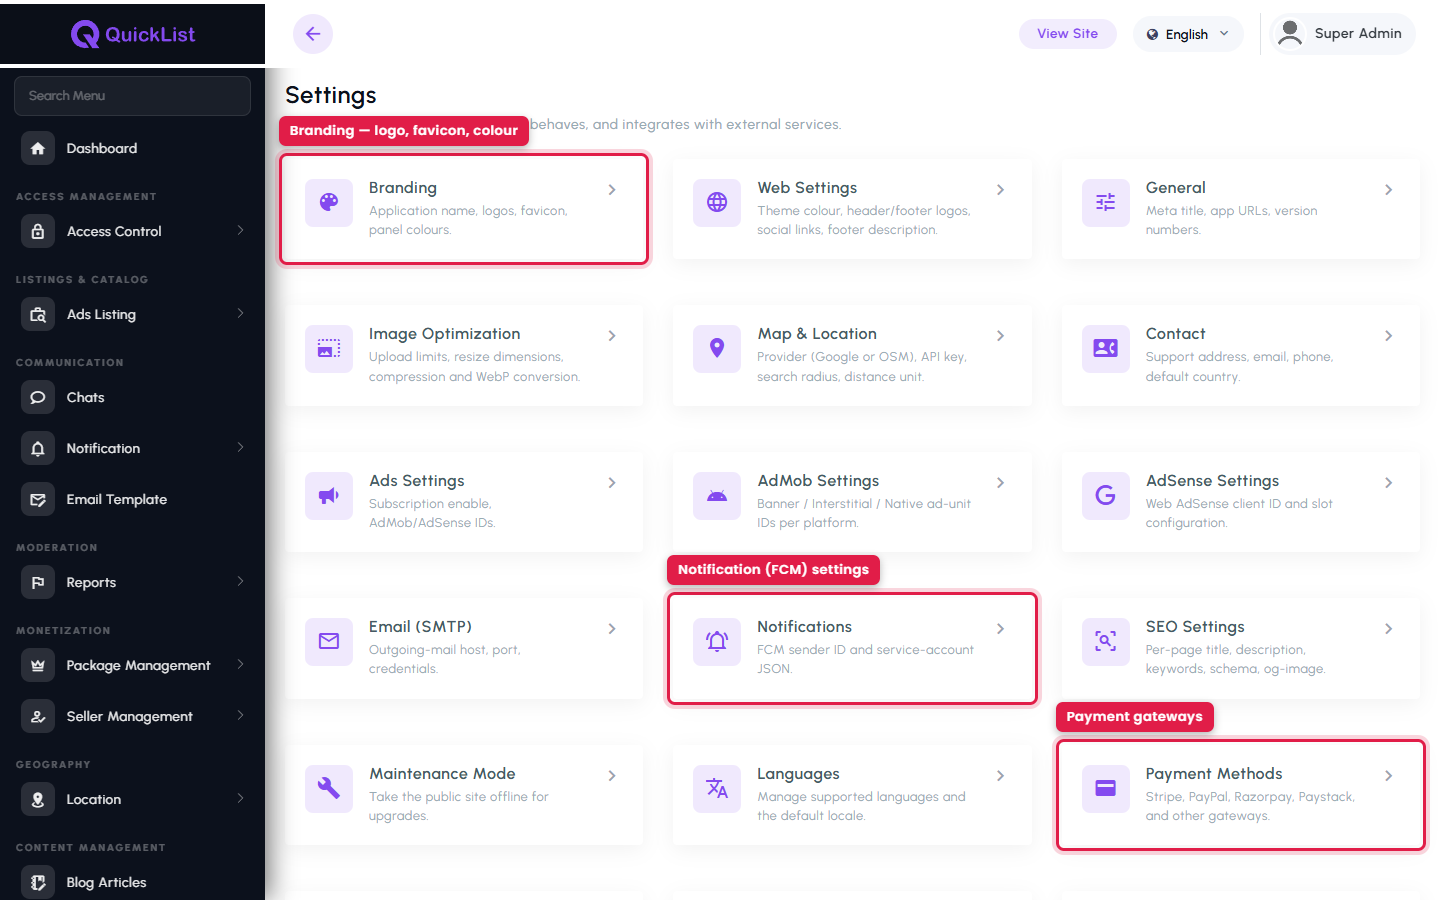
The Settings hub centralizes all configuration cards:
- Branding — app name, logo, favicon, admin panel color.
- General — default language, API Base URL, API Secure Key, and app & web versions.
- Web — theme colour, header/footer logos, social links, footer text, Web Panel URL and the Google Map iframe.
- Image, Map, Contact, Ads — image handling, map provider/key, contact details, ad posting rules.
- AdMob & AdSense — ad network configuration.
- Email / SMTP — outgoing mail configuration.
- Notifications / FCM — Firebase Sender ID and service-account upload.
- SEO — per-page SEO metadata.
- Payment — configure all payment gateways (see next section).
- Languages — manage languages and translations.
- Maintenance, Footer Template, About Us, Refund Policy, Terms & Conditions, Privacy Policy, Logs.
Setting the API base URL. Open Settings → General, set the API Base URL to your public website / API address — for example https://yourdomain.com/ — and save (this is the "Base URL of the API / website" the mobile app reads on launch). Include https:// and the trailing slash.
AdMob & AdSense — accounts, approval & costs. The AdMob (mobile app) and AdSense (website) integrations require your own Google AdMob and Google AdSense accounts, which are not included with QuickList. Google must review and approve your app and website before ads are served — approval can take time and may be declined if Google's program policies aren't met. Ad eligibility, revenue, payment thresholds and any associated charges are governed entirely by Google; QuickList does not control approval or payouts. Review the current policies at admob.google.com and adsense.google.com before enabling ads.
21. Cron & Scheduled Tasks
QuickList automatically expires advertisements that have passed their end date. This is handled by a scheduled task that must be triggered by the server's cron.
21.1. Configure the Node binary path
The scheduled command shells out to a Node.js script, so set NODE_BIN in your
.env to your Node executable path (e.g.
C:/Program Files/nodejs/node.exe on Windows, or /usr/bin/node on Linux).
21.2. Add the Laravel scheduler to cron
Add a single cron entry that runs Laravel's scheduler every minute:
* * * * * cd /path-to-your-admin-panel && php artisan schedule:run >> /dev/null 2>&1
Laravel then runs the ad:expire command hourly, which flags ads past their
expiresAt as expired and clears featured flags past featuredExpiresAt.
Note: The admin panel also ships with one-off Node utility scripts in
storage/app/firebase/ (seeding countries/states, migrations, reconciliation). These
are run manually with node and a valid credentials.json; they are not
part of the recurring cron.
22. Payment Gateway Setup
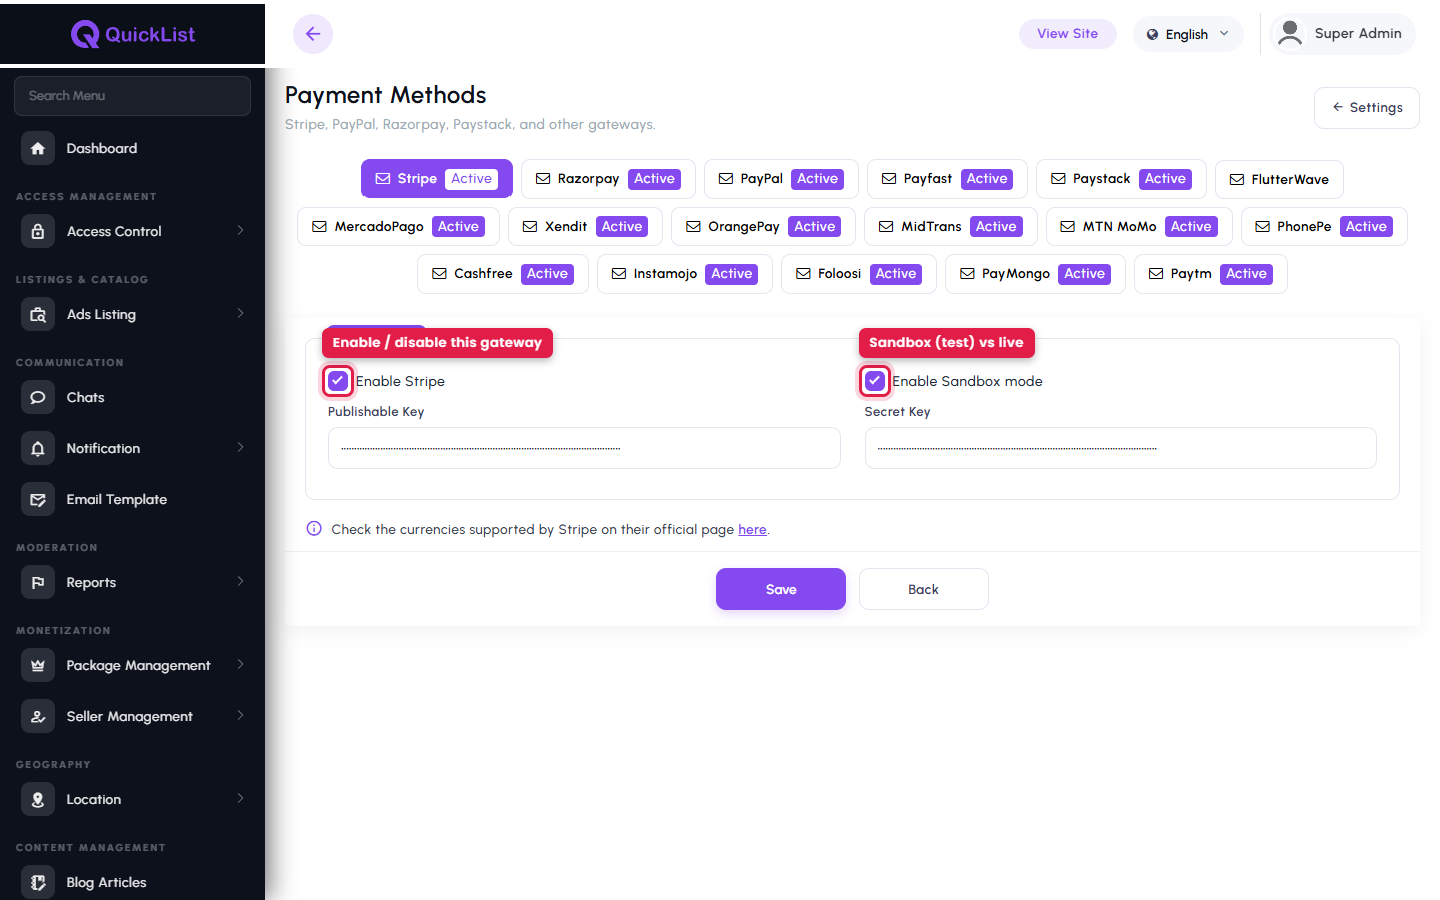
Subscription payments are processed through the gateways you enable under Settings →
Payment in the admin panel. Gateway credentials are stored securely in Firestore
(settings/payment); secret keys never leave the server. Each gateway has a sandbox/live
toggle.
QuickList integrates 17 payment gateways:
- Stripe, Razorpay, PayPal, PayFast, Paystack, Flutterwave, MercadoPago, Xendit, OrangePay, Midtrans, MTN MoMo, PhonePe, Cashfree, Instamojo, Foloosi, PayMongo, Paytm.
To enable a gateway, open its tab under Settings → Payment, enter the API keys from that provider's dashboard, choose sandbox or live mode, and save.
23. Deploy Payment Cloud Functions
The gateways that use a secret key — Stripe, Razorpay, PayPal, Flutterwave, Paystack, PayMongo, Cashfree, Instamojo, Xendit, Midtrans, Paytm, PhonePe, MercadoPago, Orange, MTN MoMo and PayFast — run their secret-key
operations (creating and verifying transactions) inside Firebase Cloud Functions, so
no secret key is ever bundled in the mobile app. The app calls these functions with only non-sensitive
data (amount, currency, reference); the functions read each gateway's secret key server-side from the
settings/payment document your admin panel manages (see
Payment Gateway Setup). Deploy the provided Firebase Cloud
Functions package:
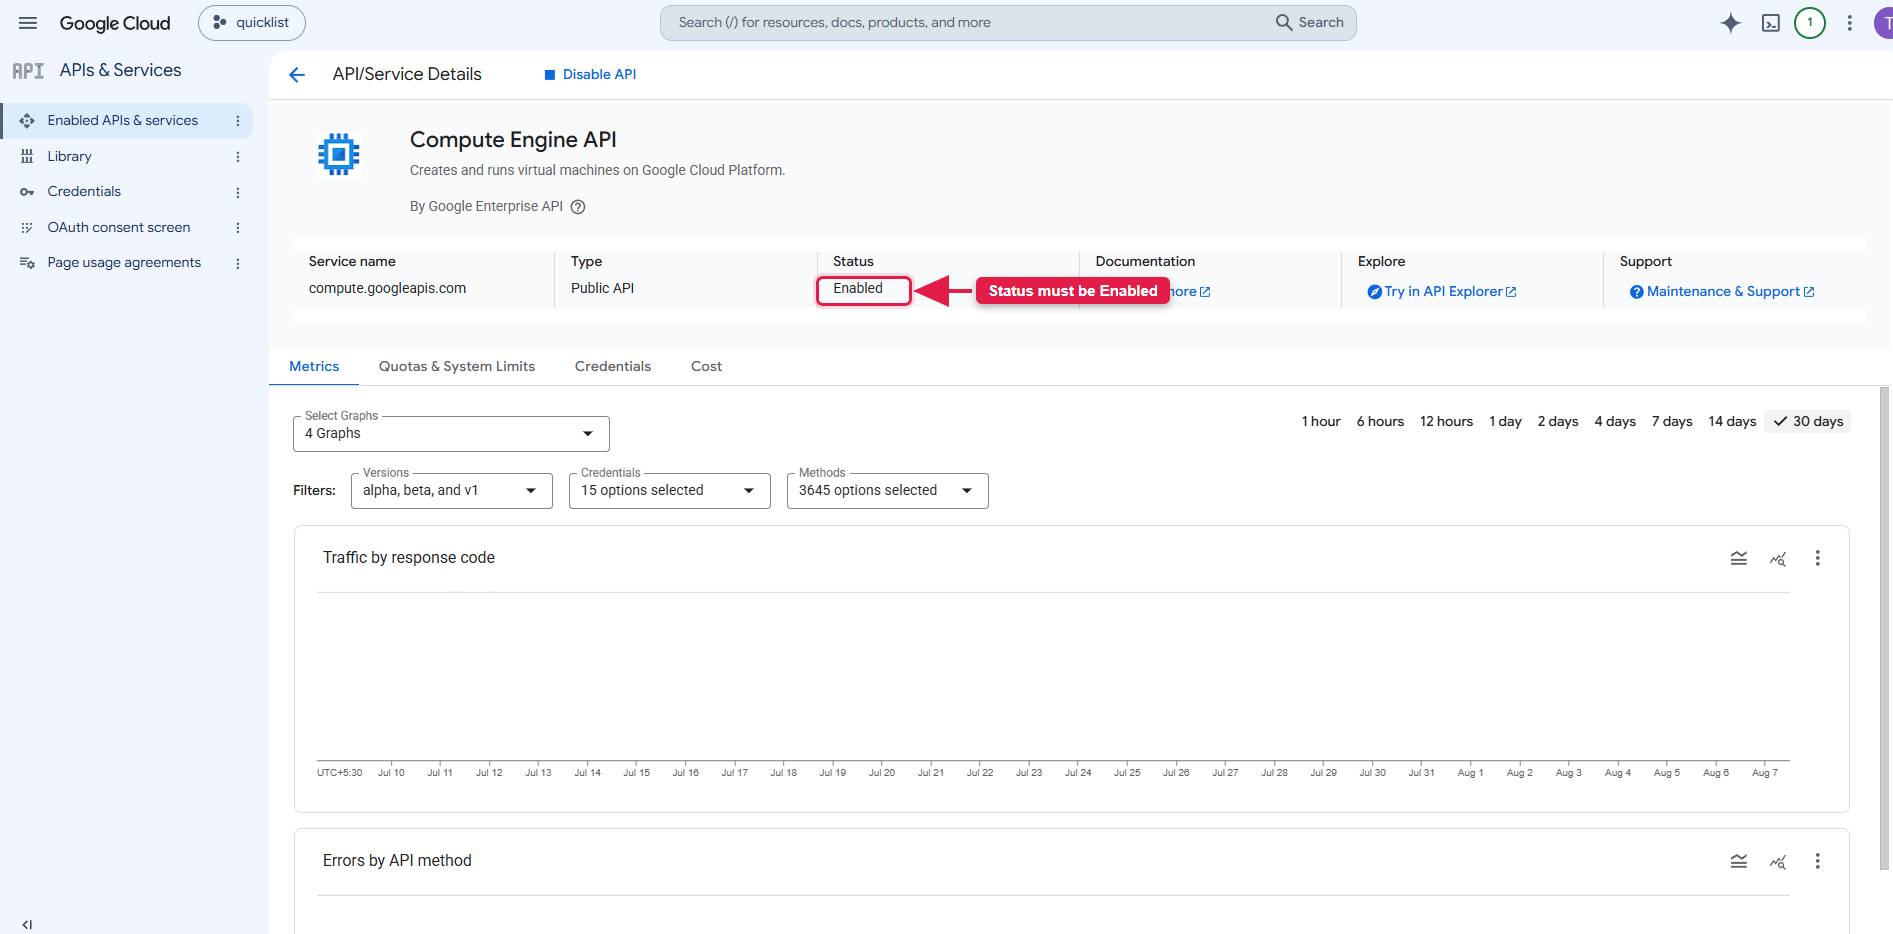
Before you deploy — enable the required Google Cloud APIs. Cloud Functions (2nd
generation) build on Cloud Build, store images in Artifact Registry,
and run on Cloud Run using your project's default compute service account. On a
new Firebase project the Compute Engine API is usually not enabled yet, so the
deploy fails for most functions with "Compute Engine API has not been used…" or
"Unknown service account" (typically only one function deploys and the rest error).
In the Google Cloud Console → APIs & Services → Enabled APIs & services,
make sure all of the following are enabled — enable any that are missing
(Compute Engine is the one most often turned off):
- Compute Engine API
- Cloud Build API
- Artifact Registry API
- Cloud Run Admin API
- Eventarc API
- Cloud Functions API
Or enable them all at once with the CLI, then wait 3–5 minutes for the change to propagate before deploying:
gcloud services enable compute.googleapis.com cloudbuild.googleapis.com \
  artifactregistry.googleapis.com run.googleapis.com eventarc.googleapis.com \
  cloudfunctions.googleapis.com --project=YOUR_PROJECT_ID
23.1. Install Node.js (if not already) and the Firebase CLI:
npm install -g firebase-tools
23.2. Unzip the provided "Firebase Cloud Functions" package and open a
PowerShell/terminal in that folder (the one containing firebase.json).
23.3. Log in to Firebase:
firebase login
23.4. Select your QuickList Firebase project:
firebase use YOUR_PROJECT_ID
23.5. Install the function dependencies:
cd functions
npm install
23.6. If your Firestore database is not the (default)
one, set its name in functions/.env so it matches the value used by the panels and app:
FIRESTORE_DB=(default)
23.7. Deploy the functions:
firebase deploy --only functions
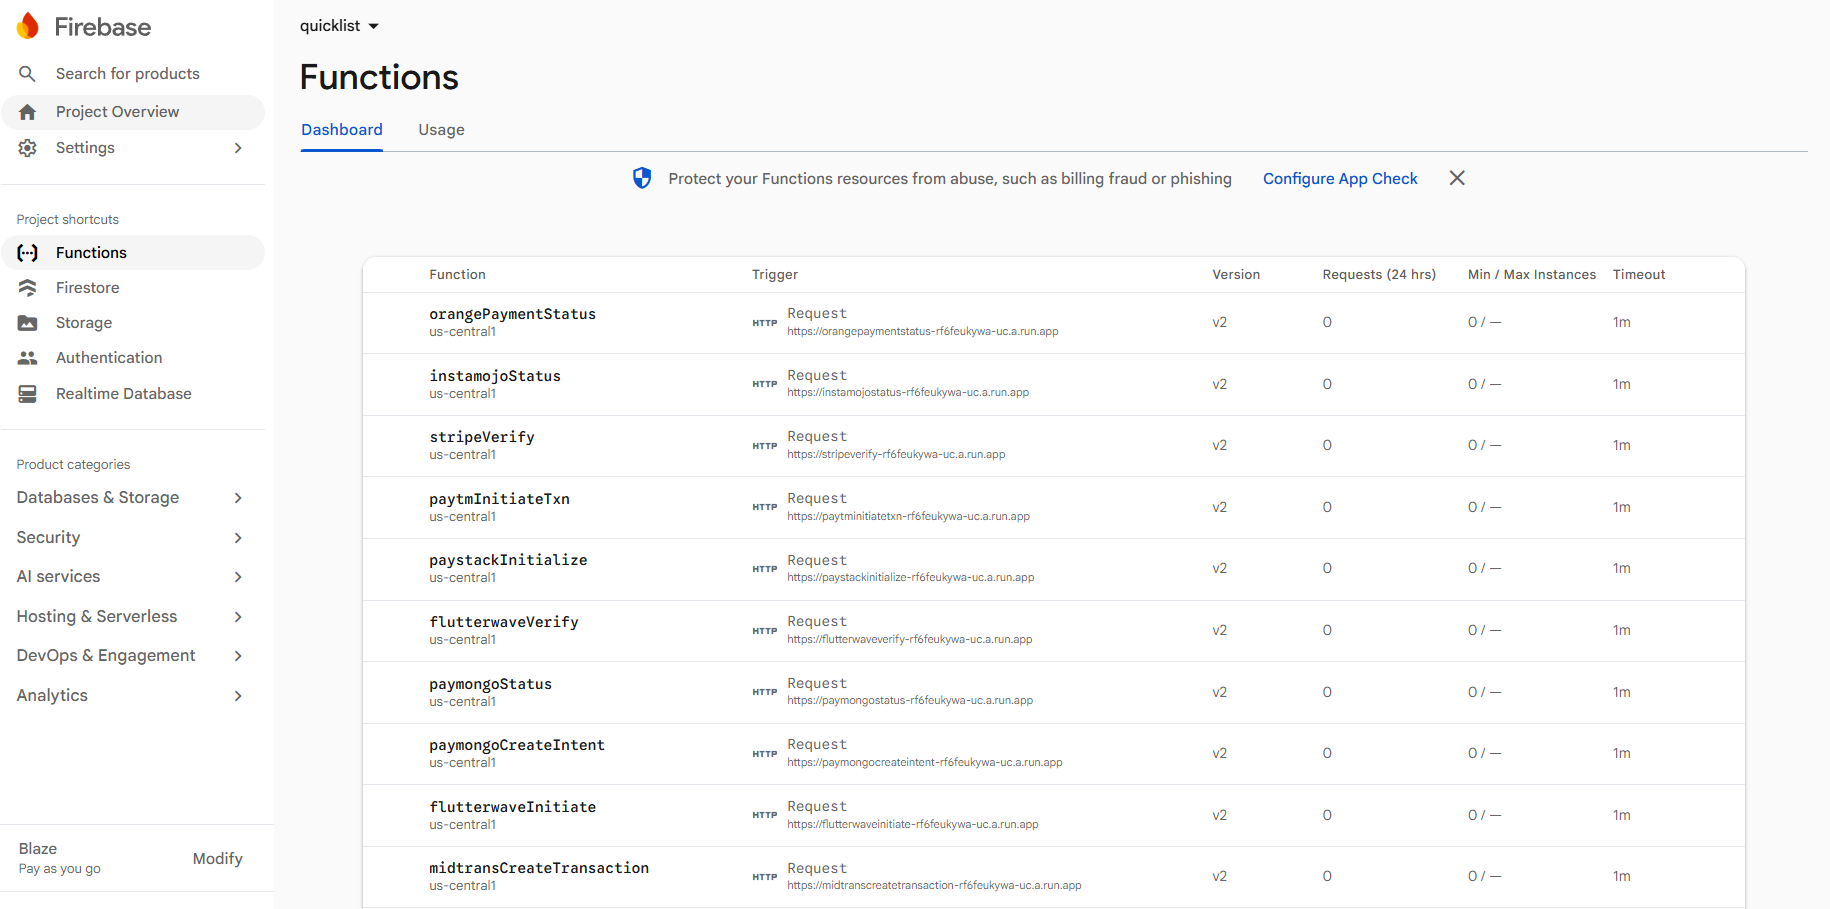
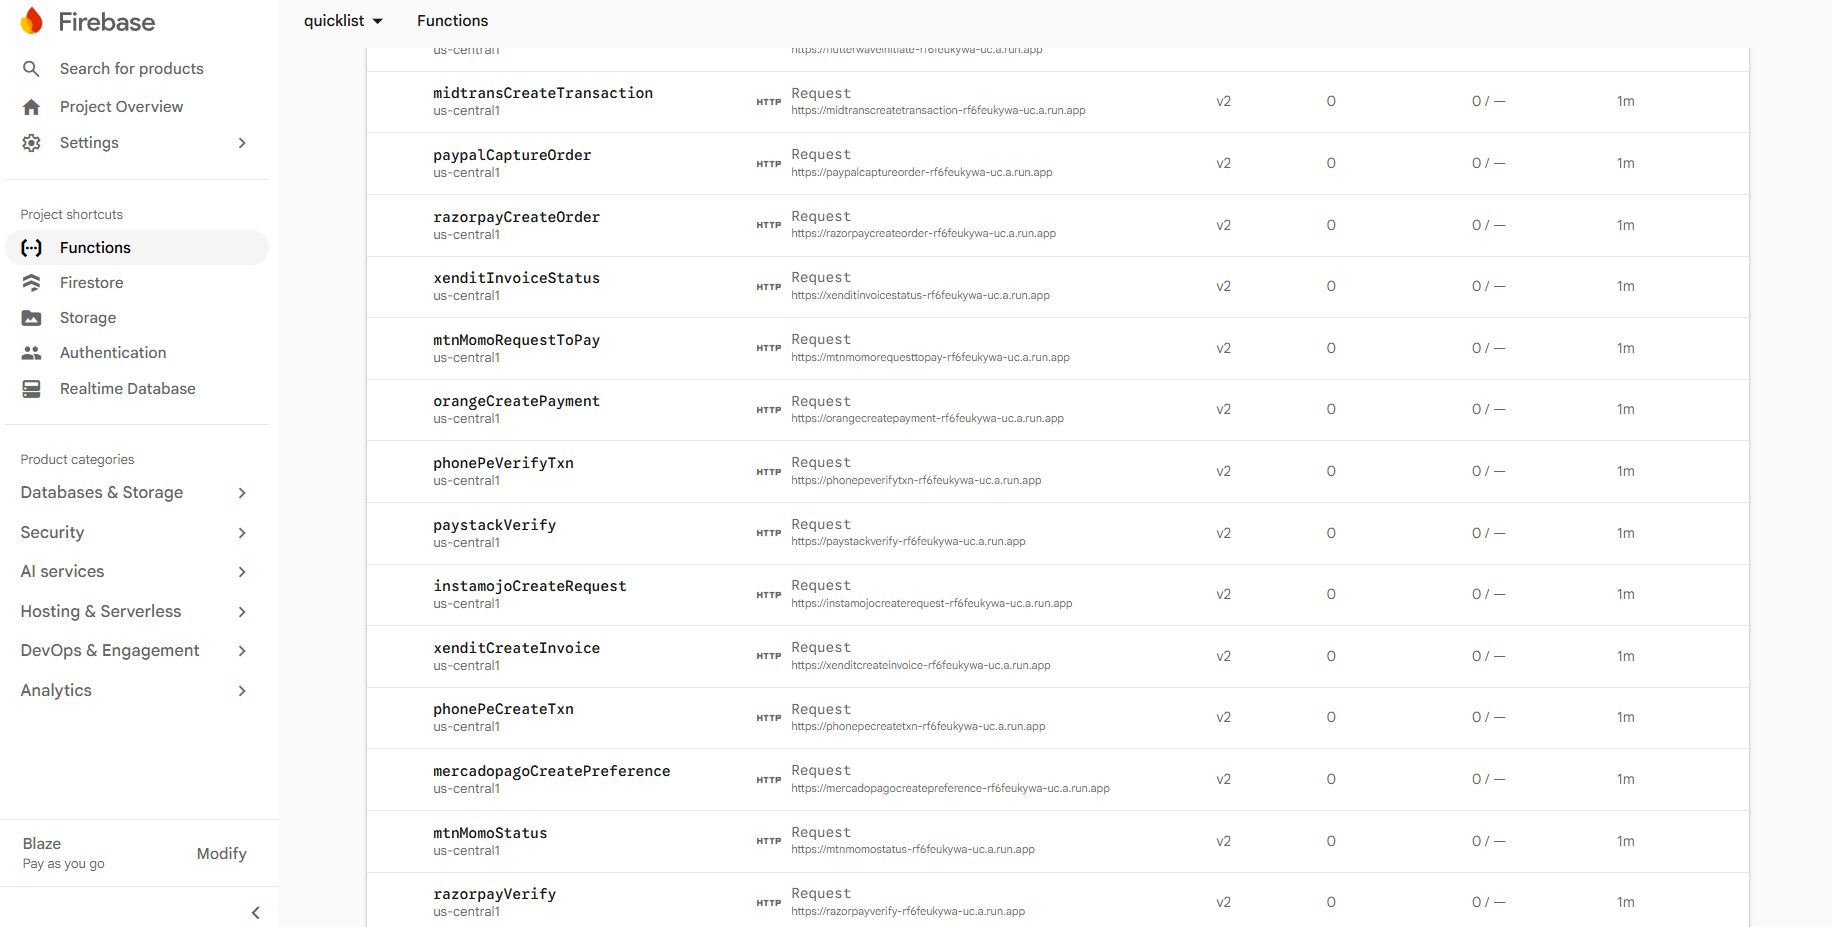
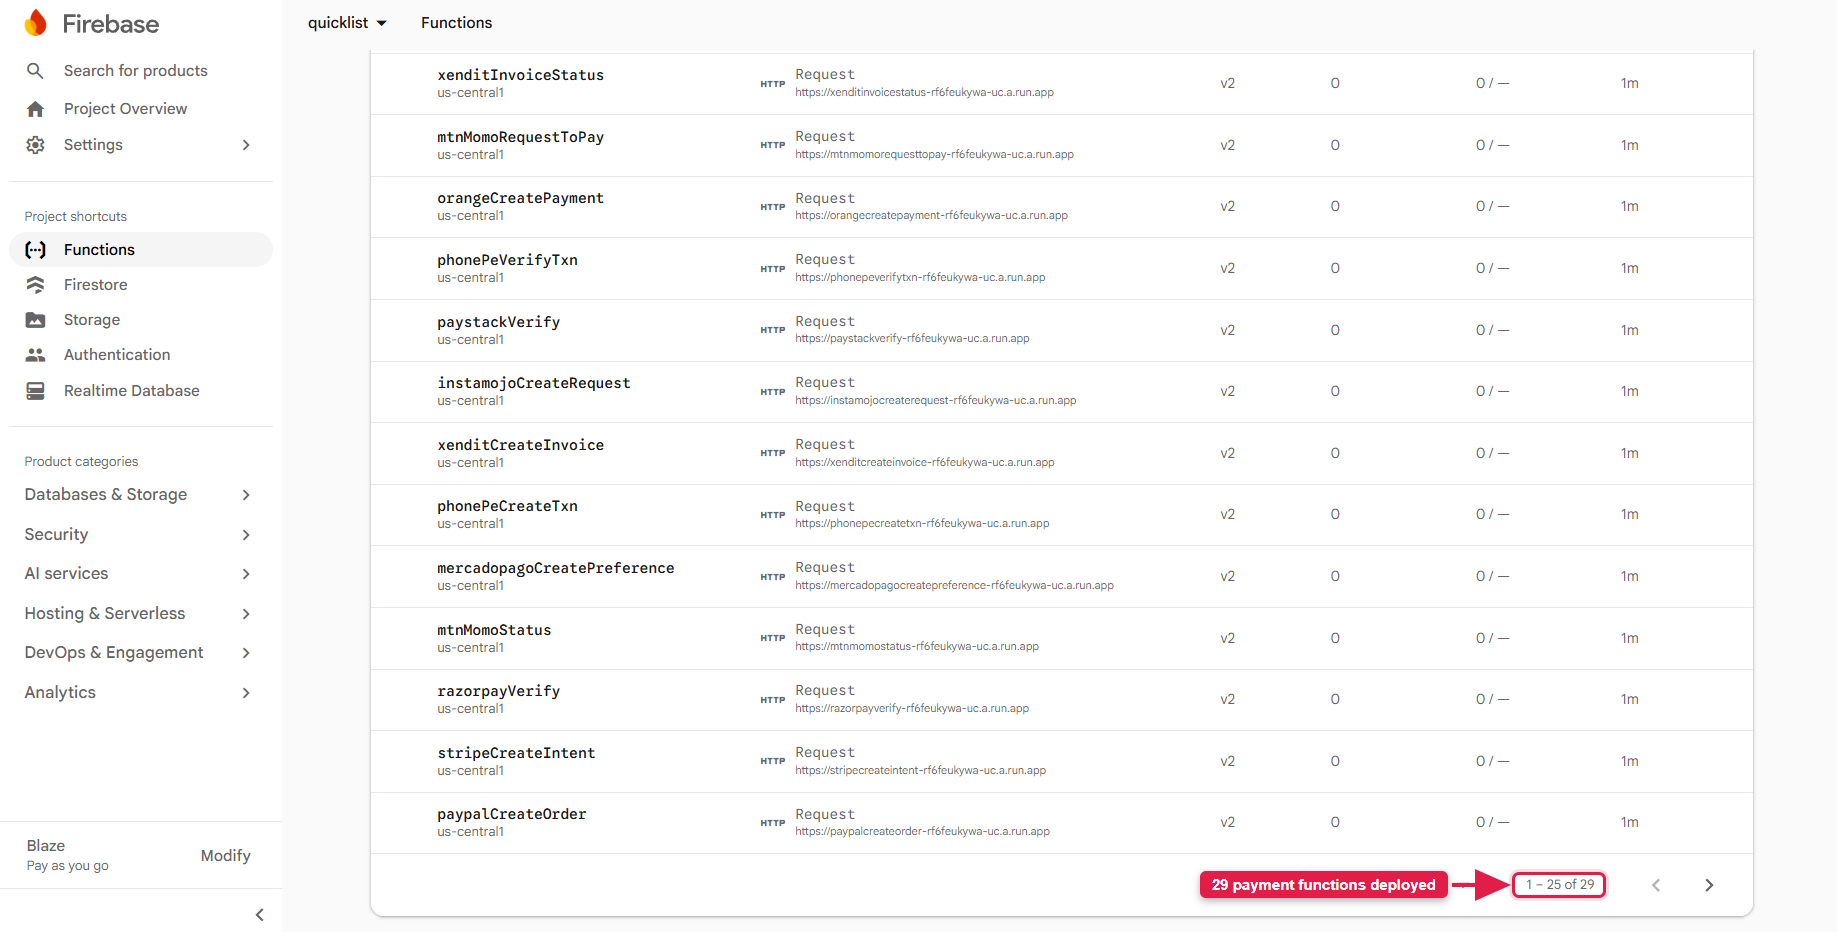
Please Note: Cloud Functions that call external payment APIs require the Firebase Blaze (pay-as-you-go) plan. Because the secret keys are read from Firestore at run time, you do not need to redeploy when an admin rotates a key under Payment Gateway Setup.
24. User Panel Setup
The User Panel is the buyer/seller-facing marketplace — a Laravel 12 + Bootstrap 5 application. It reads and writes marketplace data directly from Firestore using the Firebase JS SDK. Upload the package to your main domain (recommended) and extract it.
24.1. Install dependencies and generate the application key:
composer install
cp .env.example .env
php artisan key:generate
php artisan migrate
24.2. Add the same Firebase credentials to the User Panel's
.env that you used for the Admin Panel, including the named database value:
FIREBASE_APIKEY=
FIREBASE_AUTH_DOMAIN=
FIREBASE_DATABASE_URL=
FIREBASE_PROJECT_ID=
FIREBASE_STORAGE_BUCKET=
FIREBASE_MESSAAGING_SENDER_ID=
FIREBASE_APP_ID=
FIREBASE_MEASUREMENT_ID=
FIRESTORE_DATABASE_NAME=(default)
24.3. Place the Firebase service account file at
storage/app/firebase/credentials.json — it is used to verify the Firebase ID token and
create the Laravel session (login bridge).
Notes: Use the same Firebase project and credentials for the Admin Panel, User Panel and Mobile App so all clients share one live dataset.
Google Login
Google sign-in works out of the box once Google is enabled in Firebase Authentication. Make sure your
User Panel domain is listed under the Firebase Authentication Authorized domains, and
that the OAuth 2.0 client (in Google Cloud Console → APIs & Services → Credentials) includes your
domain under Authorized JavaScript origins and redirect URIs
(e.g. https://yourdomain.com/__/auth/handler).
24.4. The user panel is now ready. It requires no front-end build step (Bootstrap 5 is loaded via CDN). Access your site at your domain, for example http://yourdomain.com/.
25. Create Google Map API Key
QuickList uses Google Maps for ad location selection and display (with OpenStreetMap as a fallback).
25.1. Go to the Google Maps Platform and click Get Started.
25.2. Open the Google Cloud Platform home, then Billing and confirm your billing details are up to date (Google Maps will not work otherwise).
25.3. Go to APIs & Services → Credentials. Select an existing project or create a new one.
25.4. Click Create credentials → API key. Your new API key is displayed.
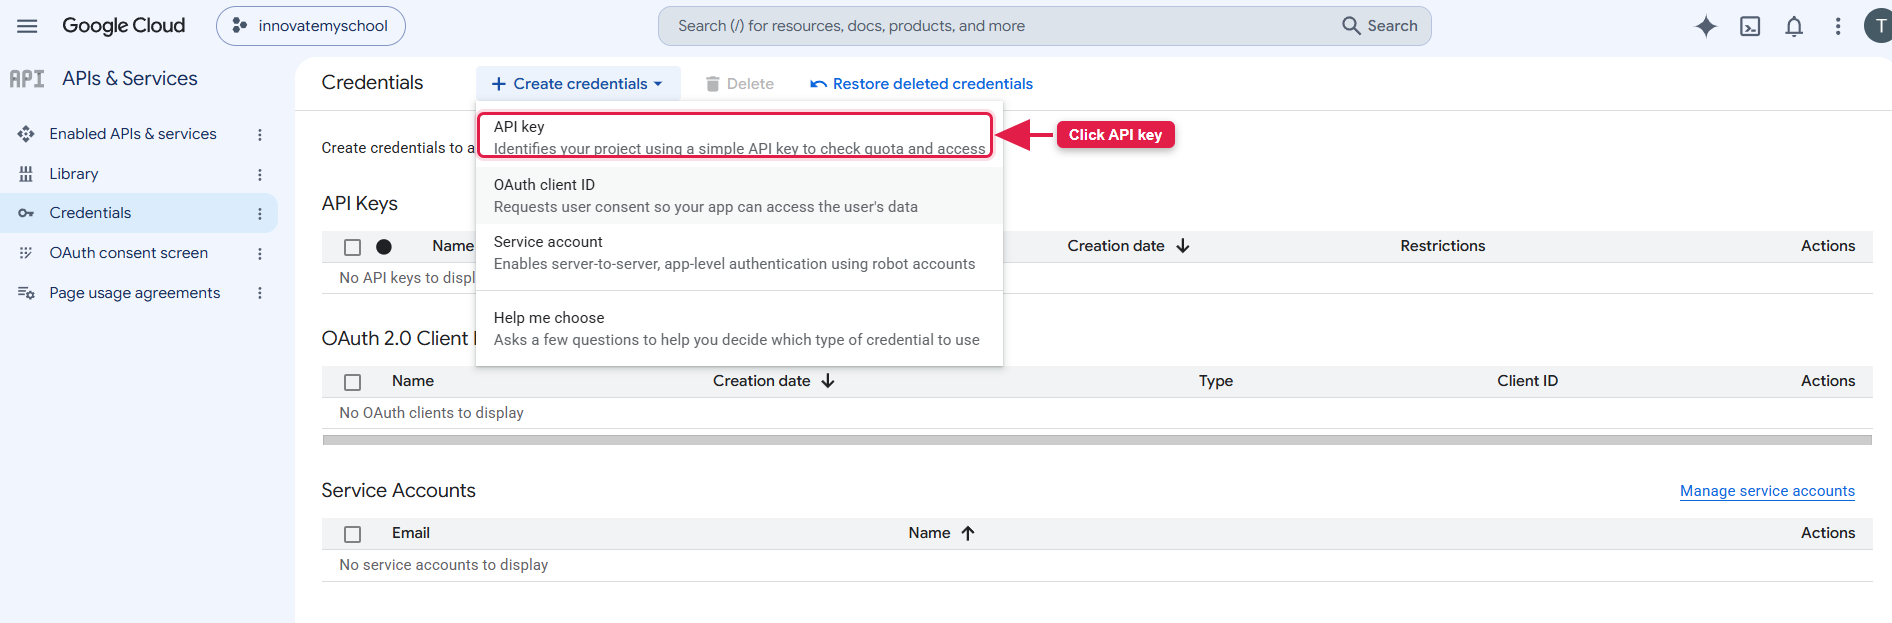
25.5. Enable the required APIs (Maps JavaScript API, Places API, Geocoding API) and restrict the key to your domains. Set this key in the admin panel under Settings → Map, and in the mobile app configuration.
26. Laravel Directory Structure
Both the Admin Panel and the User Panel follow the standard Laravel 12 layout. If you plan to customize the code, the most important folders are described below.
quicklist-admin/  (or quicklist-user/)
├── app/                Application code
│   ├── Console/        Artisan commands + scheduled tasks (e.g. ad-expiry)
│   ├── Http/
│   │   ├── Controllers/  Request handlers (thin — data is read via Firebase)
│   │   └── Middleware/    Auth & permission gates
│   ├── Models/         Eloquent models (admin auth: User, Role, Permission)
│   ├── Providers/      Service providers (incl. Firebase service)
│   └── Services/       Firebase / Firestore helper services
├── bootstrap/          Framework bootstrap + cache
├── config/             Configuration files (app, database, firebase, …)
├── database/
│   ├── migrations/     MySQL schema (admin auth, sessions, cache, jobs)
│   └── seeders/        Default admin user & base data
├── public/             Web root — index.php, css/, js/, images/
├── resources/
│   ├── views/          Blade templates (pages, layouts, partials)
│   └── lang/           Translations (e.g. en.json, ar.json)
├── routes/
│   └── web.php         All web routes
├── storage/
│   └── app/firebase/   credentials.json (Firebase service account)
├── vendor/             Composer dependencies (generated — not edited)
├── .env                Environment config (DB + Firebase credentials)
├── artisan             Laravel command-line entry point
└── composer.json       PHP dependencies
Note: vendor/ and node_modules/ are generated by
composer install / npm install and should not be edited by hand. Your
configuration lives in .env; your Firebase service account lives in
storage/app/firebase/credentials.json.
27. API & Integration Points
This section maps the external services QuickList integrates with and where each is configured, so developers can extend or replace them. All three clients — the Flutter app, the Admin Panel and the User Panel — talk to the same Google Firebase backend.
27.1. Architecture at a Glance
- Flutter app → Firebase directly (Firestore, Auth, Storage, FCM) via the Firebase SDK.
- Admin Panel (Laravel) → Firebase via
kreait/laravel-firebaseusing a service-account key; MySQL only for Laravel infrastructure. - User Panel (Laravel + JavaScript) → Firestore via the Firebase Web SDK.
27.2. Firebase Firestore (primary data store)
Application data lives in Firestore collections. The main ones are:
advertisements         categories             custom_fields
users                  seller_verifications   chat
subscription_packages  user_subscriptions     currencies / countries / cities
languages              faqs / safety_tips     report_reasons / user_reports
blogs                  slider_sections        feature_sections / notifications
To extend the platform, add fields or new collections in Firestore, then read/write them from the app
and — via kreait/laravel-firebase — from the Admin Panel.
27.3. Firebase Authentication
User identity (phone / email / social sign-in) is handled by Firebase Authentication and shared across all clients. The Admin Panel verifies Firebase ID tokens server-side.
27.4. Firebase Storage
Uploaded media — ad images, avatars and verification documents — is stored in Firebase Storage under
the bucket set by FIREBASE_STORAGE_BUCKET.
27.5. Cloud Messaging (FCM — push notifications)
Push notifications use Firebase Cloud Messaging. Set the Sender ID and upload the service-account JSON in Admin → Settings → Notifications; the panel then sends messages through the FCM API.
27.6. Payment Gateways
QuickList ships 17 payment gateways, each with its own settings screen under Admin → Settings → Payment:
Stripe    PayPal    Razorpay   Paystack     Flutterwave  Paytm    PhonePe
Cashfree  Instamojo Midtrans   MercadoPago  PayFast      PayMongo Foloosi
Xendit    OrangePay MTN MoMo
Each gateway keeps its own credentials (API key / secret) and a sandbox toggle. To add a new gateway,
mirror an existing one: its settings view in resources/views/settings/payment/, its
controller action, and the checkout handler.
27.7. Google Maps
Location picking, geocoding and map display use the Google Maps API key — see Create Google Map API Key.
27.8. Email (SMTP)
Transactional email is sent through standard Laravel mail — set the MAIL_* values in the
panel's .env.
27.9. Where Each Integration Is Configured
.env— Firebase web config (FIREBASE_*) and mail (MAIL_*).storage/app/firebase/credentials.json— Firebase service-account key (server-side).- Admin → Settings — FCM, payment gateways, Google Maps and branding.
storage/app/firebase/— Node.js utility scripts for Firestore import/export and indexing (see Installing Node.js & npm).
27.10. Extending QuickList (Developer Guide)
QuickList is intentionally modular. The most common ways to extend it:
Add a field or a new collection. All application data lives in Firestore (see
26.2). Create the field/collection in Firestore, read and write it from
the Flutter app, and — where the admin needs to manage it — add a controller and Blade view in the
Admin Panel (see Laravel Directory Structure) that read/write it via
kreait/laravel-firebase. Add a matching rule to firestore.rules and redeploy
(see the Firebase Rules package).
Add an admin page. Create a route in routes/web.php, a controller in
app/Http/Controllers/, a Blade view under resources/views/, and a sidebar
entry in resources/views/layouts/menu.blade.php guarded by the module's permission
(defined in PermissionsTableSeeder.php).
Add a payment gateway. Secret-key operations run server-side in Cloud Functions, never on the client. To add a gateway:
- Add an
onCallfunction in the Cloud Functionsindex.jsthat reads the gateway's secret fromsettings/paymentand calls the provider's server API. - Add its settings tab under
resources/views/settings/payment/in the admin panel so the keys can be entered. - Call the new function from the app with only non-sensitive data (amount, currency, reference), and handle the returned token/redirect URL. Never place a secret key in the client.
Cloud Functions shape. Each function is an authenticated
firebase-functions/v2/https onCall handler that (1) validates the caller,
(2) reads config from Firestore server-side, (3) calls the provider, and (4) returns only public
tokens / URLs. Follow the same pattern for any new server-side operation.
28. Deploying the Web Panels (Shared Hosting vs VPS)
Both panels are Laravel applications and can run on shared hosting (cPanel) or on a VPS/dedicated server. Choose the approach that matches your hosting.
28.1. Shared Hosting (cPanel)
Best for getting started quickly when you do not have SSH/root access.
- Create a MySQL database and user (see Admin Panel Setup).
- Upload the panel's ZIP to your domain/subdomain folder and extract it. Point the domain's document
root to the panel's
public/directory (or use the provided.htaccess). - Because shared hosting usually has no Composer, upload the project with its
vendor/folder already installed locally (runcomposer installon your machine first), then upload. - Configure the
.envfile (database + Firebase credentials) and placecredentials.jsoninstorage/app/firebase/. - Set writable permissions (typically
755) on thestorage/andbootstrap/cache/folders. - Set up the database by running the migrations and seeder —
php artisan migrate --seed— via cPanel's Terminal or SSH. If your plan has no shell access, run the migrations from your local machine against the remote database. - For the ad-expiry job, add the Laravel scheduler as a cron entry in cPanel (Cron Jobs) — see Cron & Scheduled Tasks.
Note: Ensure your host runs PHP 8.2+ with the required extensions,
and that mod_rewrite is enabled. Node.js may not be available on basic shared plans; if
the cron scripts require it, choose a plan that offers Node.js or use a VPS.
28.2. VPS / Dedicated Server
Recommended for production — you get SSH access, Composer, Node.js and full control.
- Install the stack: PHP 8.2+, Composer, MySQL/MariaDB, Node.js, and a web server (Nginx or Apache).
- Clone/upload the project, then run
composer install(andnpm installfor the admin panel). - Copy
.env.exampleto.env, set your database and Firebase credentials, and runphp artisan key:generatethenphp artisan migrate --seed. - Point the web server's document root to the project's
public/directory. - Set ownership/permissions so the web server can write to
storage/andbootstrap/cache/. - Add the Laravel scheduler to the system crontab
(
* * * * * php /path/artisan schedule:run) — see Cron & Scheduled Tasks. - For production, run
php artisan config:cacheandroute:cache, and serve over HTTPS.
28.3. Common Deployment Pitfalls (.htaccess & Shared Hosting)
Most shared-hosting problems come down to Apache rewrite / config issues. Watch for these:
- Only the home page works; every other route returns 404.
mod_rewriteis disabled orAllowOverrideis notAll, so Laravel'spublic/.htaccessis ignored. Enablemod_rewriteand setAllowOverride Allfor the site. - App installed in a sub-folder. Add a
RewriteBasetopublic/.htaccess, e.g.RewriteBase /quicklist/. - Document root points at the project root instead of
public/. Point the domain to thepublic/folder, or add a root.htaccessthat rewrites requests intopublic/. Never serve the project root — it makes.envreachable. - 404 on uploaded images / assets. Ensure the storage symlink exists — run
php artisan storage:link(or create thepublic/storagelink manually if symlinks are blocked on the host). - 500 error after upload. Usually permissions — set
755onstorage/andbootstrap/cache/, and confirm PHP is 8.2+. - "No input file specified". A PHP handler / CGI mismatch on some cPanel hosts — add
the host's recommended PHP handler line (or
Options -MultiViews) to.htaccess. - Mixed-content warnings over HTTPS. Set
APP_URLto yourhttps://domain and force HTTPS in.htaccess.
28.4. SSL / HTTPS Configuration (production)
Always serve both panels over HTTPS in production. Firebase Authentication, payment gateway callbacks and secure cookies all require it, and browsers block "mixed content" on pages that are not fully secure.
Shared hosting (cPanel). Most hosts issue a free certificate automatically. Open
cPanel → Security → SSL/TLS Status (or Let's Encrypt / AutoSSL),
select your domain, and click Run AutoSSL. Once issued, the site is reachable over
https://.
VPS / dedicated server. Install a free Let's Encrypt certificate with Certbot:
# Nginx
sudo apt install certbot python3-certbot-nginx
sudo certbot --nginx -d yourdomain.com -d www.yourdomain.com

# Apache
sudo apt install certbot python3-certbot-apache
sudo certbot --apache -d yourdomain.com
Certbot installs the certificate and adds an automatic renewal timer.
Force HTTPS. Redirect all traffic to https://. On Apache, add this at the
top of the panel's public/.htaccess, just inside <IfModule mod_rewrite.c>
before Laravel's front-controller rules:
RewriteEngine On
RewriteCond %{HTTPS} off
RewriteRule ^ https://%{HTTP_HOST}%{REQUEST_URI} [L,R=301]
Then finish up:
- Set
APP_URL=https://yourdomain.comin each panel's.env. - In the Firebase console → Authentication → Settings → Authorized domains, add your
httpsdomain so sign-in works. - Re-cache the config:
php artisan config:cache.
29. How QuickList Works
Using the Marketplace
1. Sign Up / Log In
- Users register or log in via email & password, phone number (OTP), or Google.
- New social/phone users complete a short profile (name, email, gender, phone).
- On successful Firebase sign-in, the browser sends the Firebase ID token to the server, which verifies it and creates the logged-in session.
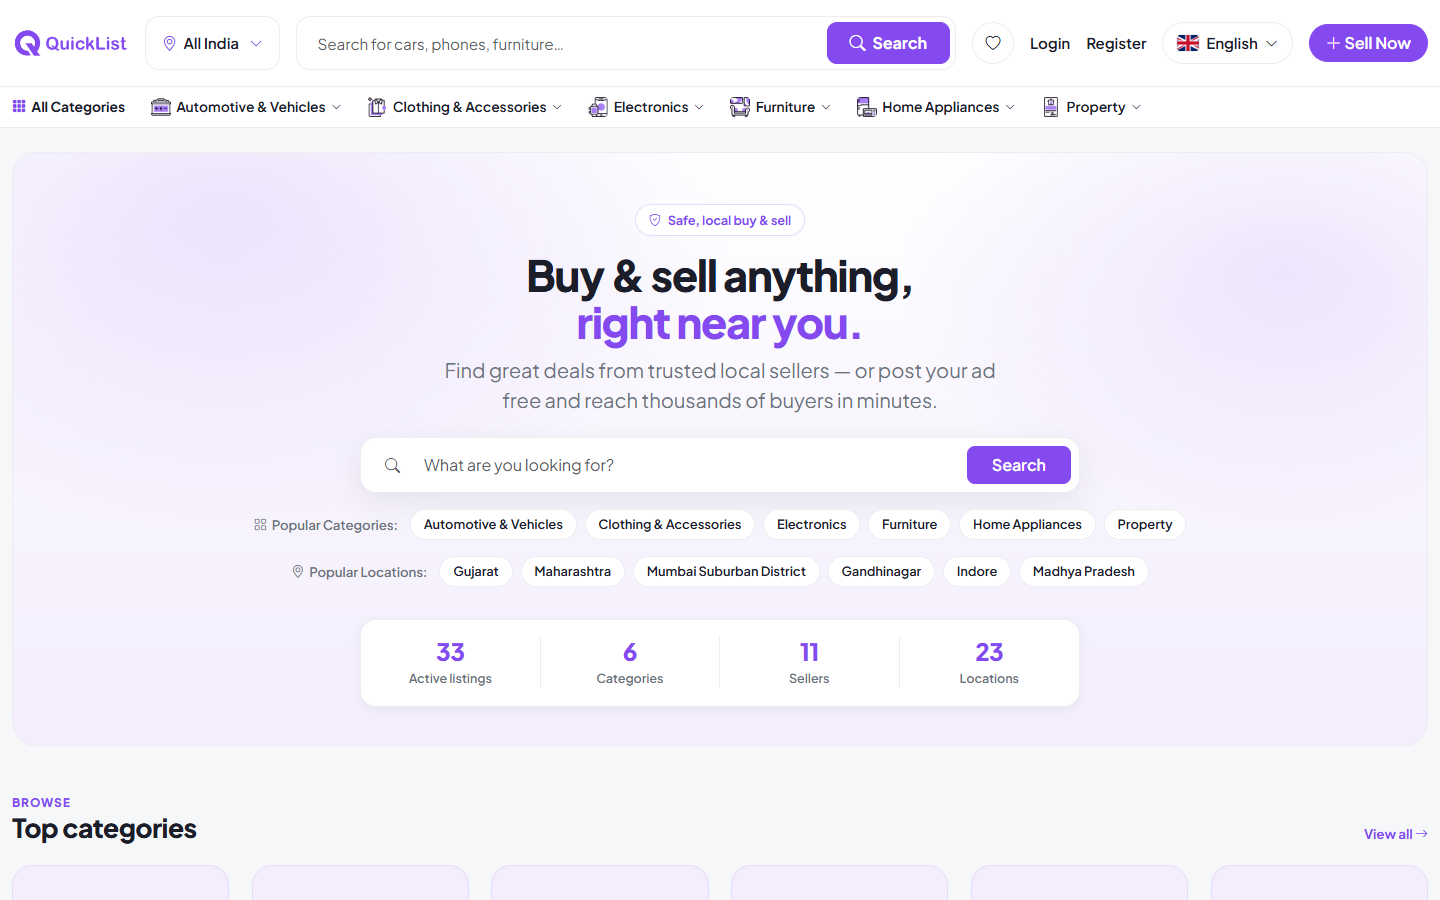
2. Browse & Search
- The home page shows sliders and feature sections configured by the admin.
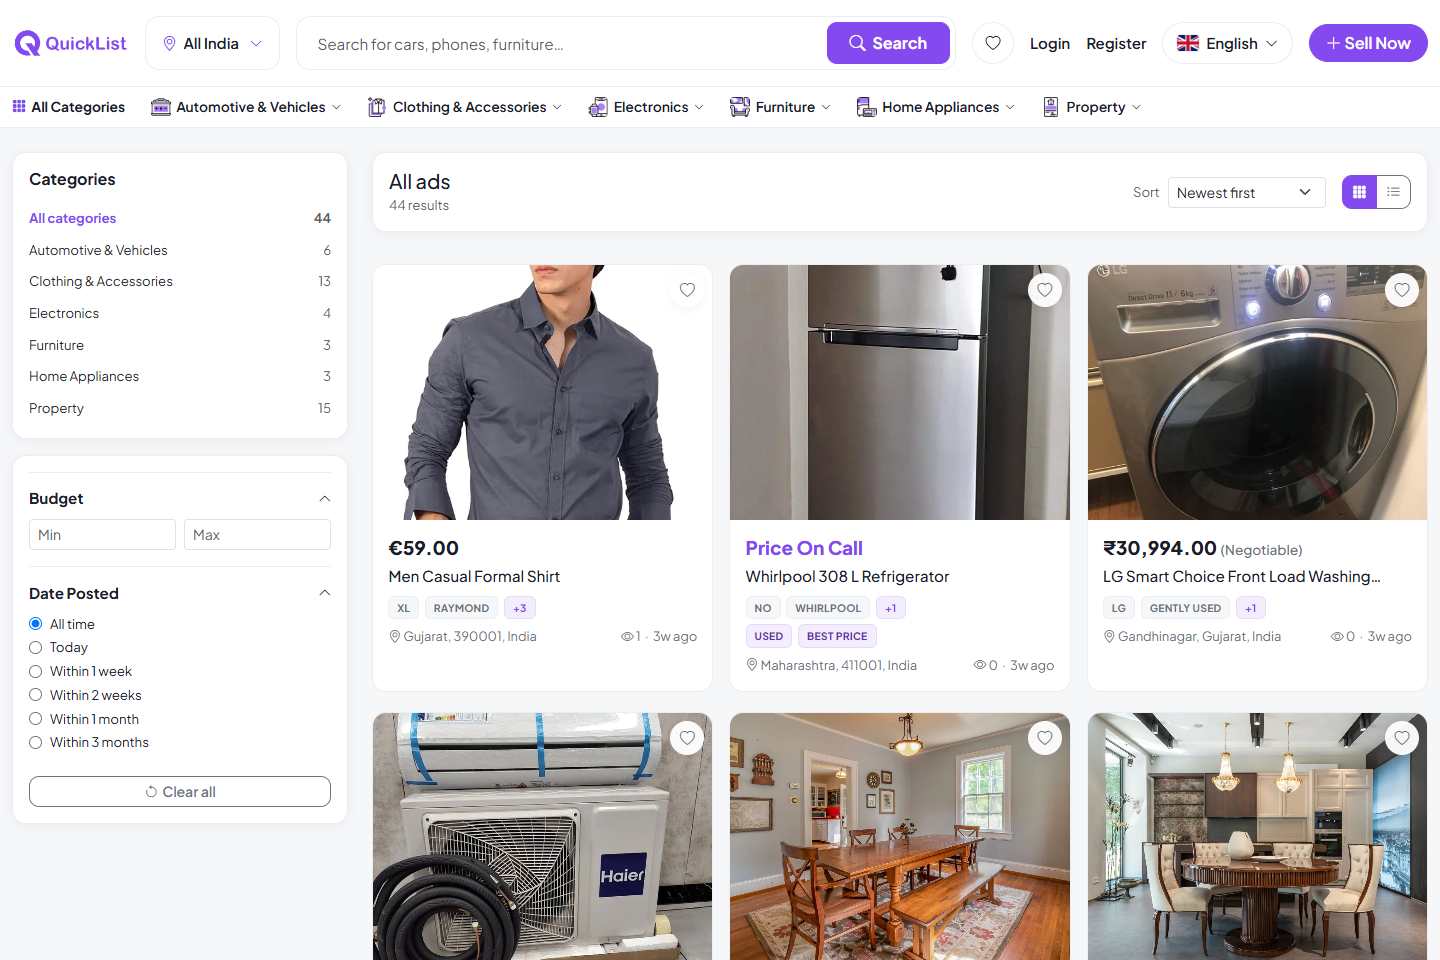
- Users search by keyword, browse the nested category mega-menu, and filter by location using the location picker.
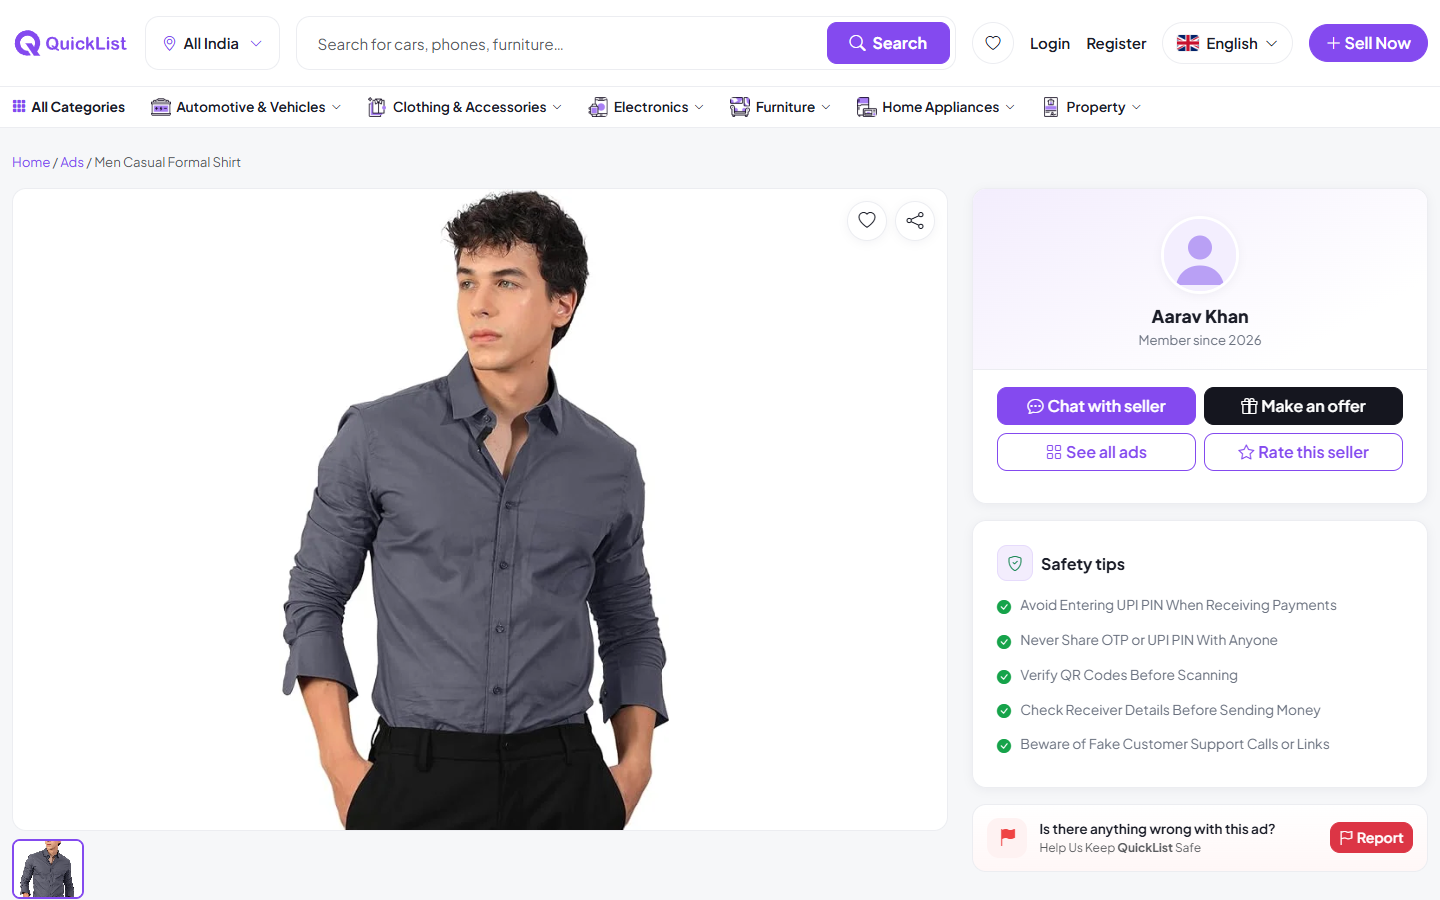
- Each ad has a detail page with images, price, specifications, seller profile and location.
Key screens (website). Browsing the marketplace — the home page, the search / listings page with filters, and an ad detail page with the seller card and chat:
3. Post an Ad (Seller)
Sellers post ads through a 5-step wizard:
- Category — pick a category (any depth).
- Details — title & description (per language), price type and price, contact phone.
- Specifications — fill the dynamic custom fields for that category.
- Photos — upload up to 8 images (first is the cover) to Firebase Storage.
- Location — search an address and drop a map pin.
On submit, the ad is published immediately (if auto-approve is on) or marked pending for admin review. Ad posting can be gated by an active Ad-Listing subscription, depending on admin settings.
4. Connect via Chat
- Buyers contact sellers through real-time in-app chat (Firestore), with unread indicators and push notifications.
5. Subscriptions & Featured Ads
- Users purchase Ad-Listing or Featured-Ads packages from the Subscriptions page.
- Checkout is processed by the configured payment gateway; on success an active subscription is created and its limits are enforced when posting.
6. Manage Account
- From the account area users manage their profile, ads, favorites/saved ads, subscriptions and messages.
- Sellers can submit verification documents to earn a verified badge, and buyers/sellers can leave reviews.
30. Customizing Branding (Logo & Colours)
QuickList is fully white-label — the application name, logos, favicon and brand colours can all be changed from the Admin Panel without editing any code. Branding is stored in Firebase, so a change made once is reflected across the Admin Panel, the User Panel (website) and the mobile app.
30.1. App Name, Logo & Favicon
Log in to the Admin Panel and open Settings → Branding. From this screen you can update:
- Application Name — the name shown in the panel header, browser tab and across the platform.
- Logo — upload your logo (a transparent PNG or SVG is recommended). It appears in the sidebar and on the login screen.
- Favicon — the small icon shown in the browser tab (use a square image, e.g. 32×32 or 64×64 px).
Click Update / Save. Your new logo and name appear immediately after the page reloads.
30.2. Admin Panel Colour
Still under Settings → Branding, use the Admin Panel Colour picker to set
the primary accent colour of the admin interface (buttons, active menu items, highlights). Pick a colour
or paste a hex value (for example #844AEF) and save.
30.3. Website Theme & Logos (User Panel)
The public marketplace's appearance is controlled from Settings → Web Settings:
- Theme Colour — the primary colour used across the website (buttons, links, badges).
This drives the site's
--ql-primarytheme variable. - Header / Footer Logos — the logos shown in the website header and footer.
- Social Links & Footer Description — footer content and social media links.
Note: Use the same Firebase project for the Admin Panel, User Panel and mobile app so that branding changes propagate everywhere. Clear your browser cache if an updated logo or colour does not appear right away.
30.4. Mobile App Branding
For the Flutter mobile application, branding is set in the source code before building:
- App Name — see Changing the App Name.
- Launcher Icon — see Changing the Launcher Icon.
- Package Name — see Changing the Package Name.
31. Troubleshooting
This section lists the most common errors seen while setting up QuickList with Firebase, along with their causes and fixes. Also see the FAQ for the Flutter "Missing project_info object" error.
31.1. "Missing or insufficient permissions" (PERMISSION_DENIED)
The Firestore reads/writes are being blocked by your security rules.
- Make sure you published the security rules from Firestore Security Rules in Firestore Database → Rules → Publish.
- Confirm you are pointing at the correct database — see
FIRESTORE_DATABASE_NAMEbelow.
31.2. "The query requires an index" (FAILED_PRECONDITION)
A Firestore composite index is missing for a search/sort query.
- Deploy the provided indexes — see Firestore Database Indexing.
- Alternatively, open the link shown in the browser console / error message; it opens the Firebase console with the required index pre-filled — click Create index and wait for it to finish building.
31.3. Data loads on one panel but not the other / "client is offline"
This almost always means the two panels point at different Firestore databases.
- Ensure
FIRESTORE_DATABASE_NAMEis identical in both the Admin Panel and User Panel.envfiles ((default)for production, or the same named database such asstaging). - Verify all
FIREBASE_*credentials belong to the same Firebase project.
31.4. "auth/unauthorized-domain" on login
Firebase Authentication is rejecting sign-in because your domain is not whitelisted.
- In the Firebase console go to Authentication → Settings → Authorized domains and add
your website domain (e.g.
yourdomain.com). - For Google login, also confirm the OAuth 2.0 client's authorized origins and redirect URIs — see User Panel Setup.
31.5. "auth/operation-not-allowed"
The sign-in provider you are using is not enabled.
- Enable Email/Password, Phone, Google (and Apple if used) under Authentication → Sign-in method — see Firebase Authentication.
31.6. Push notifications are not received
- Upload your Firebase service-account JSON and set the Sender ID in Settings → Notification Settings — see Admin Panel Setup.
- Confirm the service account file exists at
storage/app/firebase/credentials.json. - On the mobile app, verify
google-services.json/GoogleService-Info.plistare present and match the project.
31.7. Images fail to upload
- Make sure Firebase Storage is enabled — see 13.7.
- Publish the Storage security rules — see Storage Security Rules.
- Check the upload size/type: uploads are limited by the rules (e.g. images only, up to 10 MB for ads, 5 MB for profile images).
31.8. Google Maps shows a "For development purposes only" watermark or a grey map
- Enable Billing on your Google Cloud project and make sure the API key is set — see Create Google Map API Key.
- Enable the required APIs (Maps JavaScript API, Places API, Geocoding API) and remove overly strict key restrictions while testing.
31.9. "Missing project_info object" (Flutter / Android build)
The google-services.json file is missing or in the wrong place. See the detailed fix in the
FAQ.
32. Glossary
A quick reference for the technical terms used throughout this documentation.
- Firebase — Google's app-development platform. QuickList uses it as its primary backend (database, file storage, authentication and push notifications).
- Firestore (Cloud Firestore) — Firebase's NoSQL cloud database. It stores all marketplace data (ads, users, categories, chat, settings) as documents grouped into collections.
- Named Database /
FIRESTORE_DATABASE_NAME— Firestore can host more than one database per project.(default)is the standard one; a named database (e.g.staging) is used to isolate environments. All panels must target the same name. - Firebase Storage — cloud file storage for images and documents (ad photos, avatars, verification files).
- Firebase Authentication — Firebase's sign-in service, supporting email/password, phone (OTP), Google and Apple.
- FCM (Firebase Cloud Messaging) — Firebase's push-notification service used to deliver booking, chat and status notifications to devices.
- Sender ID — a numeric identifier for your FCM project, entered in the admin Notification Settings.
- Security Rules — the access-control rules that decide who can read/write Firestore documents and Storage files. They must be published in the Firebase console.
- Composite Index — a Firestore index that lets a query filter and sort on multiple fields. Missing indexes cause a "query requires an index" error.
- Service Account /
credentials.json— a private key file that lets the server (Laravel) act on behalf of your Firebase project (verify login tokens, send push, run scripts). Kept instorage/app/firebase/. google-services.json/GoogleService-Info.plist— the Firebase configuration files added to the Android and iOS mobile apps respectively.- Laravel — the PHP web framework that powers the Admin Panel and User Panel.
- Blade — Laravel's templating engine used to build the page views.
- Composer — the dependency manager for PHP, used to install Laravel packages
(
composer install). .env— the environment configuration file holding database and Firebase credentials for each panel.- Artisan — Laravel's command-line tool (e.g.
php artisan migrate,php artisan serve). - Cron / Scheduler — a server task runner. A single cron entry triggers Laravel's scheduler, which runs QuickList's automatic ad-expiry job.
- cPanel — a common web-hosting control panel used here to create the MySQL database and user.
- SHA-1 / SHA-256 — cryptographic fingerprints of your Android signing key, registered in Firebase to enable Google/Phone sign-in.
- API Key — a credential that authorises use of a service, such as the Google Maps API key.
- OAuth 2.0 Client ID — the credential Google uses to authorise "Sign in with Google" for your website.
- Flutter — Google's framework used to build the Android & iOS mobile app.
- APK / AAB / IPA — mobile build outputs: APK/AAB for Android, IPA for iOS.
- CodeCanyon — the Envato marketplace where the QuickList source code is distributed.
- Custom Fields — admin-defined, per-category attributes (e.g. brand, condition) collected when posting an ad.
- Subscription Package / Featured Ad — monetisation plans that grant ad-listing limits or promote listings.
- CMS Pages — content pages managed from the admin panel (About, Contact, Privacy, Terms, Refund).
33. Admin & User Panel Update
To update the Admin Panel and User Panel, upload the latest source code package to the root directory of each respective panel and extract the contents.
If your project includes custom modifications, we strongly recommend performing the update using Git so your customizations are preserved while integrating the latest changes.
33.1 Updating via Git (Recommended)
- Commit and push your existing changes to a dedicated Git branch.
- Download the latest source code package from CodeCanyon.
- Create a new branch using the latest release source code.
- Merge the latest branch into your existing project branch and resolve any conflicts.
- Run
composer install(andnpm installfor the admin panel) to update dependencies. - Run
php artisan migrateto apply any new database migrations. - Thoroughly test the Admin Panel and User Panel before deploying to production.
33.2 Replacing the Source Code
If you have not modified the source code:
- Download the latest source code package from CodeCanyon.
- Replace the existing panel files with the files from the latest release (keep your
.envandstorage/app/firebase/credentials.json). - Run
composer installandphp artisan migrate, then verify both panels.
34. Mobile Application Update
To update the Mobile App, replace the existing source code with the latest release and rebuild the applications.
34.1 Updating via Git (Recommended)
- Commit and push your existing application source code to a dedicated Git branch.
- Download the latest source code package from CodeCanyon and create a new branch from it.
- Merge the latest branch into your existing project branch and resolve any conflicts.
- Run
flutter pub getto install the latest dependencies. - Thoroughly test the app, then generate new build files (APK, AAB, or IPA) and deploy.
34.2 Replacing the Source Code
- Download the latest source code package from CodeCanyon.
- Replace the existing application source code, keeping your
google-services.json/GoogleService-Info.plistand configuration. - Run
flutter pub get, test the app, then publish the updated builds to the app stores.
35. Changelog
Version 1.0 — Initial Release
- Initial release of QuickList — Ads Buy & Sell classified marketplace.